- Overview
- Initial Configuration
- Revert Site 40 PC changes and enable DIA
- Upload Image to vManage
- Add the Security Policy
- Firewall Policy Update
- Add the IPS Policy and Finalize the Security Policy
- Updating the Application List and Device Template
- Verifying installation and performing signature updates
- Activity Verification
Overview
An Intrusion Prevention System (IPS) allows the network to detect anomalies based on known signatures and block/report them. The IPS module in Cisco SD-WAN can be deployed on Cisco IOS-XE SD-WAN Devices, working in Detect or Prevention mode. This solution is an on-prem on-box feature providing PCI compliance.
Snort is leveraged on Cisco SD-WAN IOS-XEW Devices for IPS and IDS capabilities.
-
- Initial Configuration
- Revert Site 40 PC changes and enable DIA
- Upload Image to vManage
- Add the Security Policy
- Firewall Policy Update
- Add the IPS Policy and Finalize the Security Policy
- Updating the Application List and Device Template
- Verifying installation and performing signature updates
- Activity Verification
Initial Configuration
We will be performing some initial configuration in the network before it can support the IPS module. Key points to be noted:
- The cEdge should have a minimum of 4 vCPUs and 8 GB RAM (already done)
- Site 40 PC settings will be reverted
- Images uploaded to vManage for deployment
Revert Site 40 PC changes and enable DIA
-
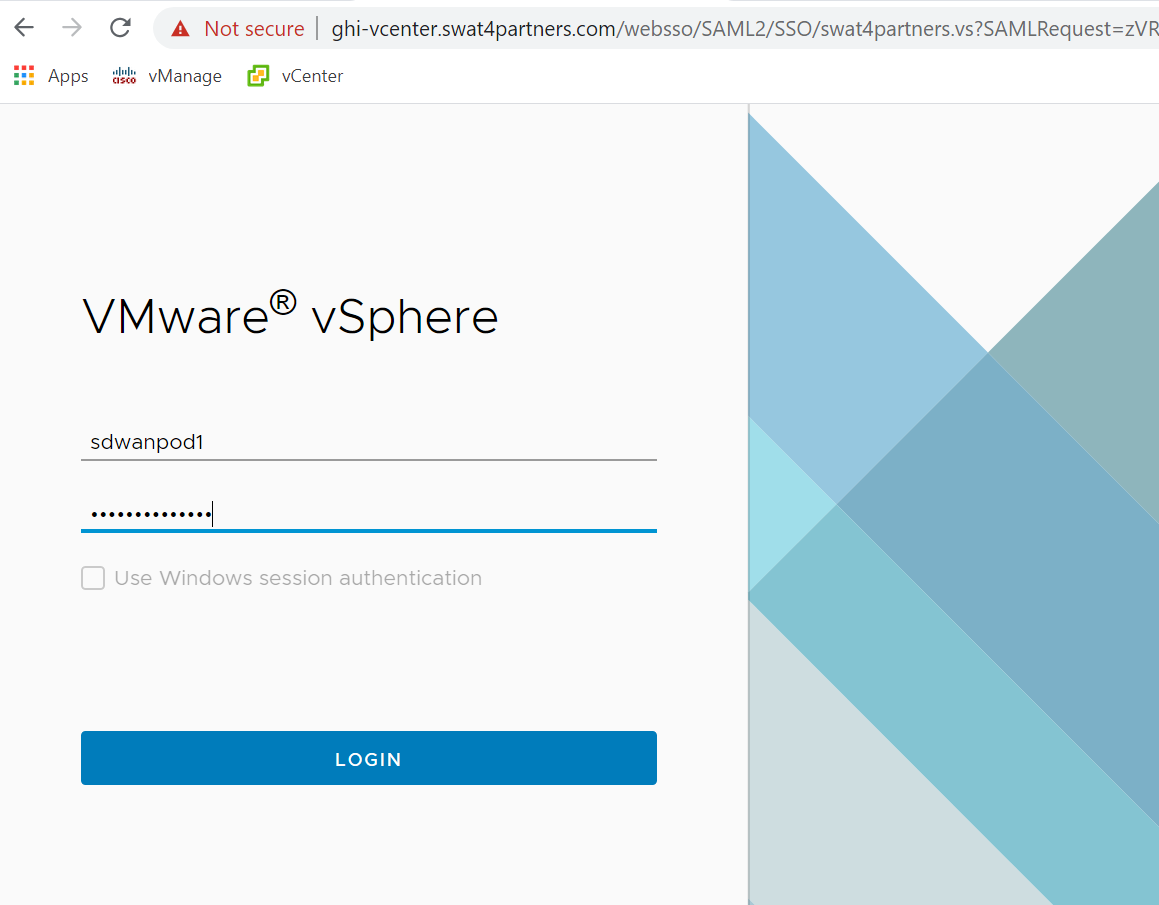
Log in to vCenter via the bookmark in Chrome, or via the URL (10.2.1.50/ui if connected to the GHI DC and 10.1.1.50/ui if connected to the SJC DC). Use the credentials provided for your POD. Click on Login
-
Locate your Site 40 PC (image below shows Site40_PC, VM name for your POD should be sdwan-sjc/ghi-site40pc-podX) and choose to open the console. Select Web Console, if prompted

-
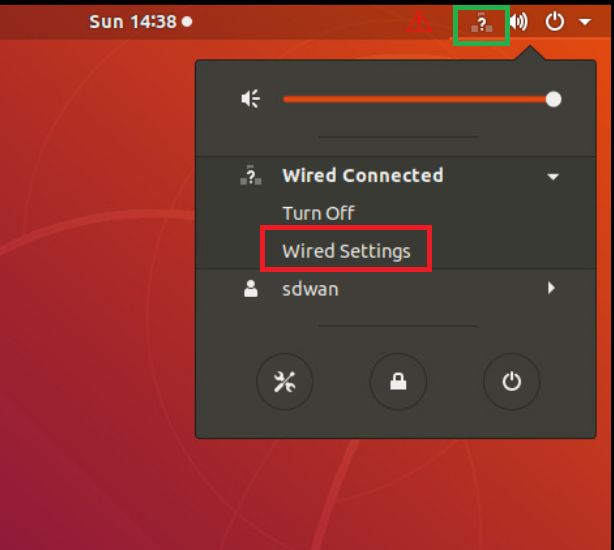
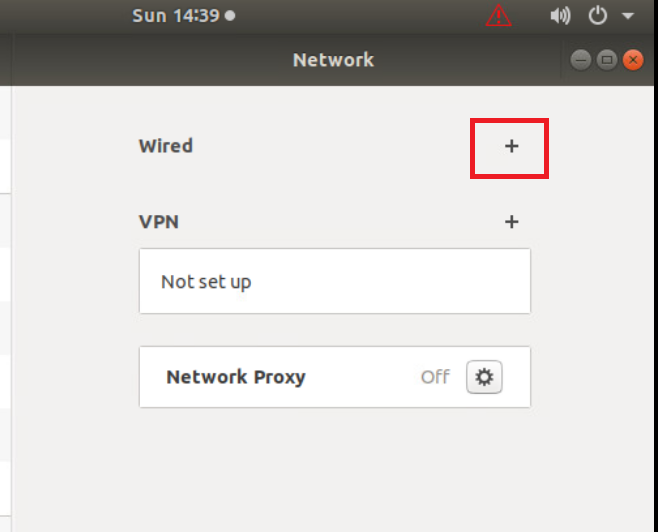
Log in to the PC and click on the network icon in the top-right corner. Expand Wired Connected and click on Wired Settings
-
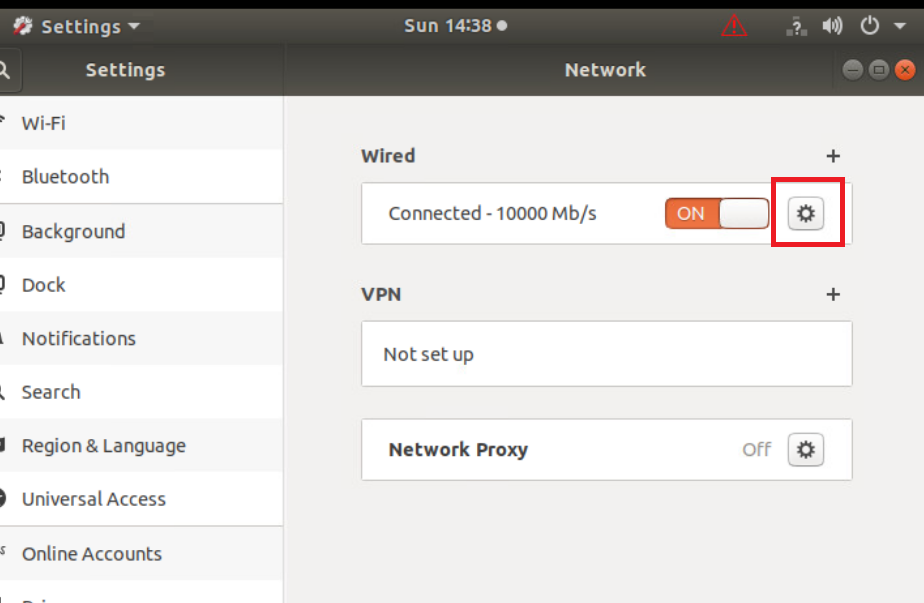
Click on the cog wheel/gear icon
-
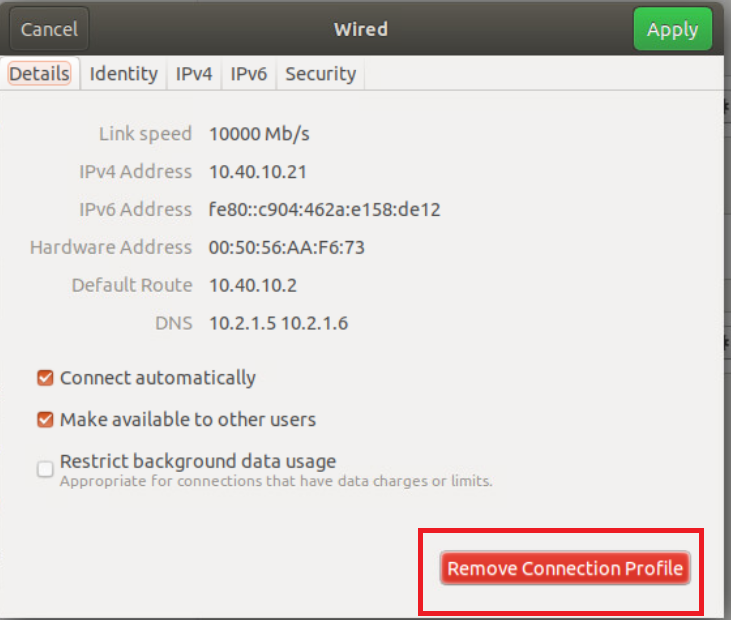
Click on Remove Connection Profile
-
If you still see a cog wheel/gear icon next to Wired, click on it and choose to Remove Connection Profile again. Once the + icon can be seen next to Wired, click on it
-
Go to the IPv4 tab and click on Manual for the IPv4 Method. Enter details as given below and click on Add. Over here, y is 1 if you’re connected to the SJC DC and 2 if you’re connected to the GHI DC. The email sent with lab access details should enumerate which DC you’re POD is on
Address Netmask Gateway DNS 10.40.30.21 255.255.255.0 10.40.30.2 Automatic - Off
10.y.1.5, 10.y.1.6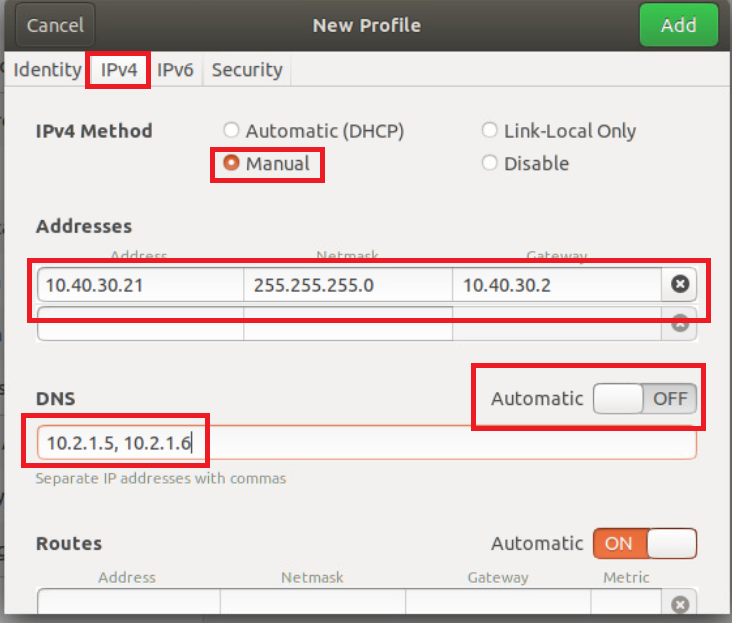
-
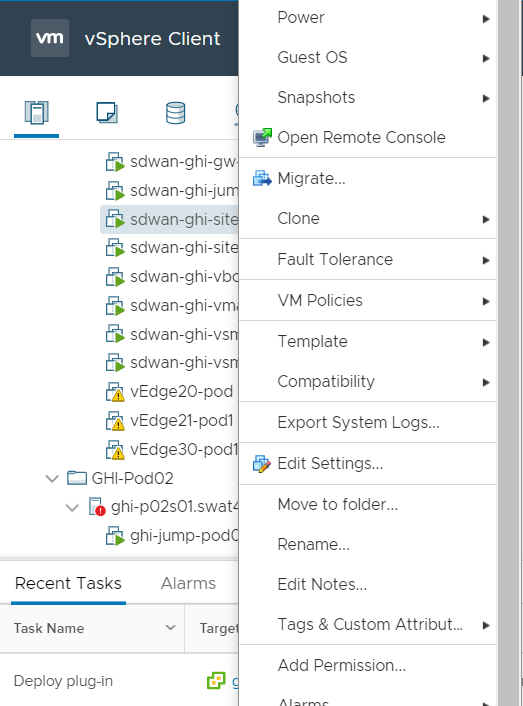
Back at the vCenter GUI, right click on your Site 40 PC and choose Edit Settings
-
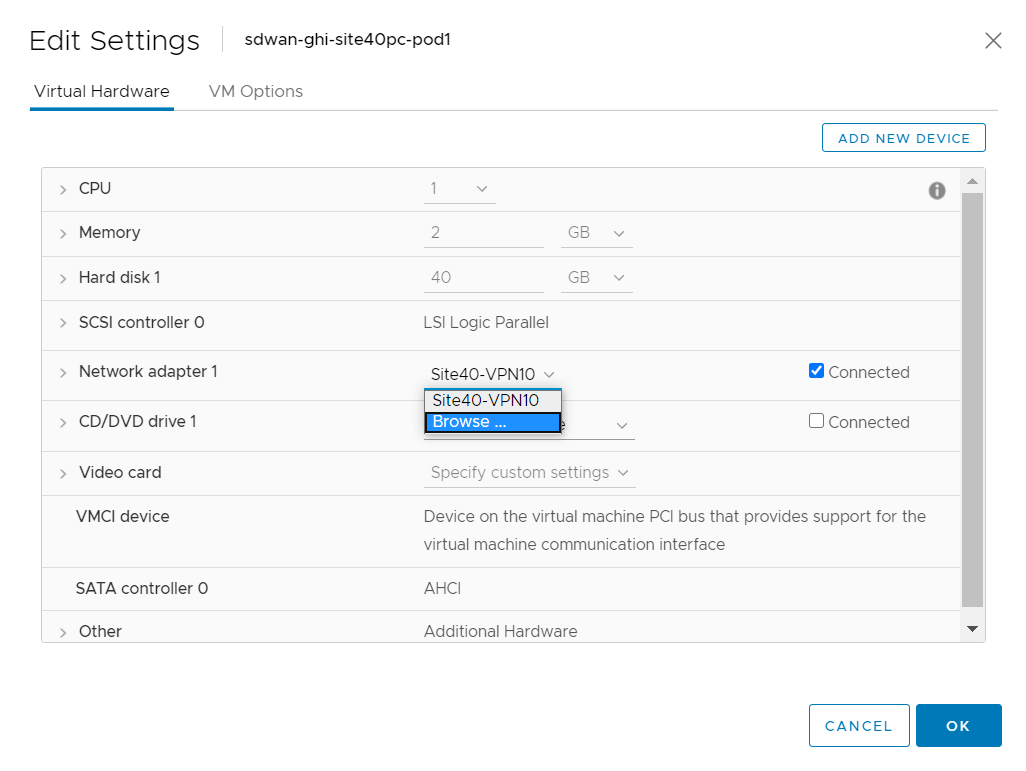
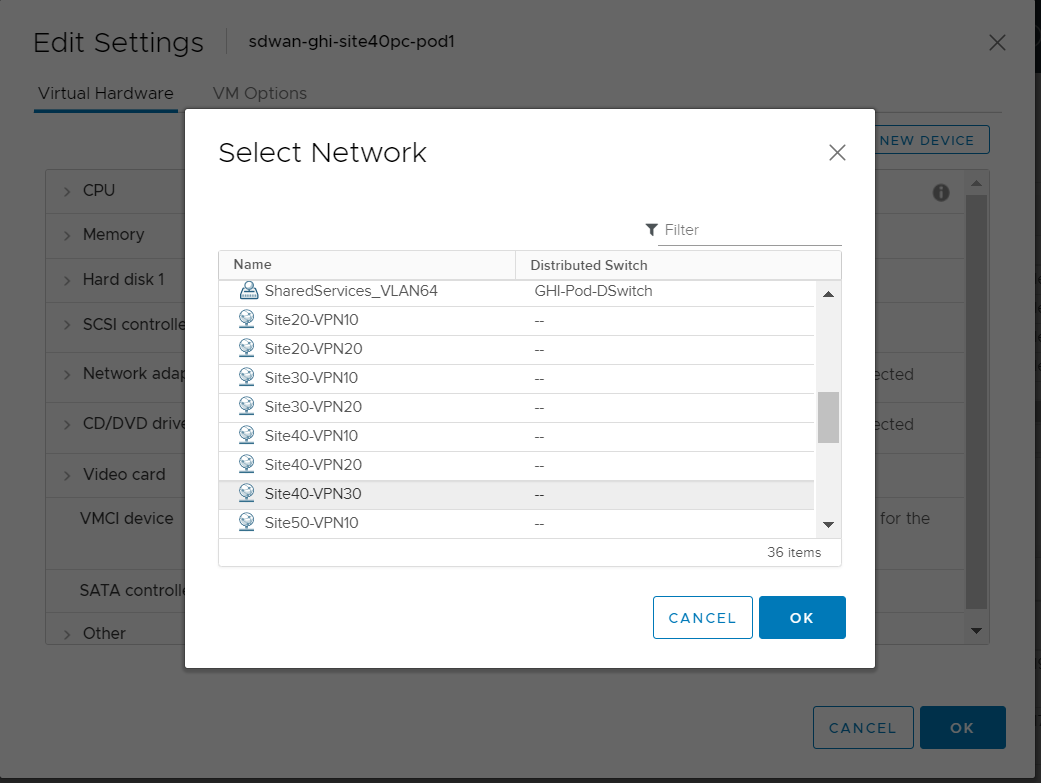
Click on the drop down next to Network Adapter 1 and click on Browse
-
Choose the Site40-VPN30 network and click on OK. This should take you to the Edit Settings page, click on OK again
-
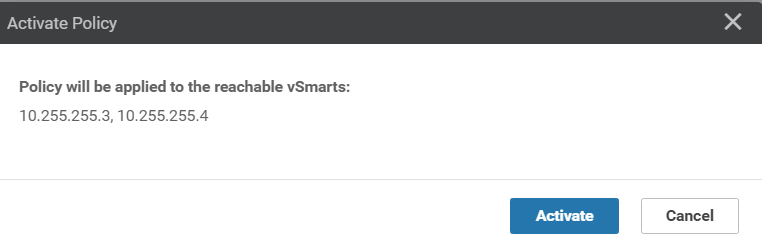
On the vManage GUI, go to Configuration => Policies and locate the Site40-Guest-DIA. Click on the three dots next to it and choose to Activate. Confirm the Activation

-
Go back to the console for the Site 40 PC and open Terminal. (Start => search for terminal => click on the icon). Type
ping 8.8.8.8and hit Enter to verify Internet connectivity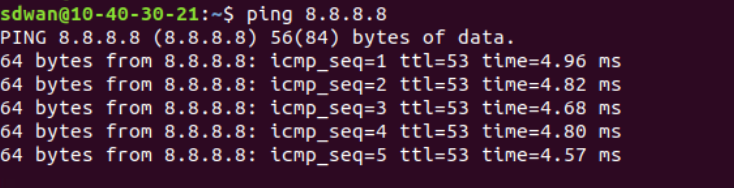
We have set the Site 40 PC back to what it was, before our QoS section.
-
- Initial Configuration
-
- Upload Image to vManage
- Add the Security Policy
- Firewall Policy Update
- Add the IPS Policy and Finalize the Security Policy
- Updating the Application List and Device Template
- Verifying installation and performing signature updates
- Activity Verification
Upload Image to vManage
-
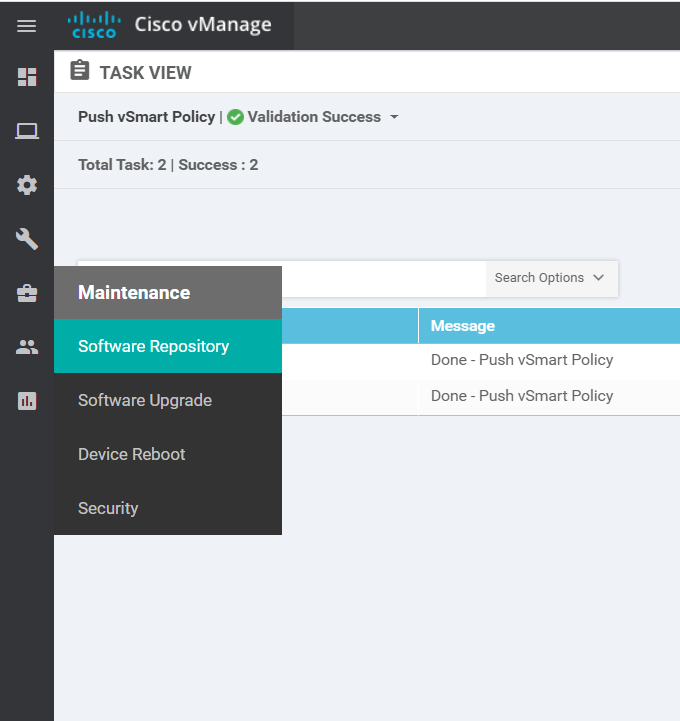
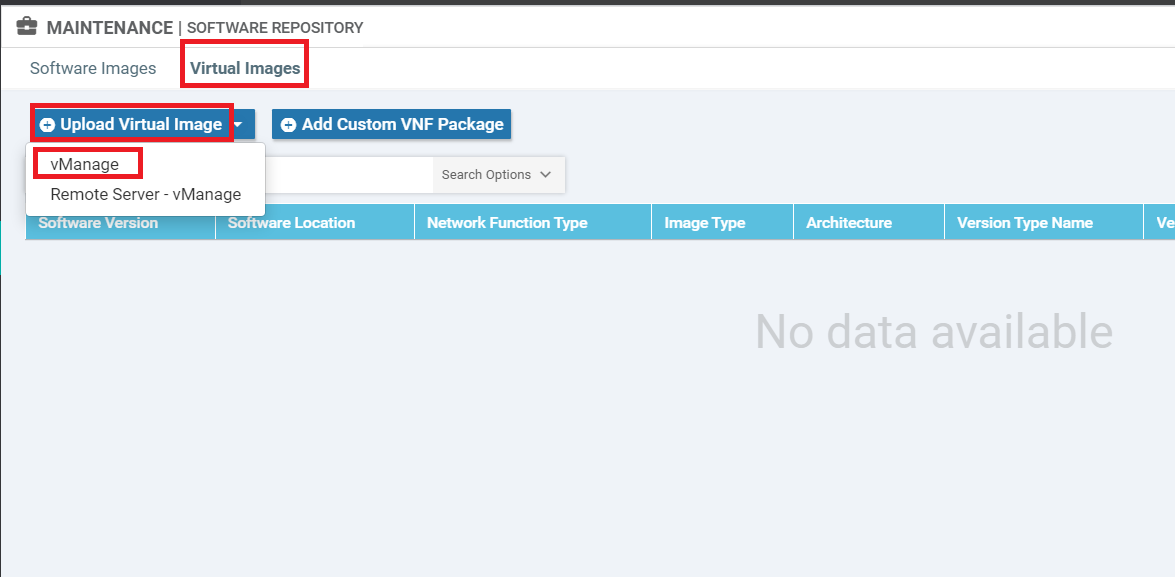
On the vManage GUI, go to Maintenance => Software Repository
-
Click on the Virtual Images tab and then click Upload Virtual Image. Choose vManage
-
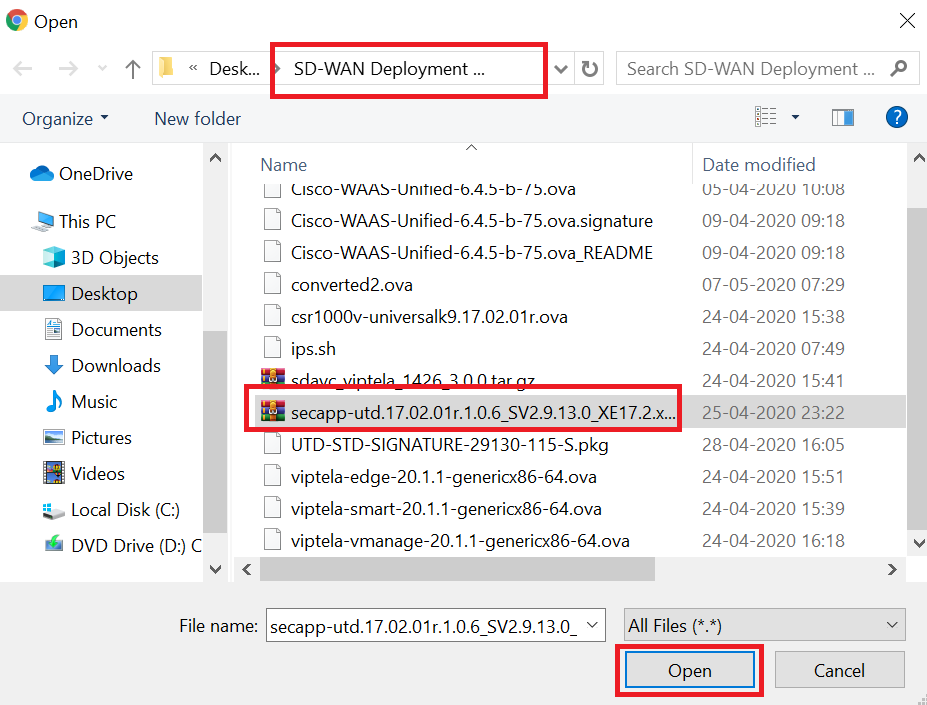
Click on Browse and make sure you’re in the SD-WAN Deployment Files folder. This folder can be found on the Desktop of your Jumphost. Select the file starting with secapp-utd… and click on Open

-
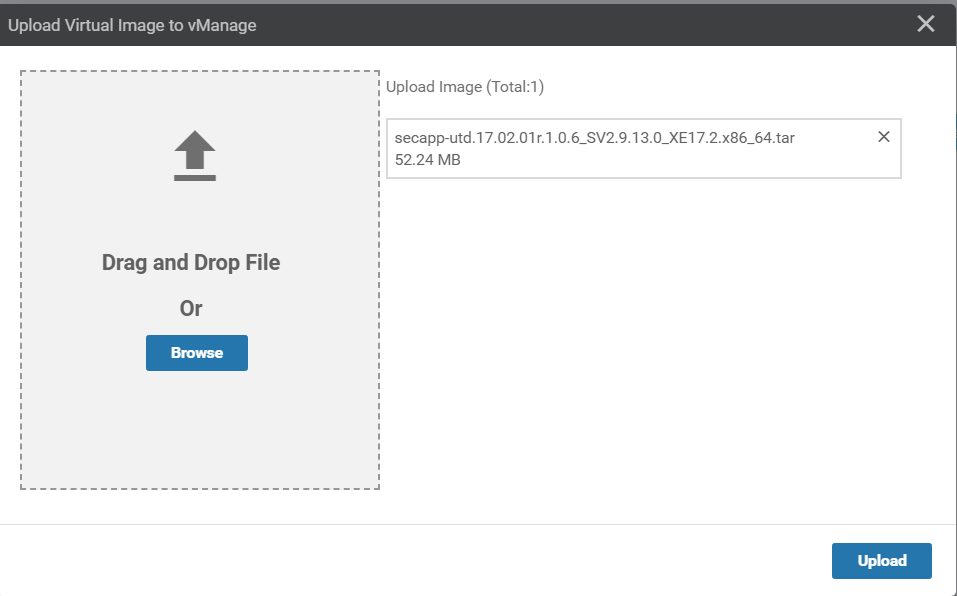
Click on Upload
-
Once the file is uploaded, it should show up under Virtual Images

-
-
-
-
- Add the Security Policy
- Firewall Policy Update
- Add the IPS Policy and Finalize the Security Policy
- Updating the Application List and Device Template
- Verifying installation and performing signature updates
- Activity Verification
Add the Security Policy
A Security Policy will be applied to the Device Template for cEdge40 to trigger IPS installation and functionality. We will be setting up the policy over here, including the previously created Firewall Policy in our overarching Security Policy.
Firewall Policy Update
-
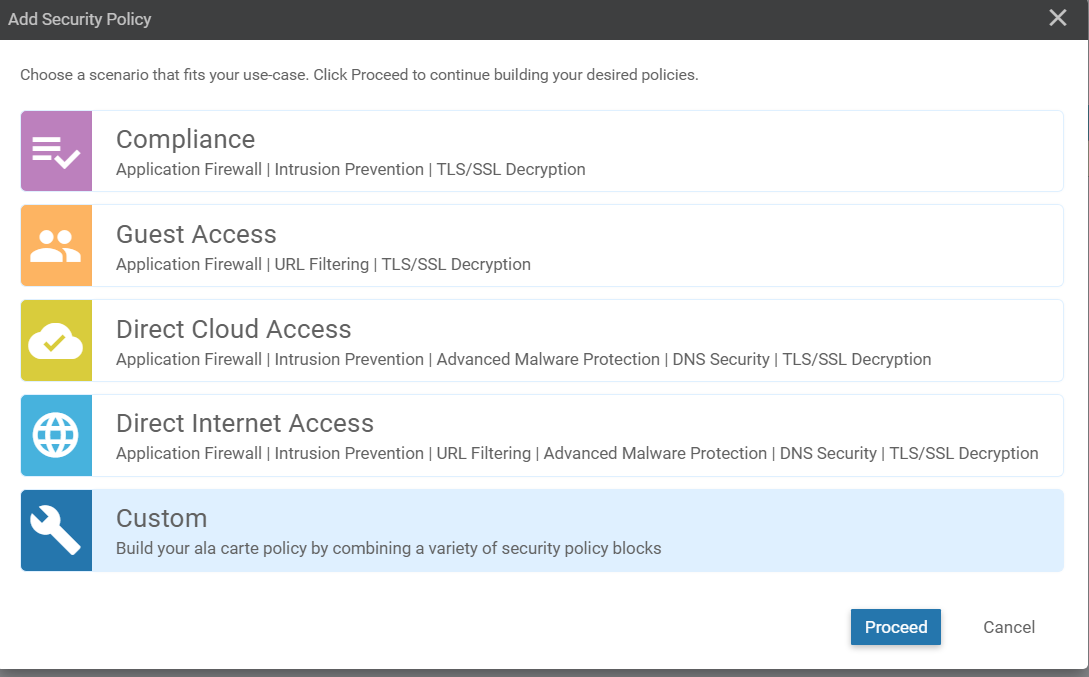
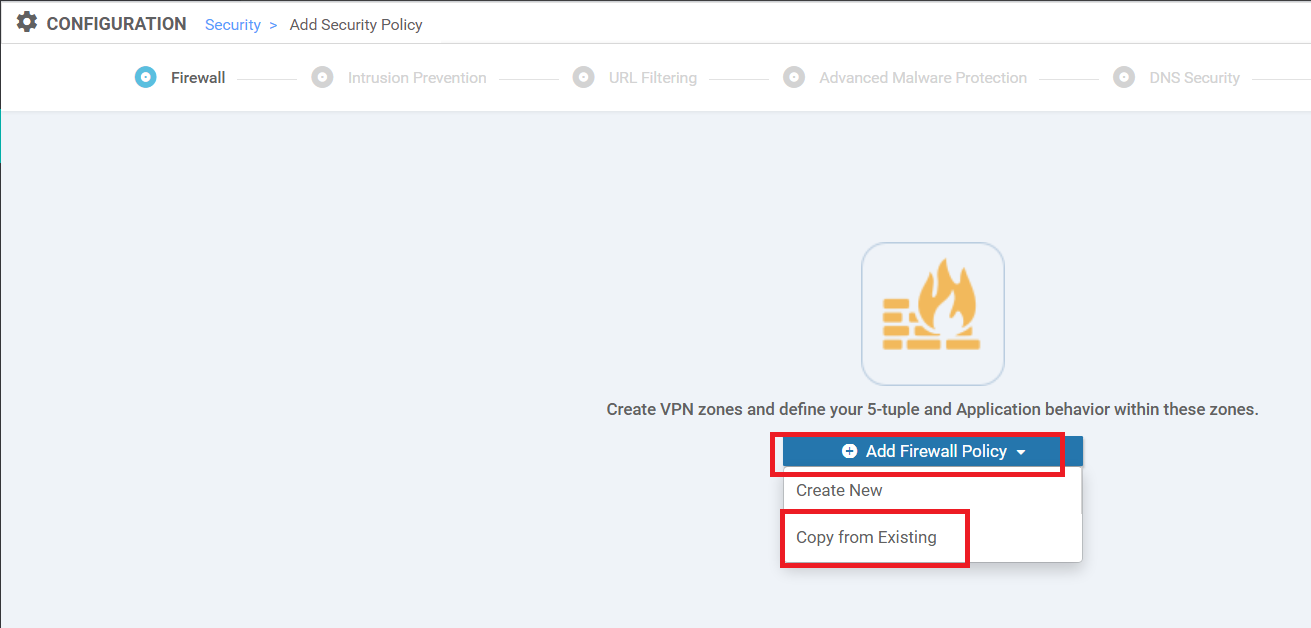
On the vManage GUI, navigate to Configuration => Security and choose Add Security Policy. Select Custom and click on Proceed
-
Under Firewall, click on Add Firewall Policy and choose Copy from Existing. We already have a Firewall Policy in place but the Security Policy type chosen for it was Guest Access, which doesn’t have an option of including an IPS policy. Hence, we will create a new custom policy which will include the Firewall Policy created before
-
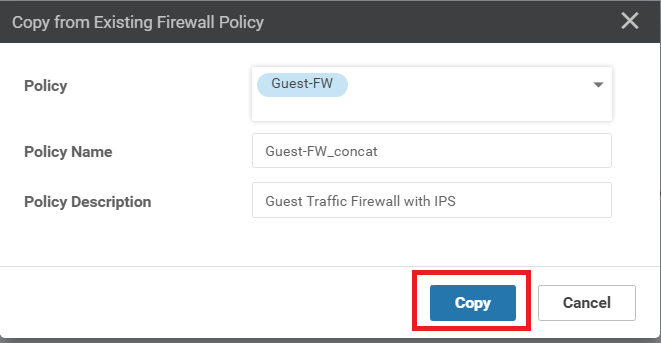
Select Guest-FW as the Policy and specify the Policy Name as Guest-FW_concat. Give a Description of Guest Traffic Firewall with IPS. Click on Copy
-
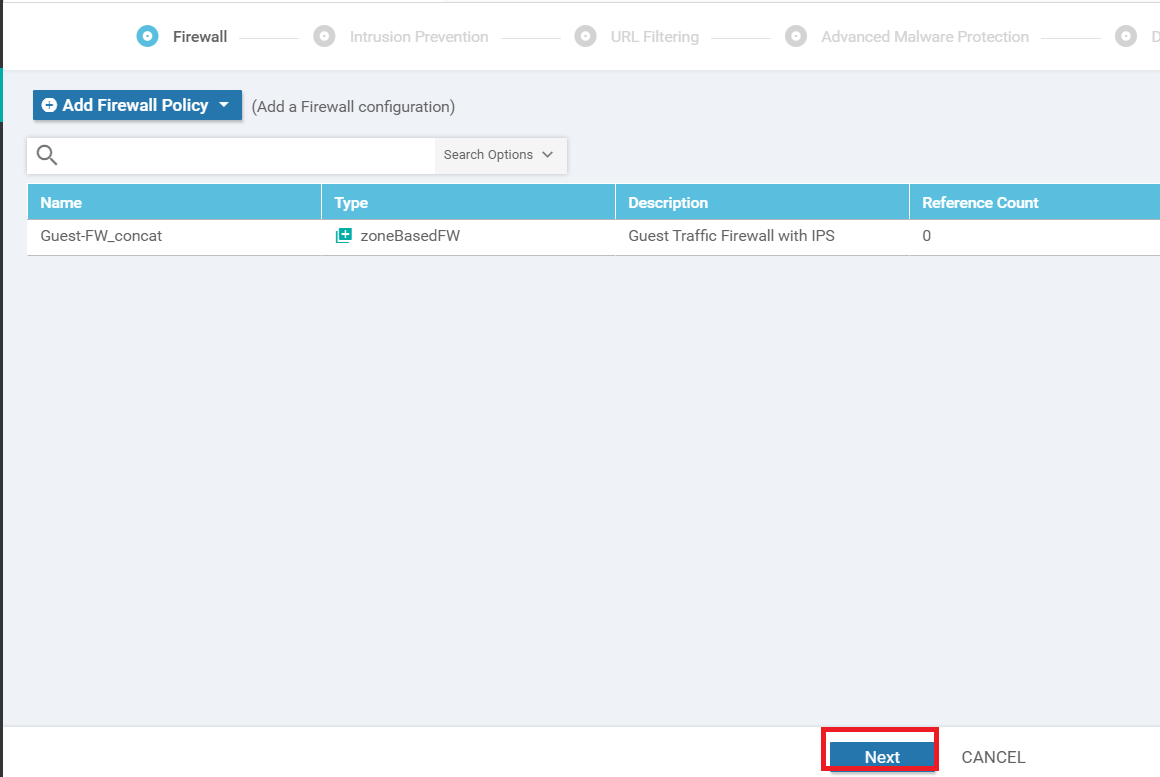
The Firewall Policy we just copied should show up. Click on Next
Configuration of the Security Policy continues in the next section.
-
-
-
-
- Add the Security Policy
-
- Add the IPS Policy and Finalize the Security Policy
- Updating the Application List and Device Template
- Verifying installation and performing signature updates
- Activity Verification
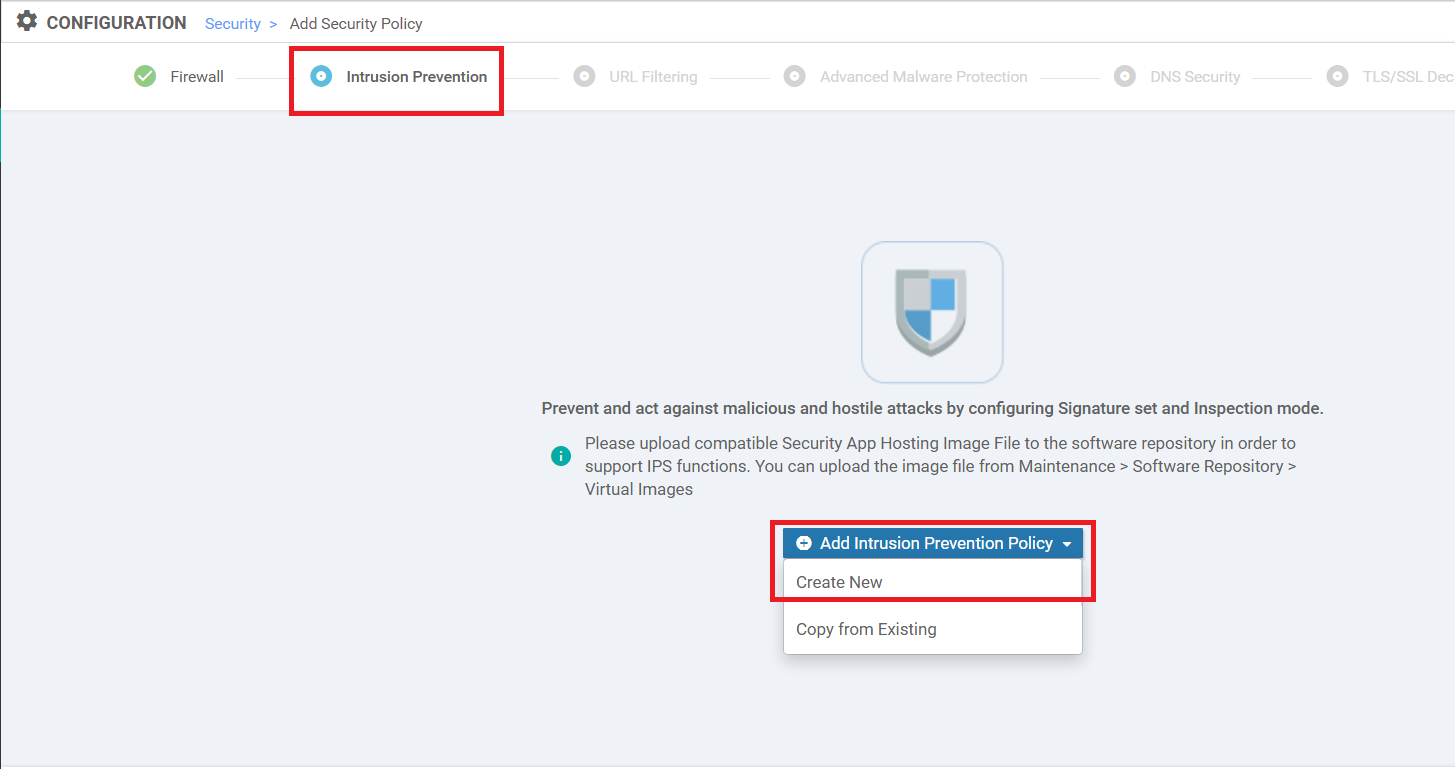
Add the IPS Policy and Finalize the Security Policy
-
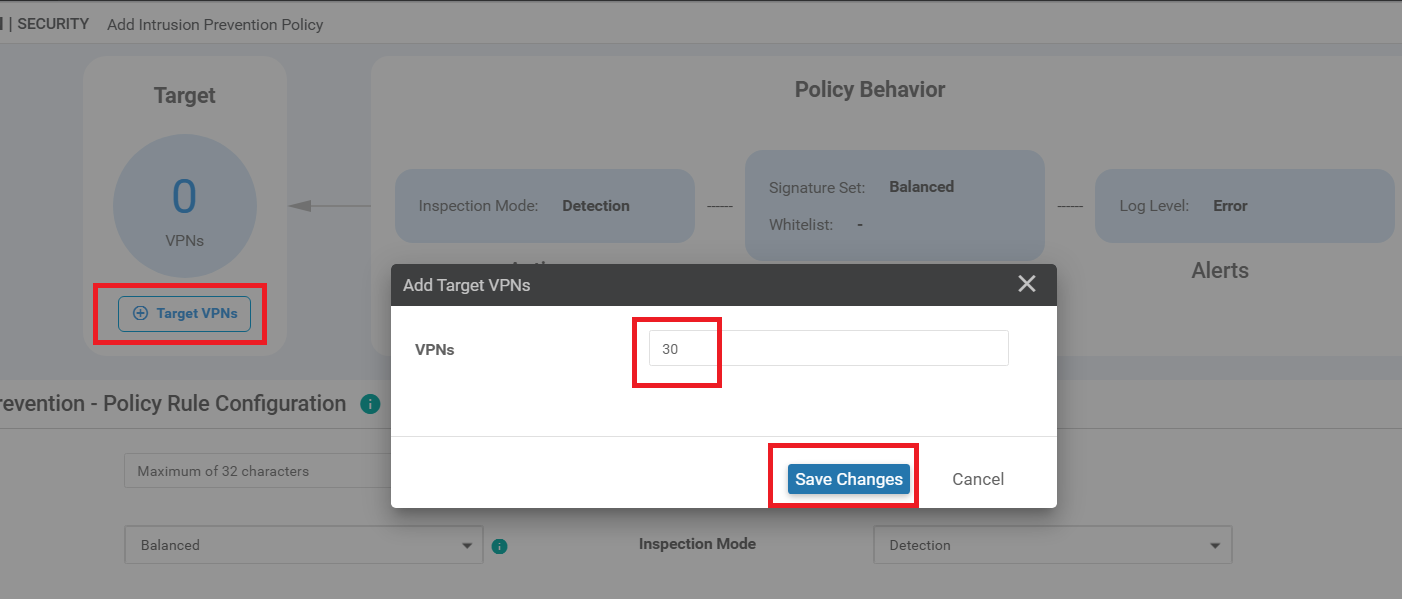
Under the Intrusion Prevention page, click on Add Intrusion Prevention and choose Create New
-
Click on Target VPNs and enter a VPN of 30. Click on Save Changes
-
Under the Intrusion Prevention - Policy Rule Configuration, enter the following details and click on Save Intrusion Prevention Policy
Policy Name Signature Set Inspection Mode Alerts Log Level Guest-IPS Security Protection Info 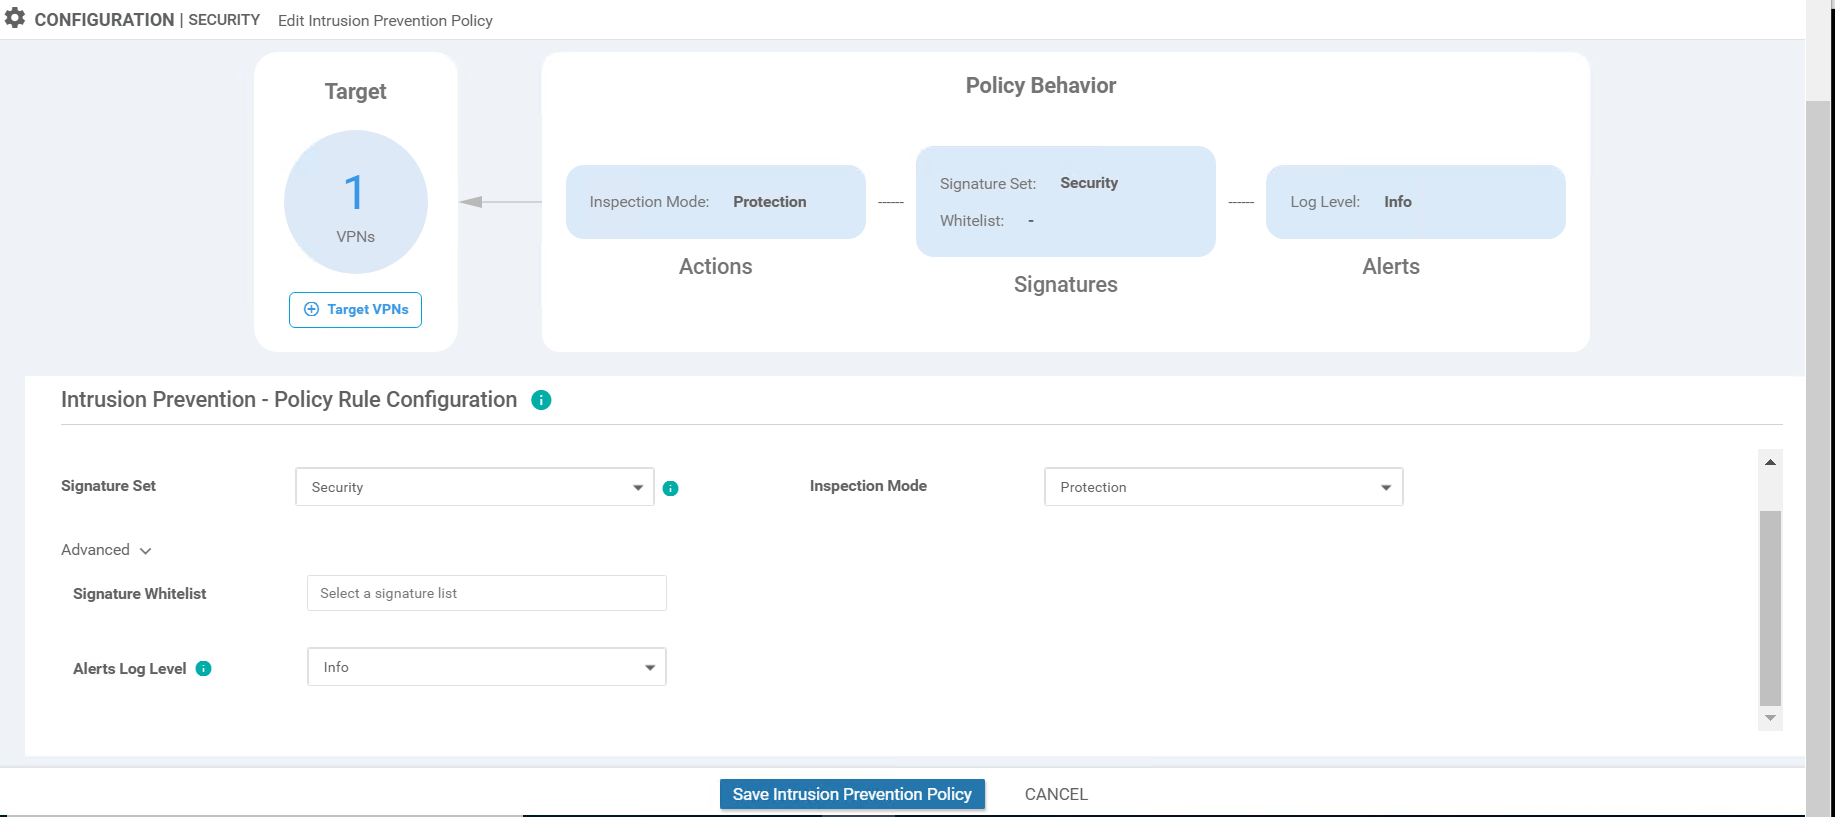
-
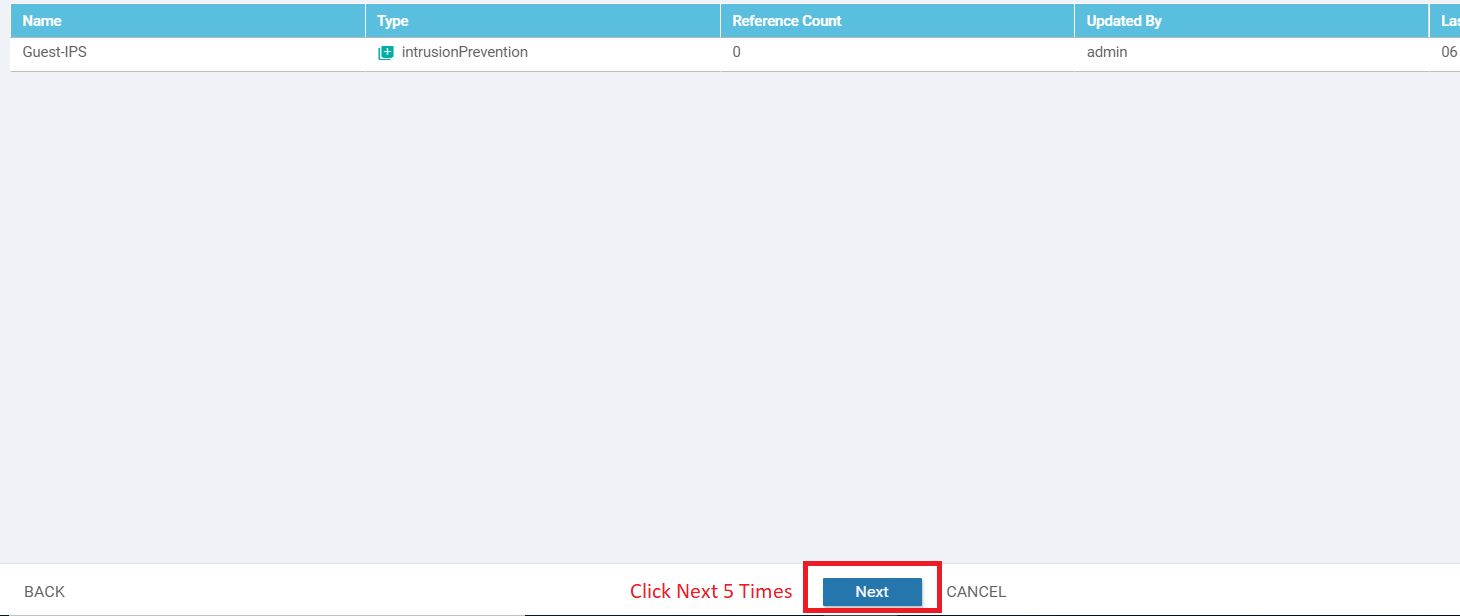
Back at the main Security Policy page, click on Next 5 times
-
Enter the details as shown in the table below and click on Save Policy
Security Policy Name Security Policy Description TCP SYN Flood Limit Audit Trail Guest-FW-IPS-DIA Guest Firewall and IPS DIA Enabled
5000On 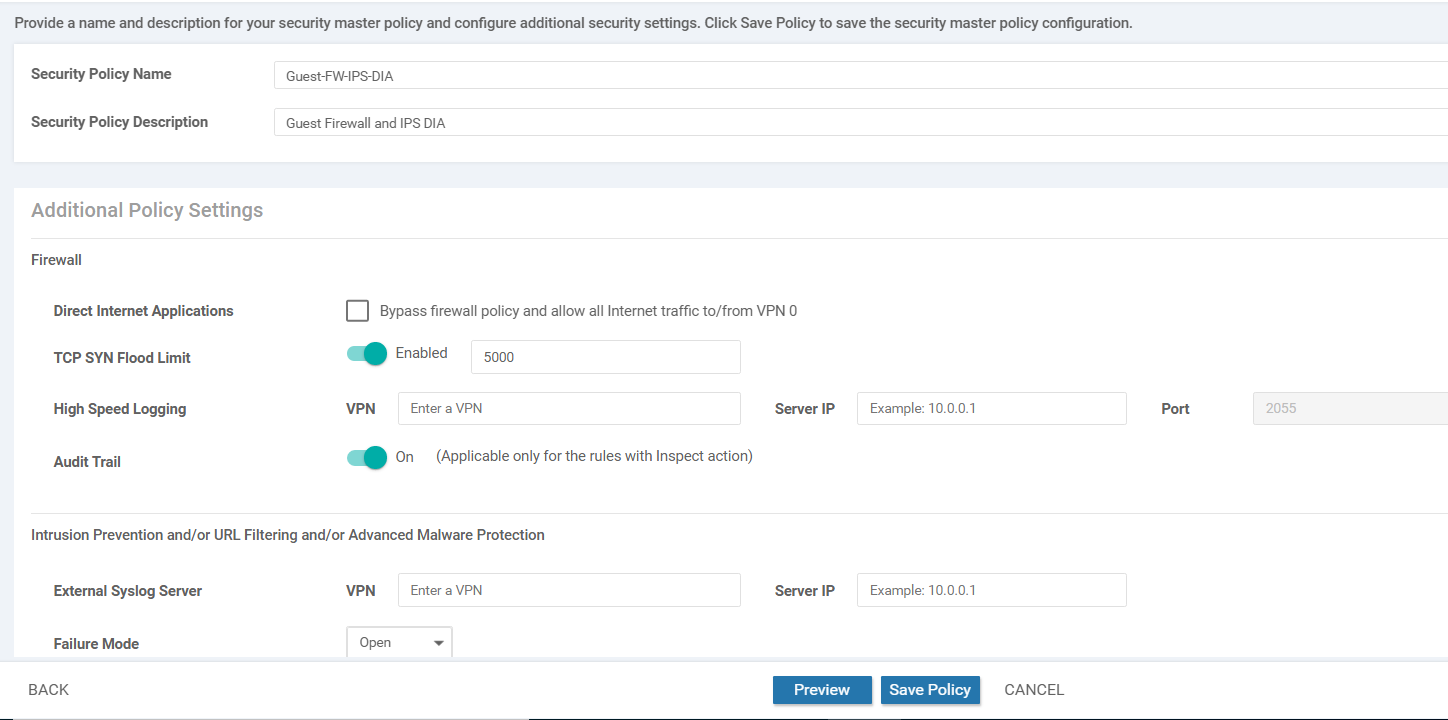
This completes the configuration of our Security Policy.
-
-
-
-
-
-
-
- Updating the Application List and Device Template
- Verifying installation and performing signature updates
- Activity Verification
Updating the Application List and Device Template
The Application List attached to the Firewall Policy that we had earlier will need to be instantiated again before we can use it. For that, we will make a dummy modification to the Application List
-
On the vManage GUI, go to Configuration => Security. Click on Custom Lists (top right-hand corner) and choose Lists
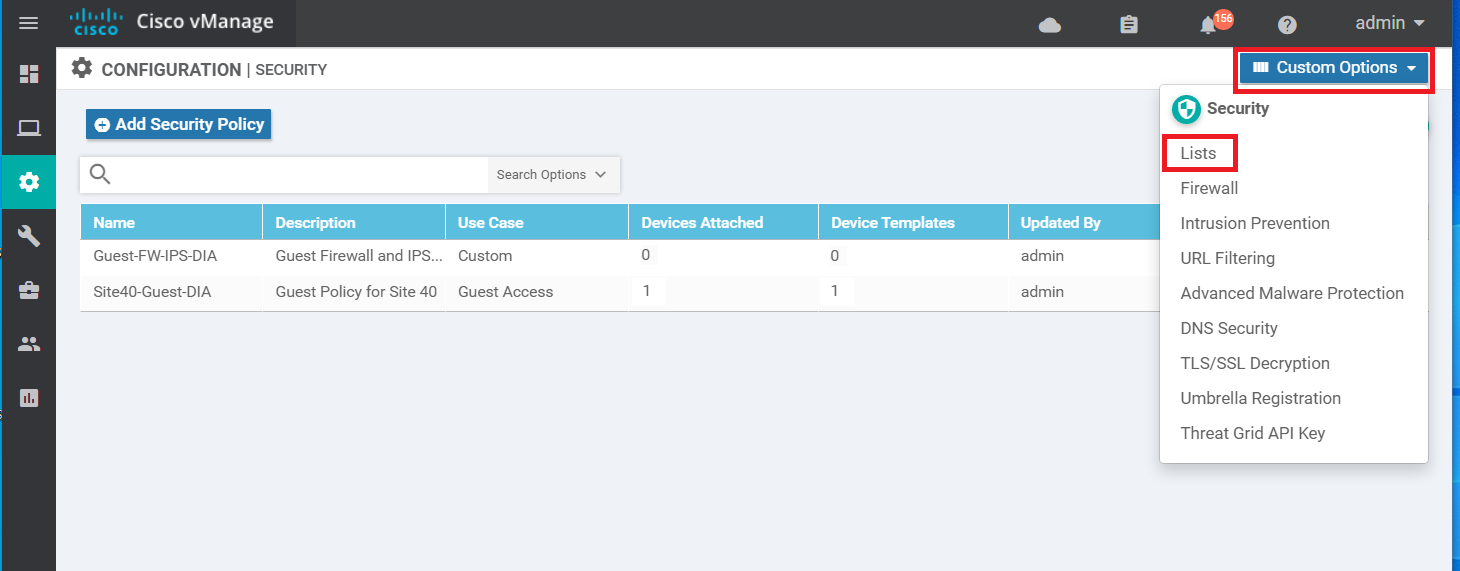
-
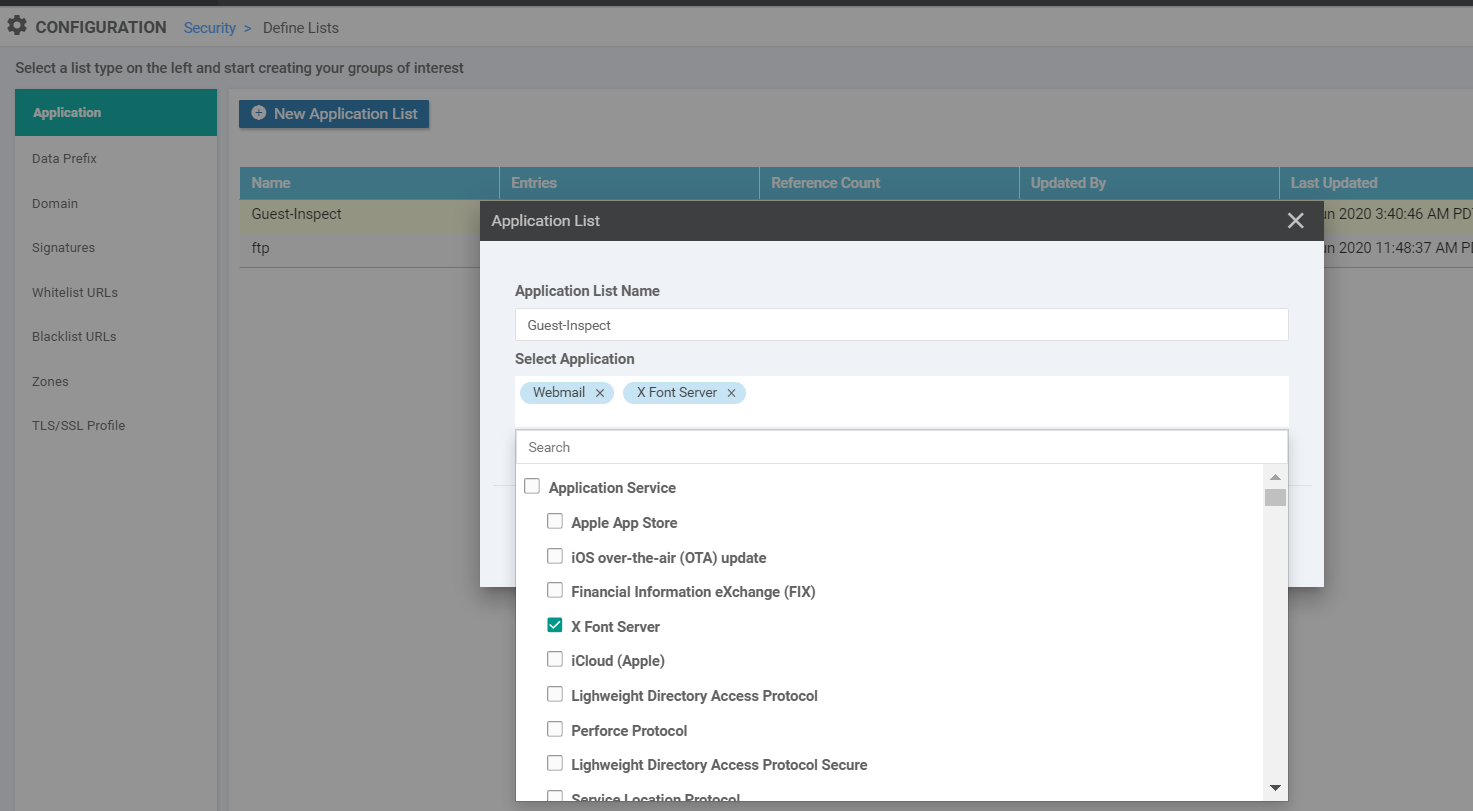
Identify the Guest-Inspect Application List and click on the pencil icon on the right-hand side to edit it. Under Select Application, check X Font Server (or any application that you want, this is a dummy entry)
-
Scroll down the list and uncheck Webmail, but check all the other Applications under Webmail

-
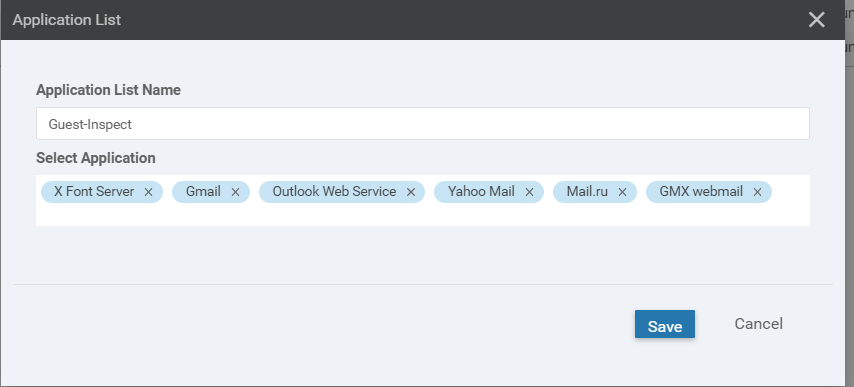
Click outside the box and choose to Save the Application List. Click on Activate, if prompted. Click on Next followed by Configure Devices
-
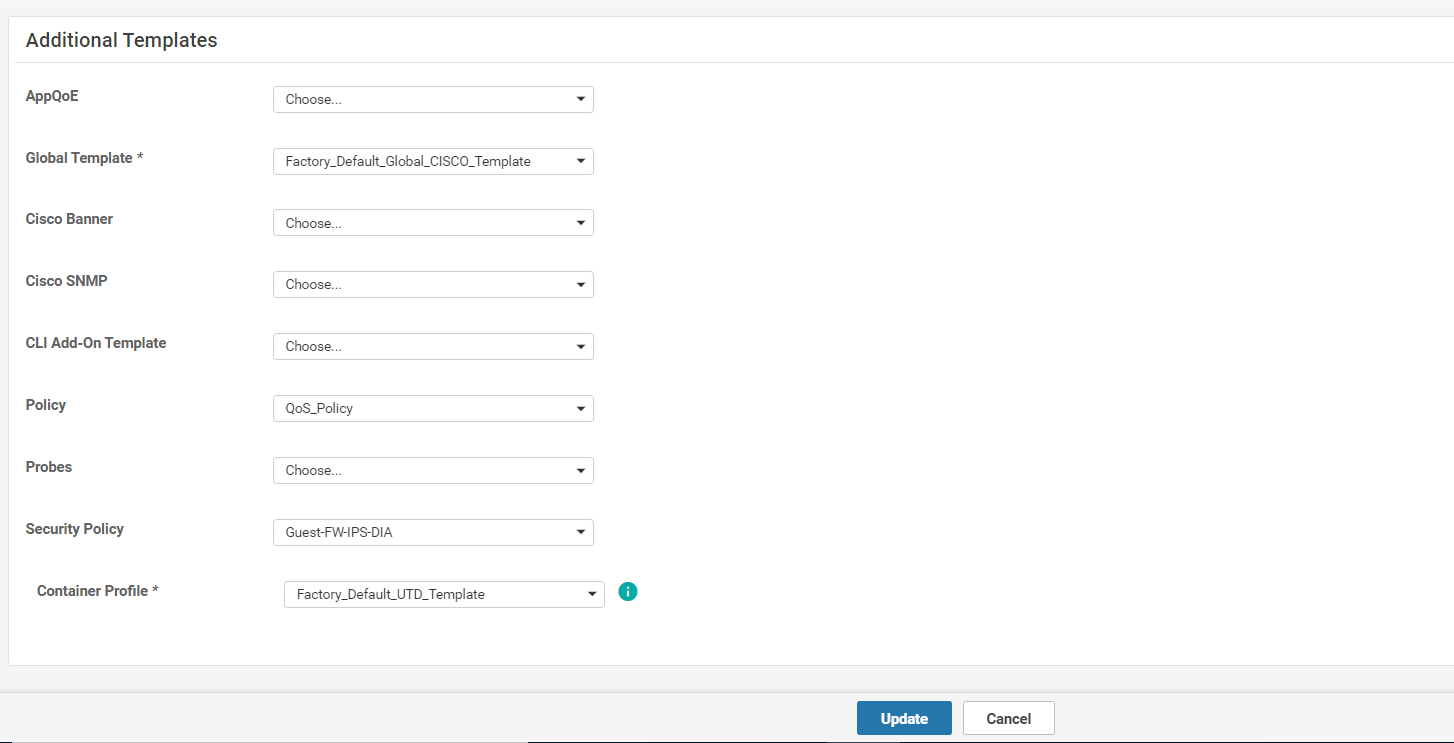
Go to Configuration => Templates and click on the three dots next to cedge_dualuplink_devtemp. Click on Edit
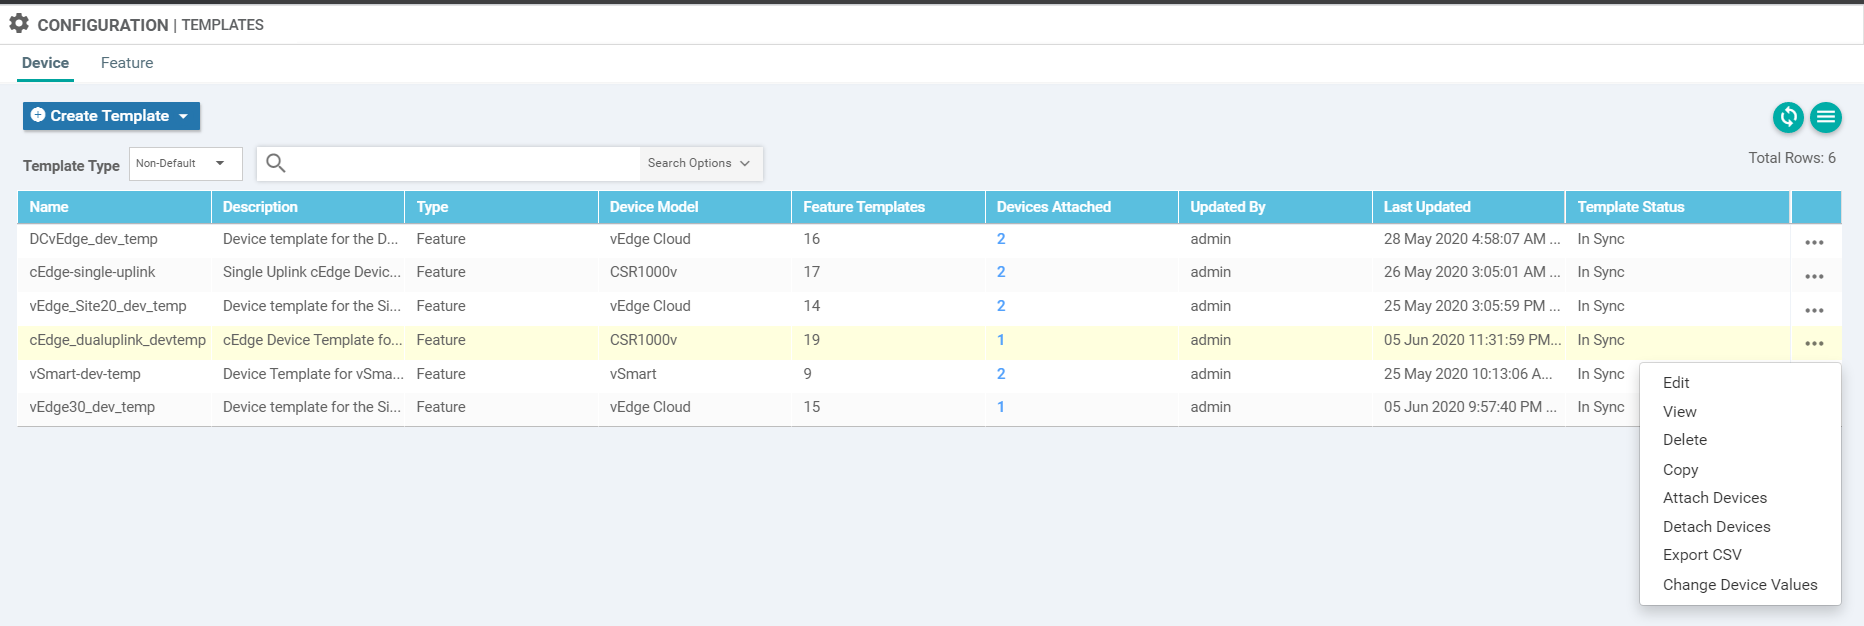
-
Navigate to the Additional Templates section and populate the Security Policy field with the policy we just created - Guest-FW-IPS-DIA. Click on Update
-
Click on Next and you can choose to view the side-by-side configuration. Click on Configure Devices. If you do choose to view the configuration, notice the UTD related commands being pushed by vManage - they are for the IPS module
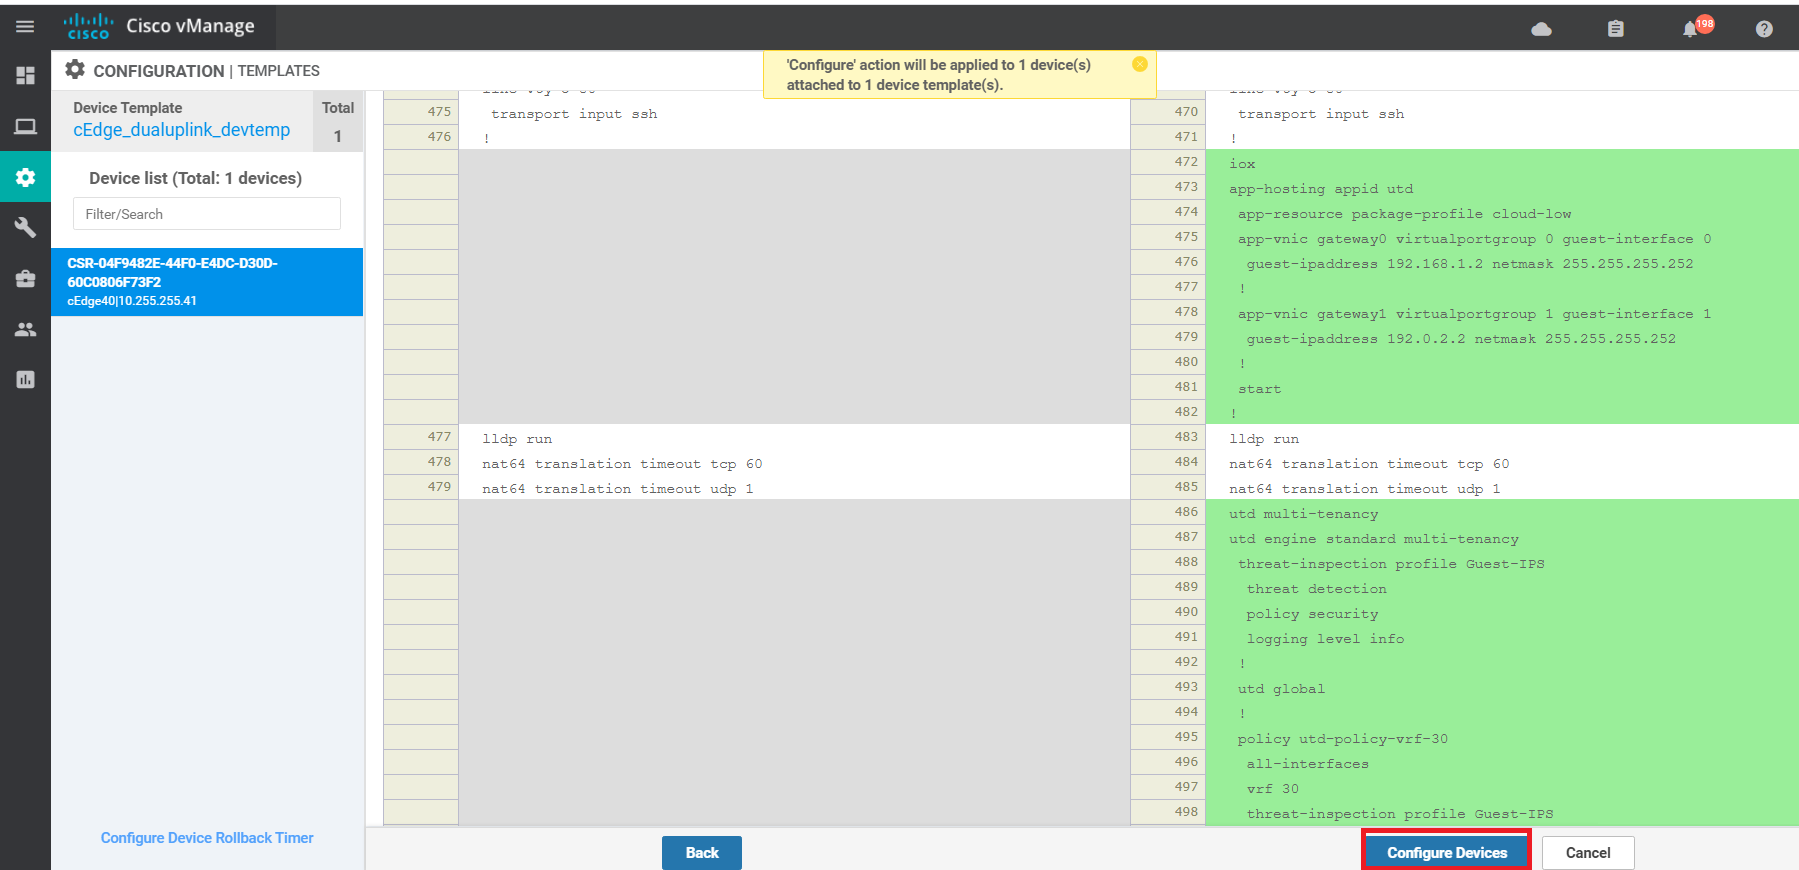
-
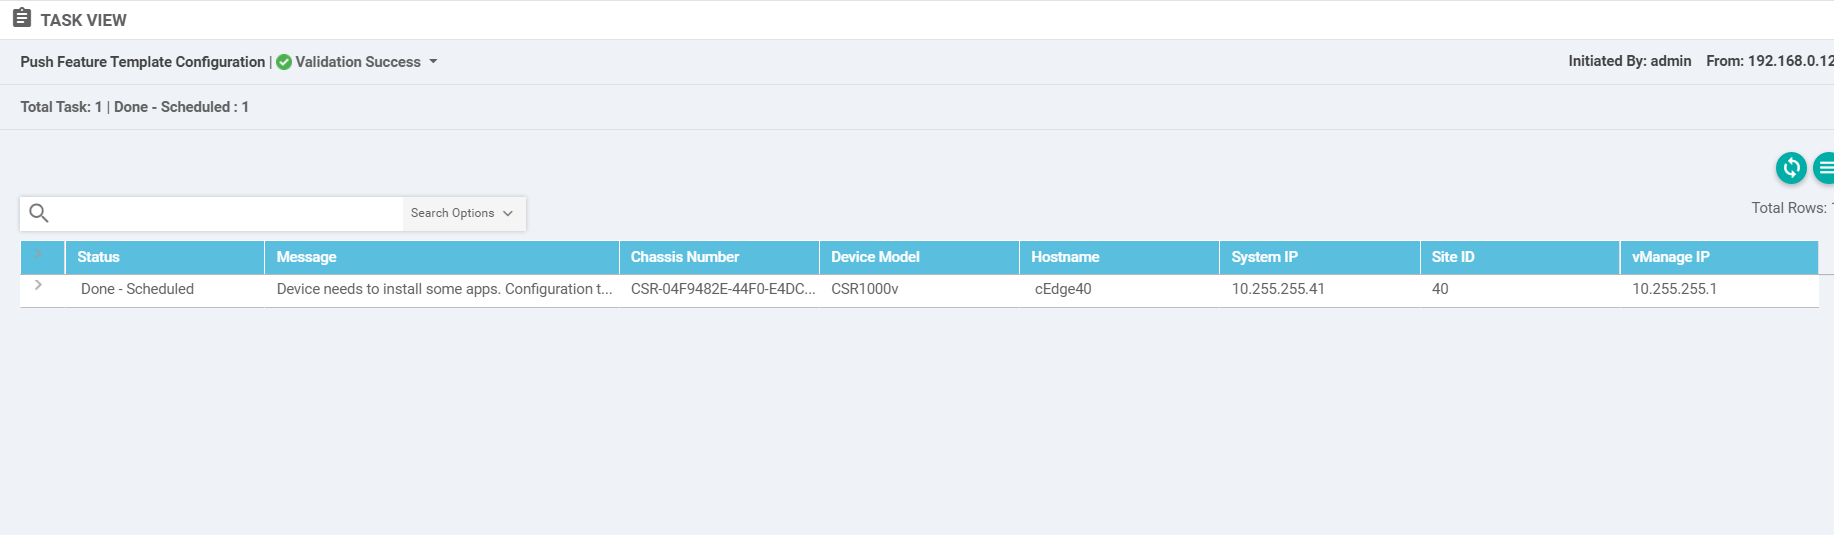
The status of this change will show up as Done - Scheduled. This is expected since the IPS engine has to be installed on the cEdge
-
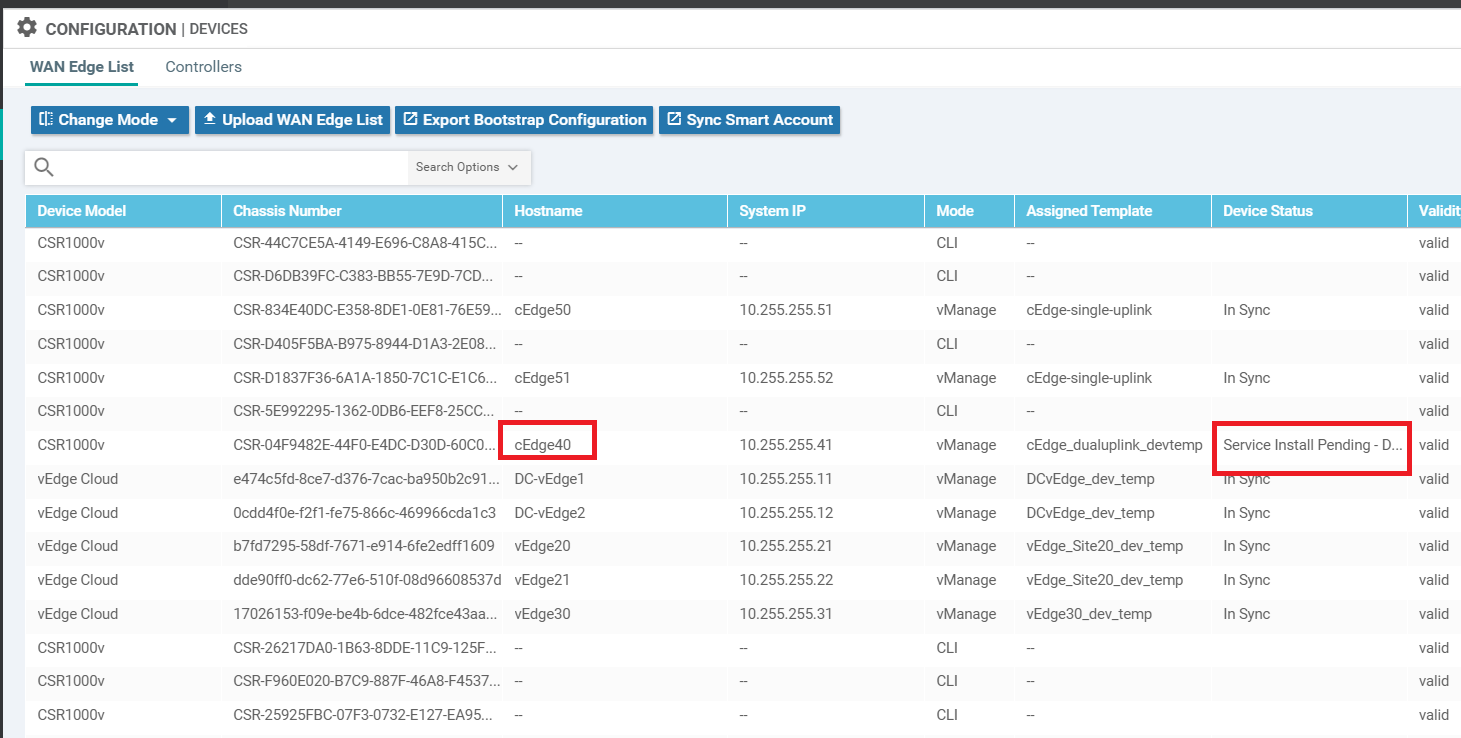
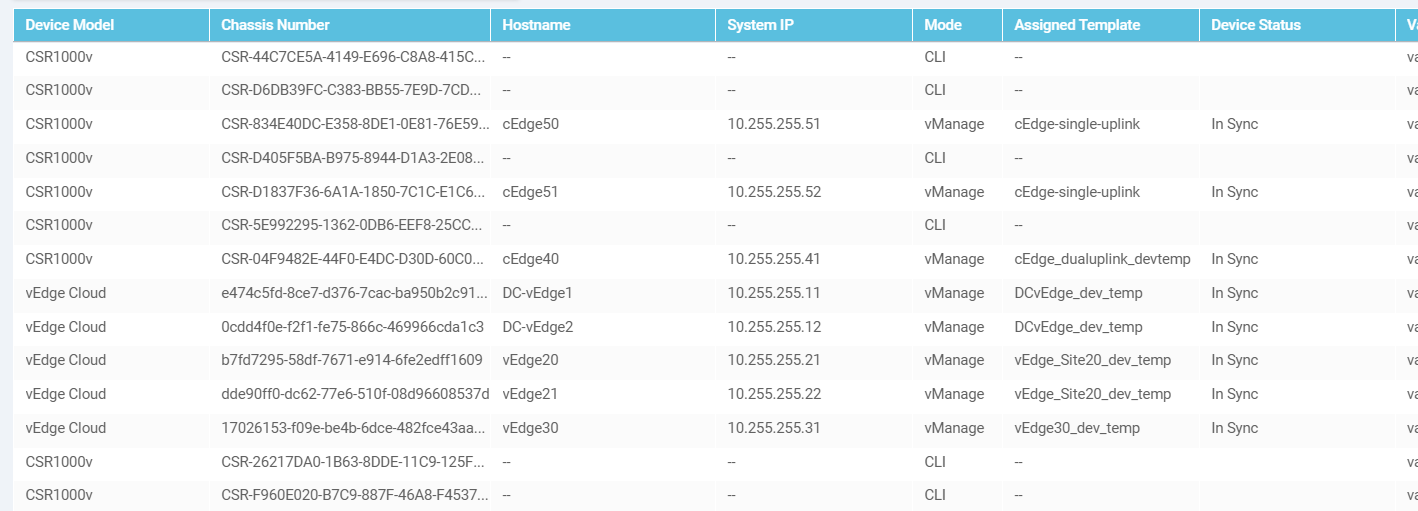
Navigate to Configuration => Devices and locate the cEdge40 Device. You will notice that the Device Status is Service Install Pending (might have to scroll to the right or remove columns to see this)
Since it takes approximately 5 minutes for the install process to go through, this will be a perfect time to grab a cup of tea/coffee! We will validate the installation in the next section.
-
-
-
-
-
-
-
-
- Verifying installation and performing signature updates
- Activity Verification
Verifying installation and performing signature updates
-
After you’re done with the cup of tea/coffee, check the Configuration => Devices page again. cEdge40 should now be In Sync
-
Log in to the CLI of cEdge40 via Putty and enter the
show utd engine standard statuscommand. The Overall system status should be Green and the Engine should be Running. If the Signature is version 29.0.c, proceed to the next step else skip to Activity Verification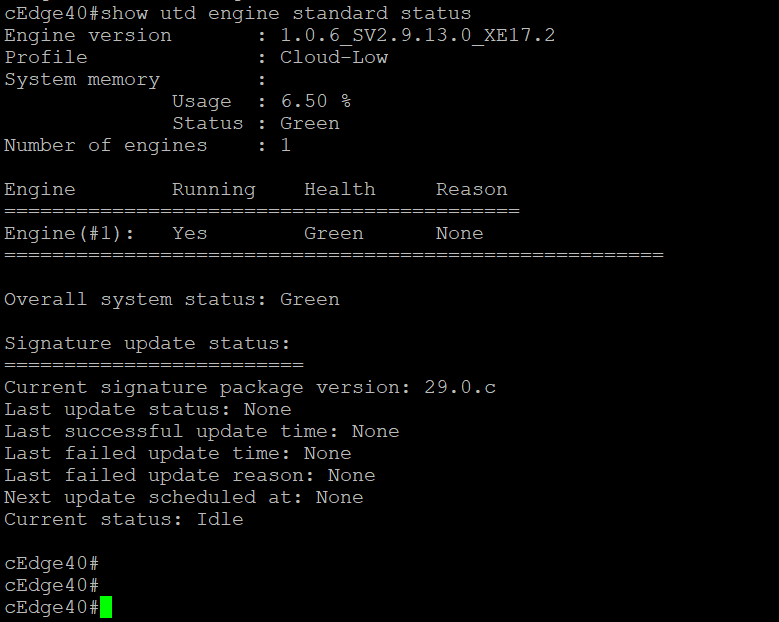
show utd engine standard status -
To update the signatures, run the command
copy scp: bootflash:. Details to be entered are given below, confirm the signature updateAddress or name of remote host Source username Source filename Destination filename Password 100.100.100.1 admin UTD-STD-SIGNATURE-29130-115-S.pkg UTD-STD-SIGNATURE-29130-115-S.pkg admin 
Once the image is copied over to the bootflash: of cEdge40, run the command
utd signature update file bootflash:UTD-STD-SIGNATURE-29130-115-S.pkg. Confirm the signature update
copy scp: bootflash: utd signature update file bootflash:UTD-STD-SIGNATURE-29130-115-S.pkg -
Run
show utd engine standard statusto check if the signature package version matches with the image below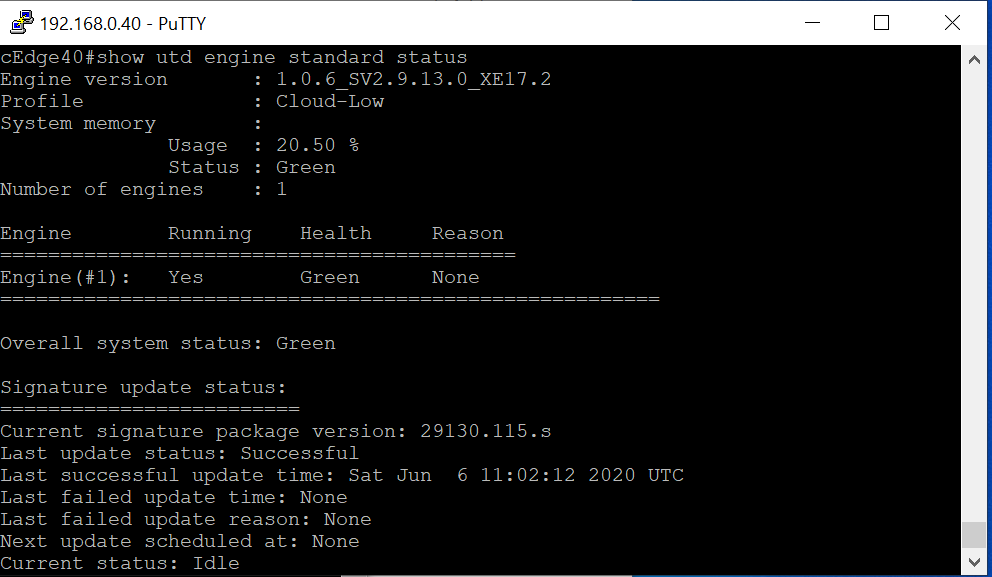
show utd engine standard status
-
-
-
-
-
-
-
-
-
- Activity Verification
Activity Verification
-
Log in to vCenter and console in to your Site 40 PC again, like before (click here to review the process). Open Terminal and type
ping 8.8.8.8to verify that Internet connectivity is still there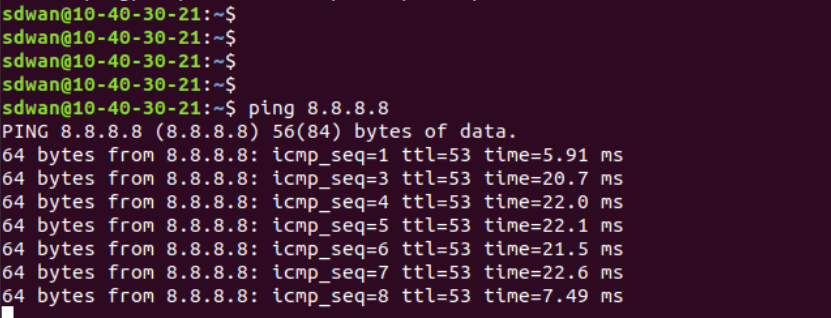
-
Still in Terminal, run
./ips.shto trigger a few HTTP connections which will trigger the IPS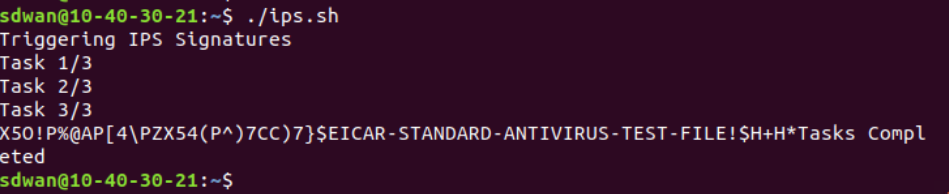
-
Back at the cEdge40 CLI, issue
show utd engine standard logging events. You should see alerts triggered as a result of running the ips.sh file (this file attempts to download some simulated malware). Thus, our IPS engine is working as expected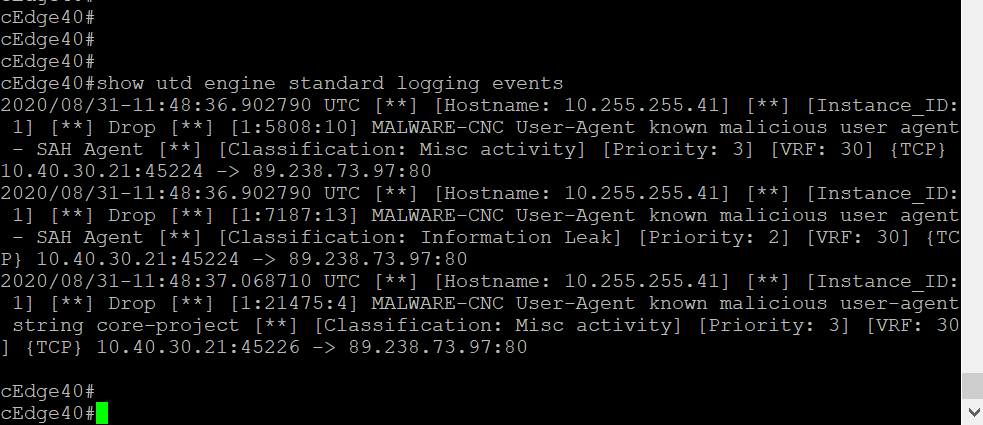
-
We can view this information on the vManage GUI as well. Go to Dashboard => Security and you should see some Signature hits. The dashboard does take some time to get populated (it’s never too soon for another cup of tea/coffee!)
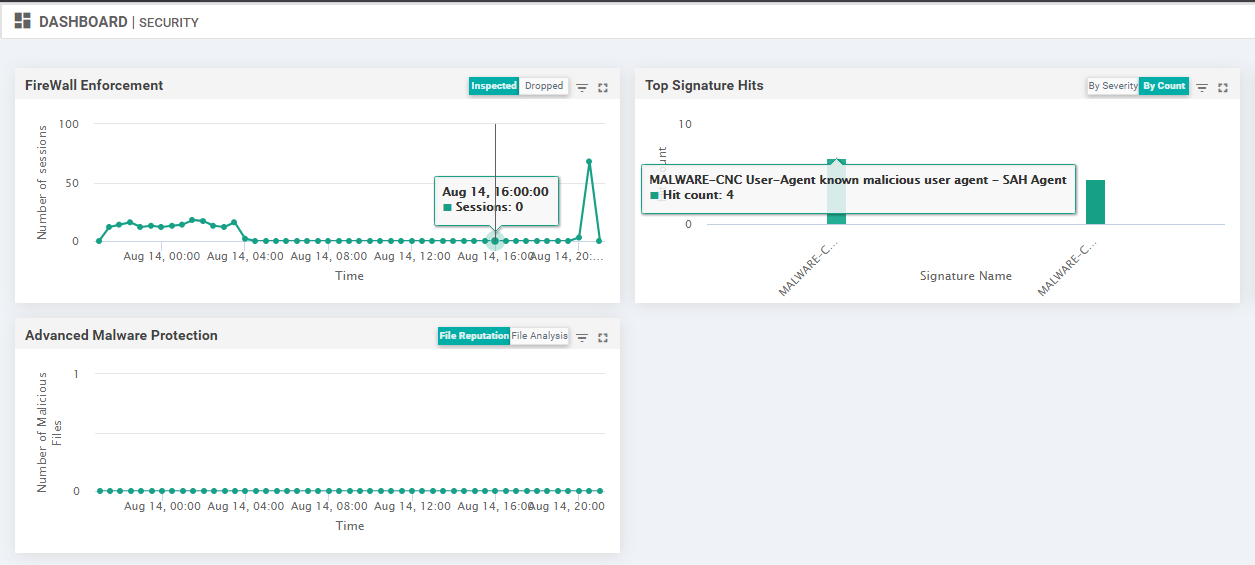
This completes the verification activity.
-
-
-
-
-
-
-
-
-
-