- Overview
- Pre-Work
- Enabling Site 30 for DIA
- Life without Cisco Umbrella
- Basic Configuration for Umbrella
- Configuring WAN Edge for Umbrella Redirection
- Making Umbrella Ours
- API Keys and AD Configuration
- DC Configuration Download
- AD Connectors
- Roaming Computer Configuration
- Building a DNS Policy
- Setting up IPSEC Tunnels
- Configuring a Firewall Policy
- Configuring a Web Policy
Overview
Cisco Umbrella offers flexible, cloud-delivered security when and how you need it. It combines multiple security functions into one solution, so you can extend protection to devices, remote users, and distributed locations anywhere. Umbrella is the easiest way to effectively protect your users everywhere in minutes.
The Umbrella portfolio includes, among others, the following Security functions:
-
DNS Layer Security
-
Cloud-delivered Firewall (IPSEC Tunnel)
-
Secure Web Gateway (IPSEC Tunnel)
In this section, we will deploy DNS Layer Security as an Umbrella feature and then see how SD-WAN can simplify Tunnel creation and Cloud-Delivered Firewall/SWG functionality.
-
- Pre-Work
- Enabling Site 30 for DIA
- Life without Cisco Umbrella
- Basic Configuration for Umbrella
- Configuring WAN Edge Umbrella Redirection
- Making Umbrella Ours
- API Keys and AD Configuration
- DC Configuration Download
- AD Connectors
- Roaming Computer Configuration
- Building a DNS Policy
- Setting up IPSEC Tunnels
- Configuring a Firewall Policy
- Configuring a Web Policy
Pre-Work
We will need to change a few settings with respect to the DNS servers to ensure that the Umbrella infrastructure isn’t utilized by the SD-WAN solution. As of now, all DNS traffic is being queried via the Umbrella resolvers.
Additionally, we will be working on the Site 30 PC which is part of an AD domain (swatsdwanlab.com). The Domain Controller is at 10.30.10.50, which is also acting as the DNS server for the Site 30 PC.
-
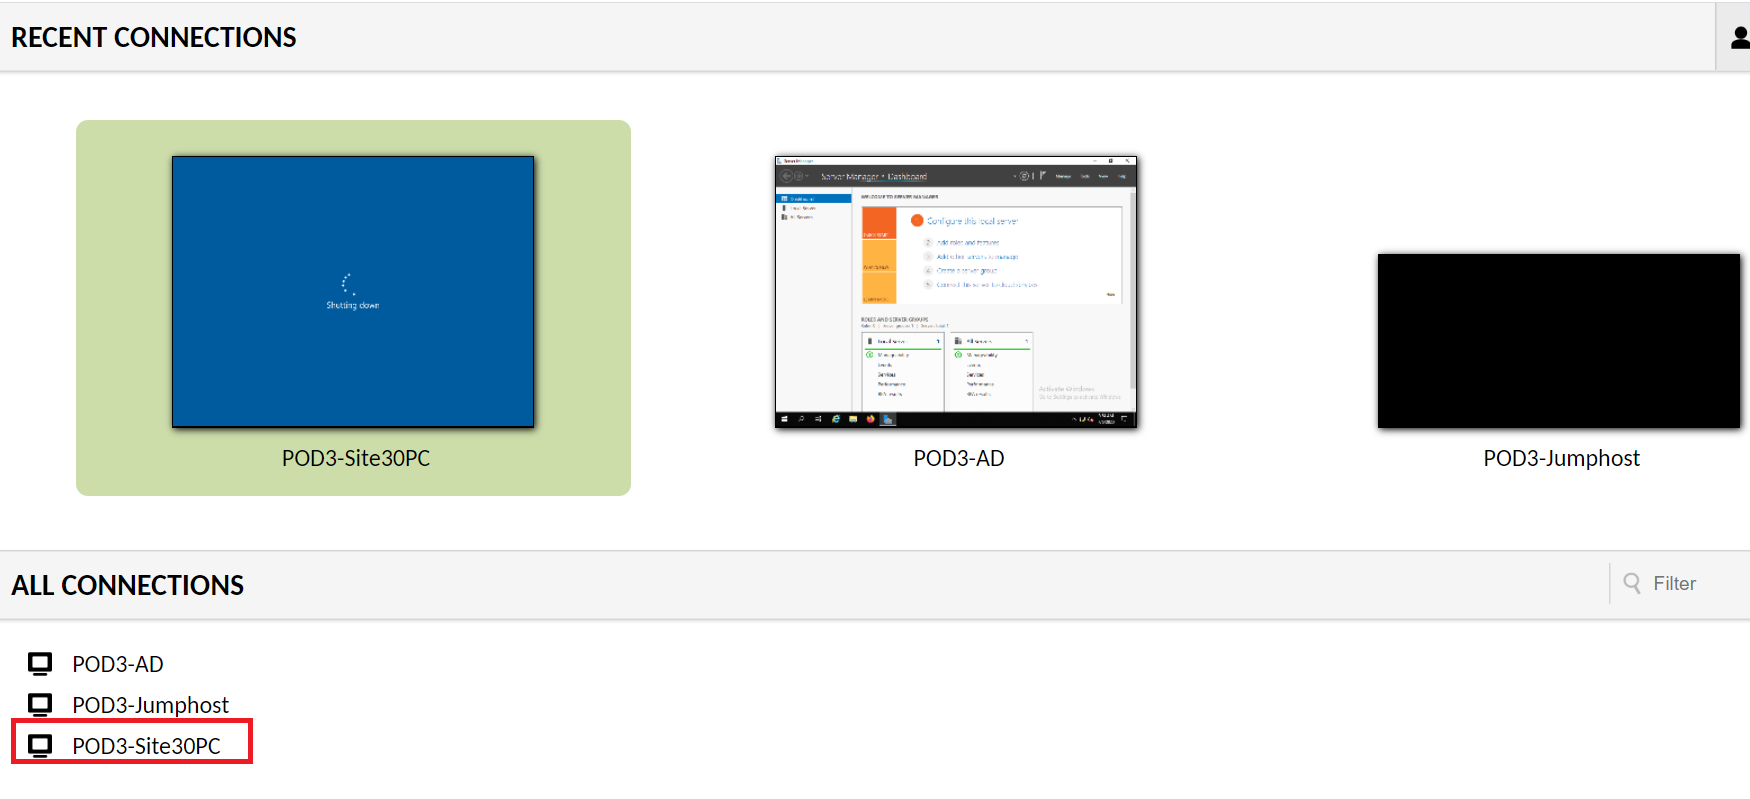
Connect to the Site 30 PC to verify that Site to Site communication is operational but the Internet cannot be accessed. Log in to Guacamole (10.2.1.20X:8080/guacamole if connected to the GHI DC and 10.1.8.20X:8080/guacamole if connected to the SJC DC, where X is your POD number) with the credentials given below and click on the PODX-Site30PC option.
Alternatively, you can RDP to 10.2.1.16X if connected to the GHI DC and 10.1.8.16X if connected to the SJC DC (where X is your POD number) from the Jumphost. RDP to the Site 30 PC will only work from the Jumphost
Connection Method Username Password Guacamole sdwanpod C1sco12345 RDP swatsdwanlab\sdwan C1sco12345 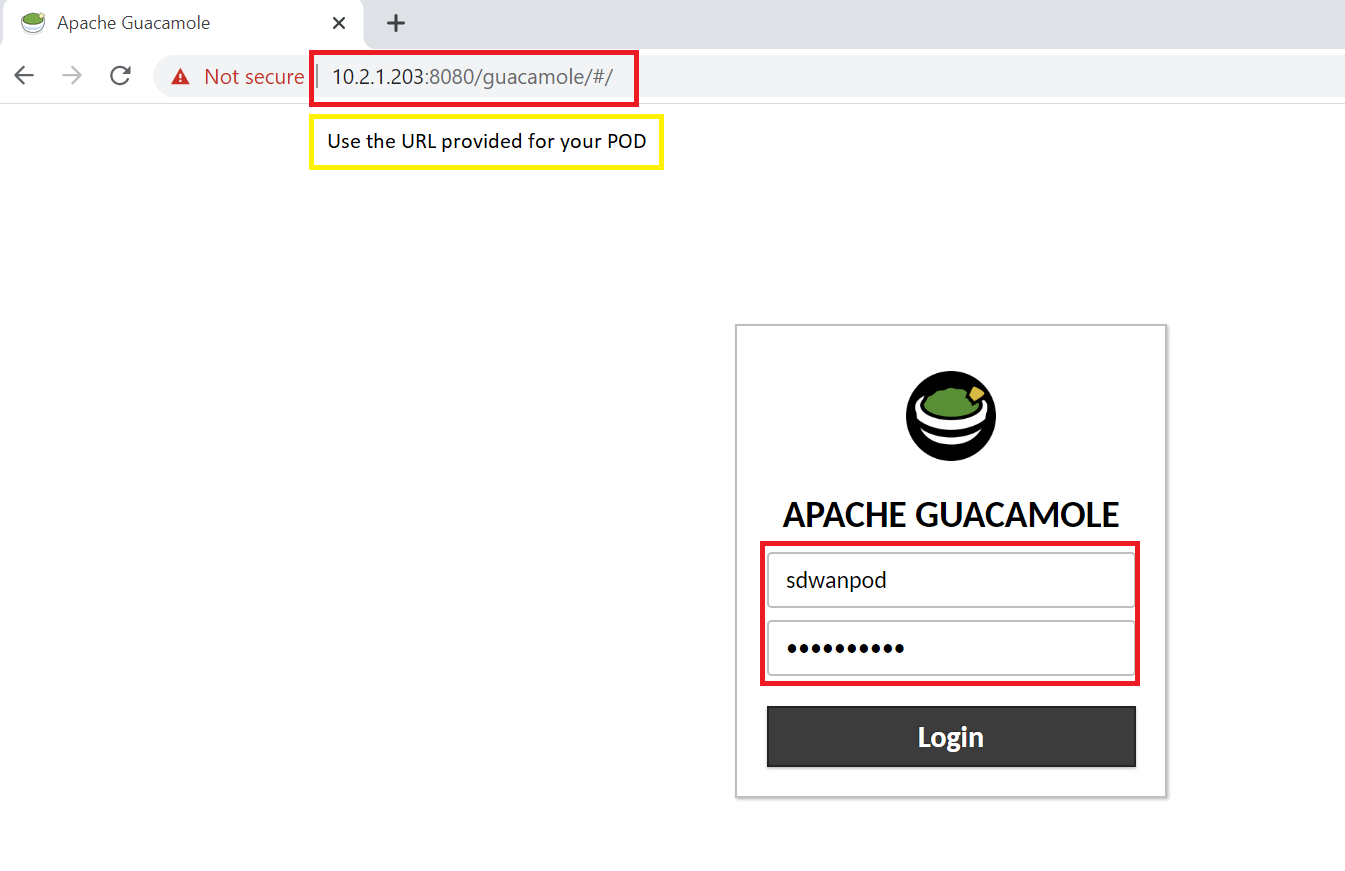
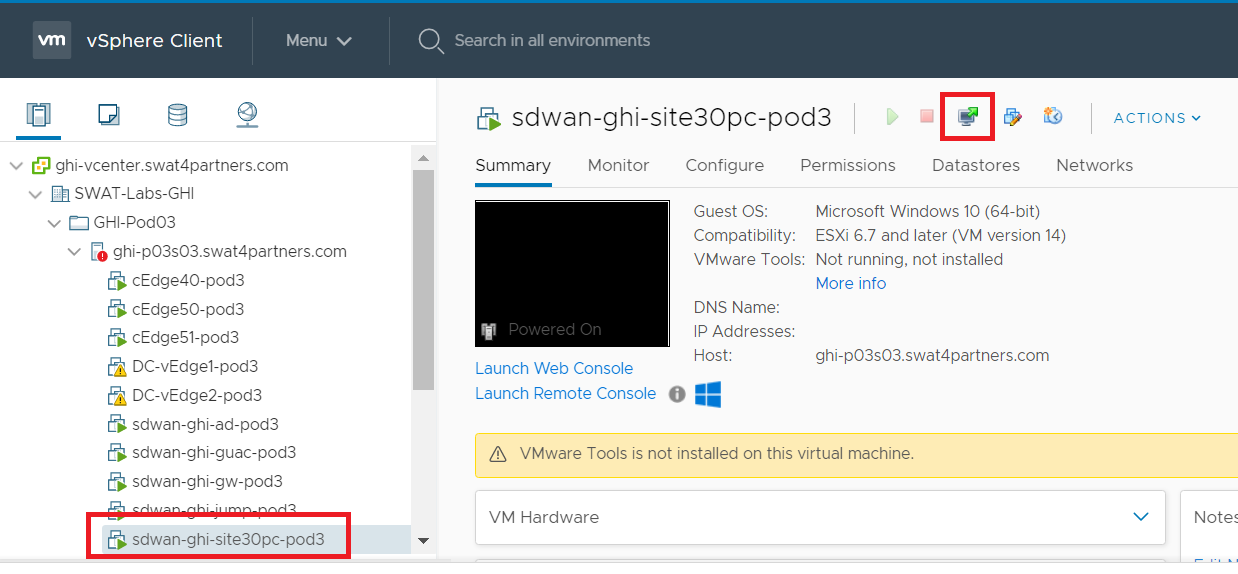
vCenter (accessible via the bookmark or 10.2.1.50/ui if connected to the GHI DC and 10.1.1.50/ui if connected to the SJC DC and the credentials provided for your POD) can also be used to console to the Site30 PC
-
Depending on the connection method, you may need to enter credentials again to log in to the Site 30 PC. Please enter the credentials shown below, if prompted
Connection Method Username Password Guacamole Not Required Not Required RDP swatsdwanlab\sdwan C1sco12345 vCenter swatsdwanlab\sdwan C1sco12345 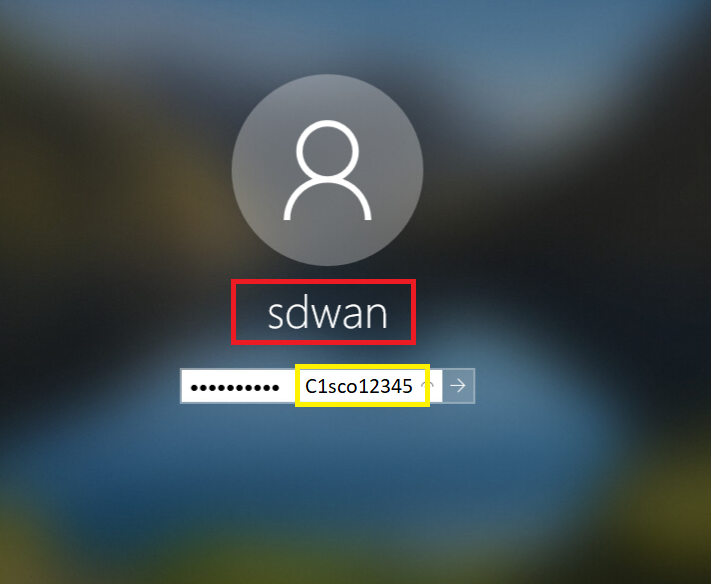
-
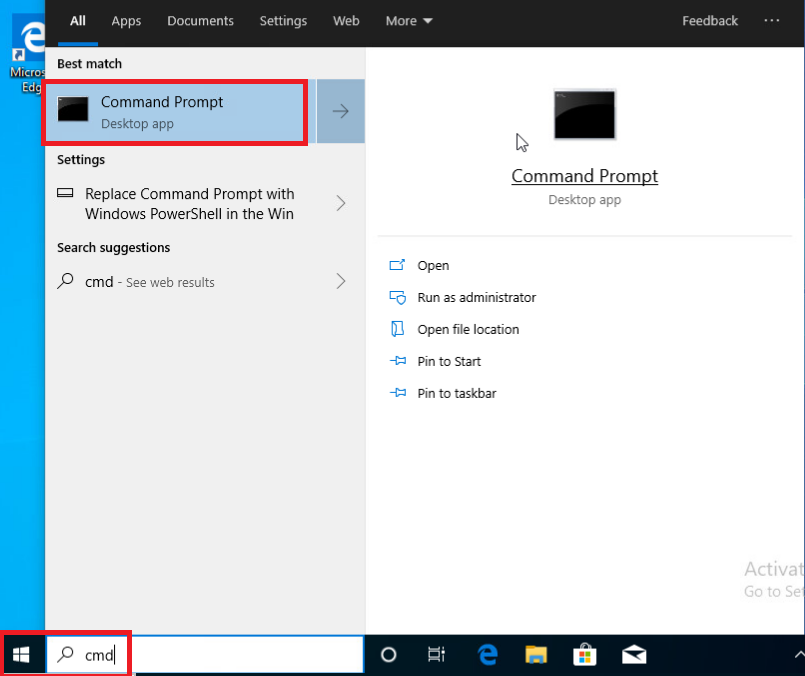
Click on Start and type cmd. Click on the Command Prompt App that pops up in the search results
-
Type
ipconfigand Hit Enter. Also, typeping 10.0.0.1and Hit Enter. The pings should work. On typingping 8.8.8.8, the pings should fail indicating that there is no Internet connectivity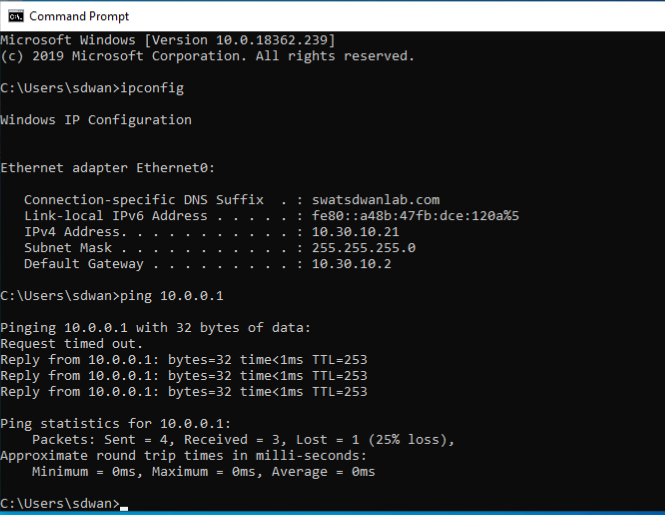
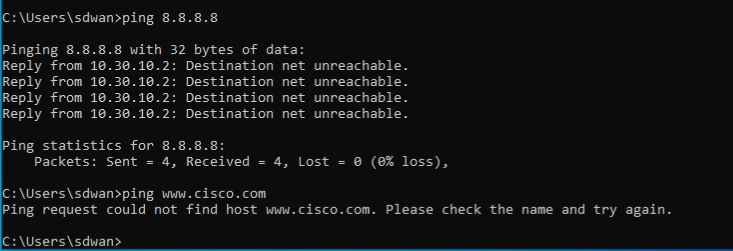
ipconfig ping 10.0.0.1 ping 8.8.8.8 -
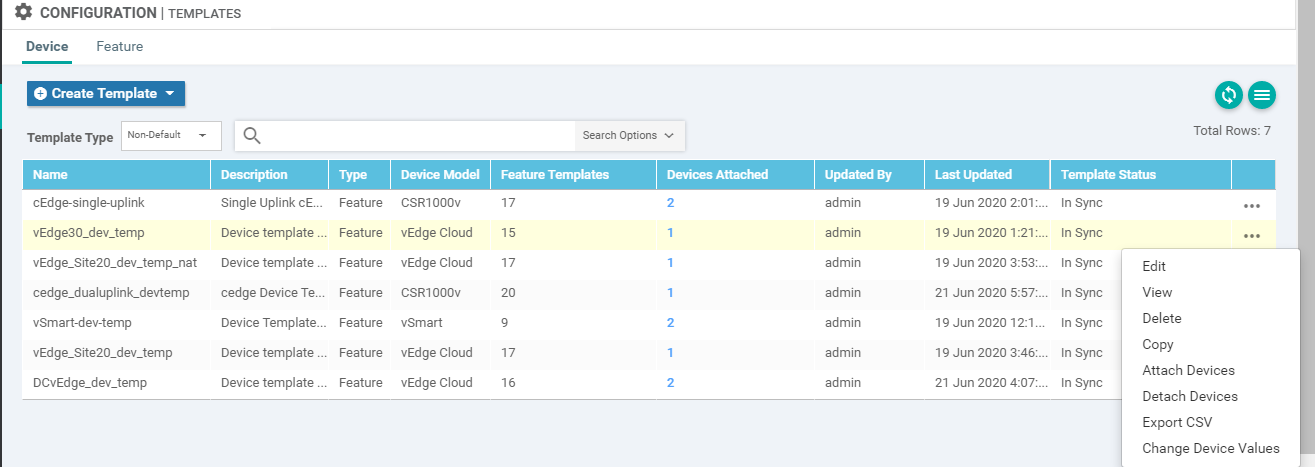
Go to the vManage GUI and navigate to Configuration => Templates

-
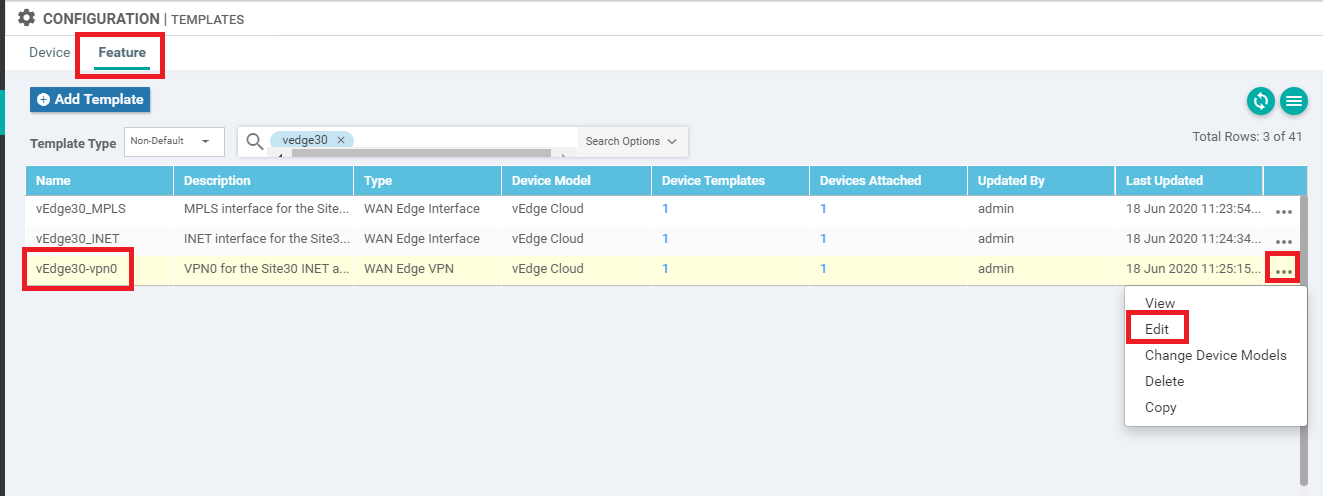
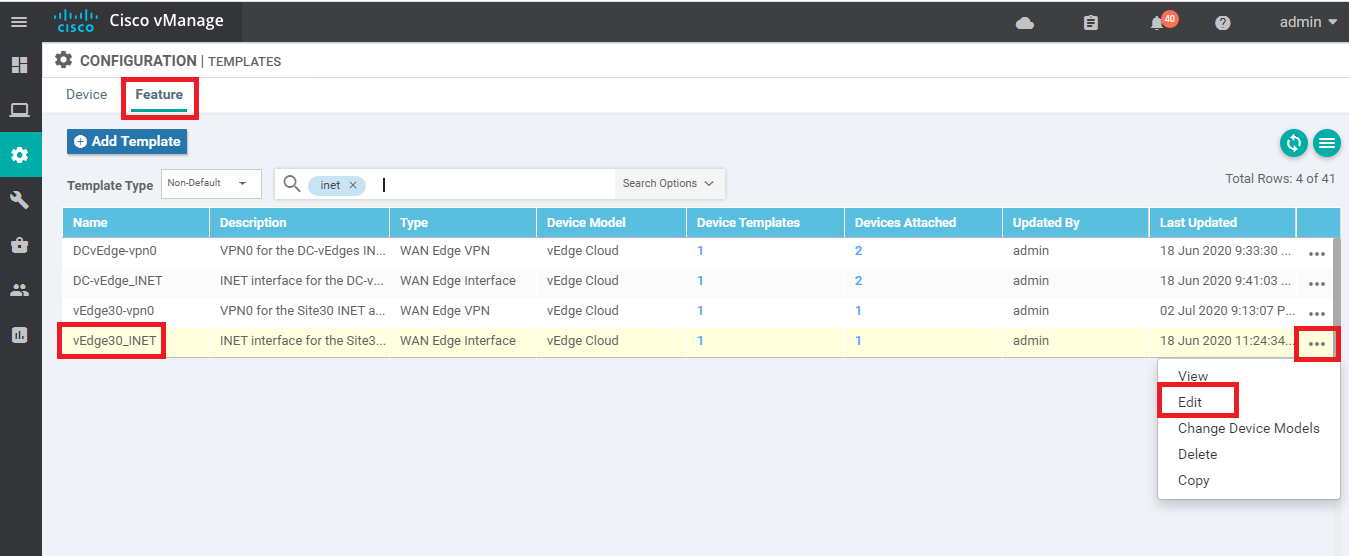
Click on the Feature tab and locate the vEdge30-vpn0 Feature Template. Click on the three dots next to it and choose to Edit
-
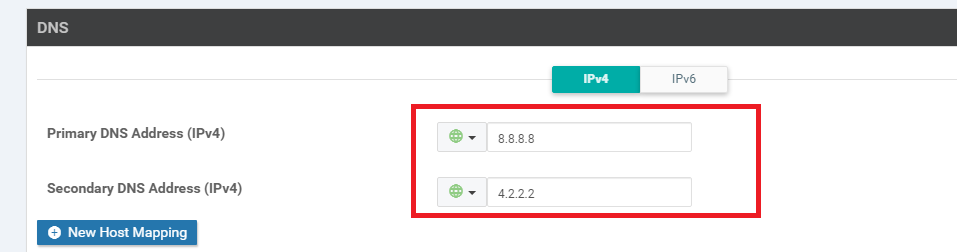
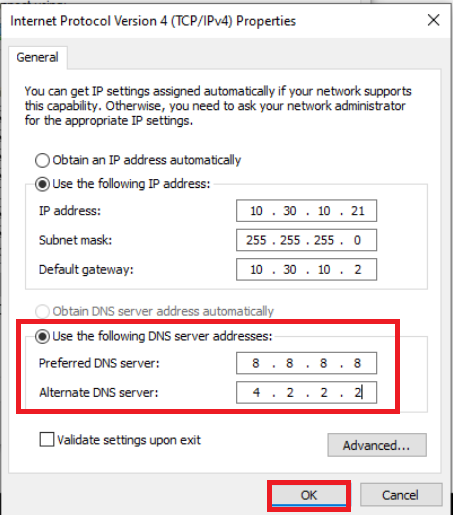
Scroll to the DNS section and update the Primary DNS Address (IPv4) to 8.8.8.8 and the Secondary DNS Address (IPv4) to 4.2.2.2
-
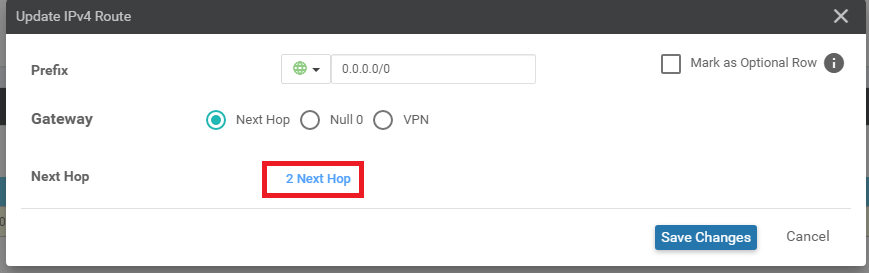
Locate the IPv4 Route section and click on the pencil icon to edit the 0.0.0.0/0 route

-
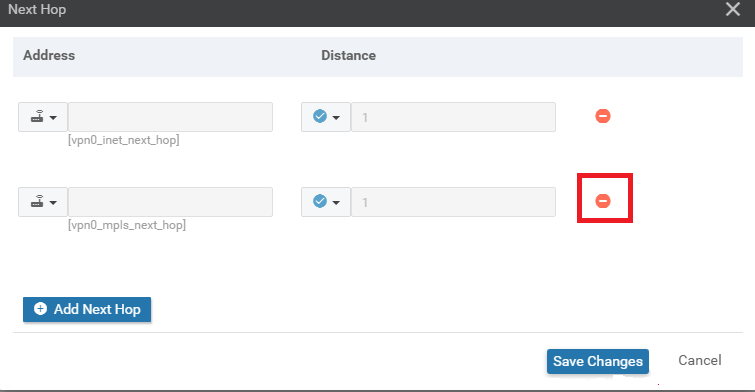
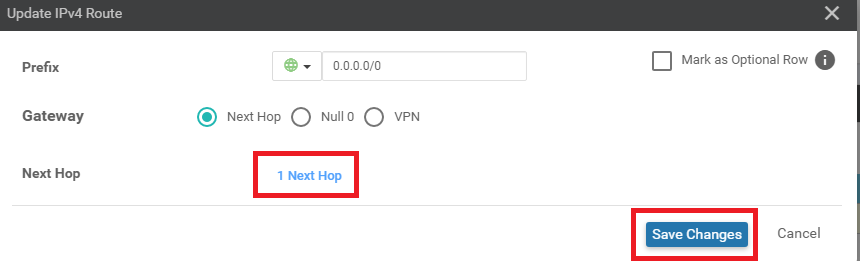
Click on 2 Next Hop and remove the vpn0_mpls_next_hop option by clicking on the red minus icon
-
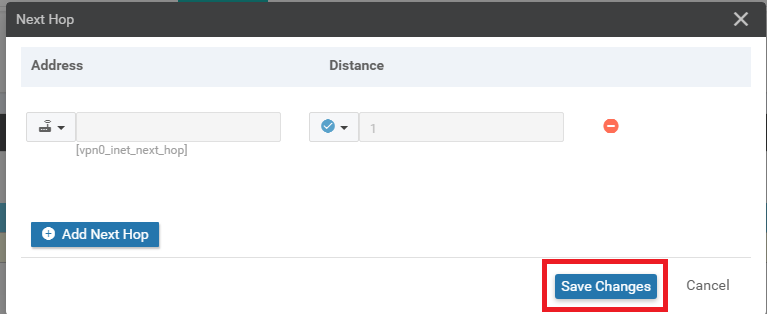
Click on Save Changes
-
Ensure that the Update IPv4 Route window shows 1 Next Hop and click on Save Changes
-
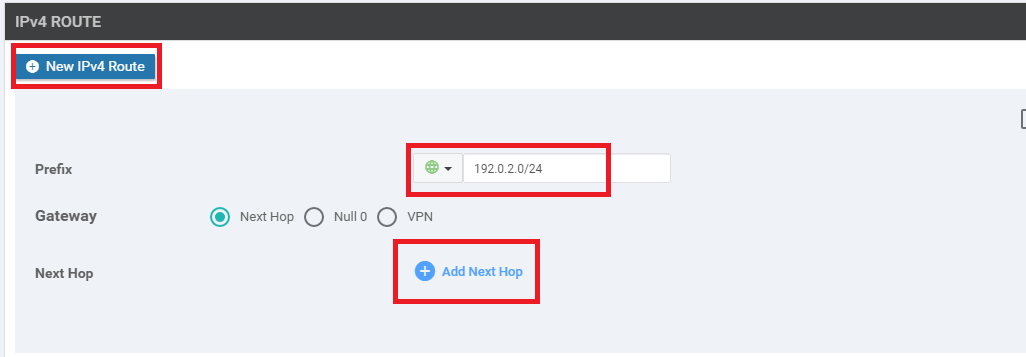
Click on New IPv4 Route and enter a Prefix of 192.0.2.0/24. Click on Add Next Hop
-
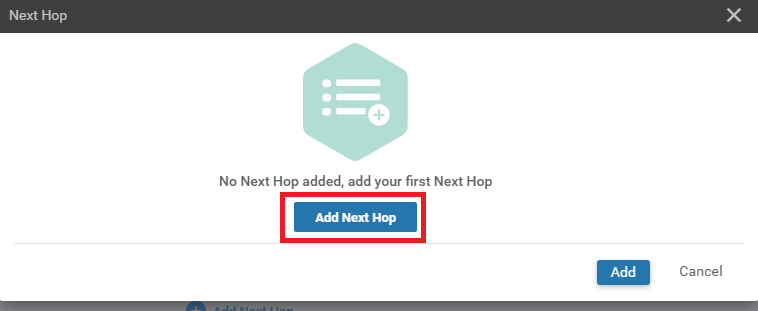
Click on Add Next Hop again
-
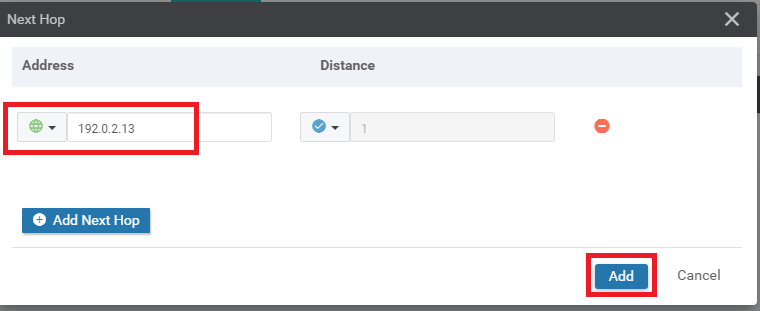
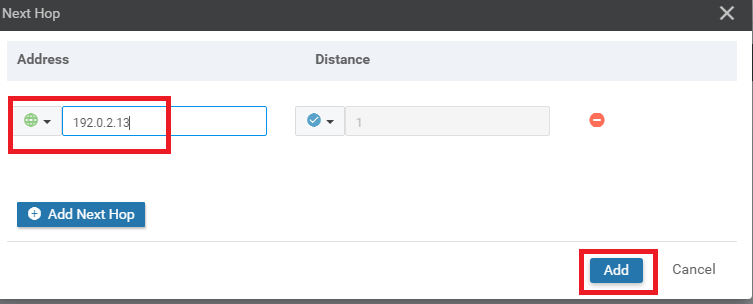
Enter a Global value of 192.0.2.13 in the Address field and click on Add
-
Click on Add again to add the route

-
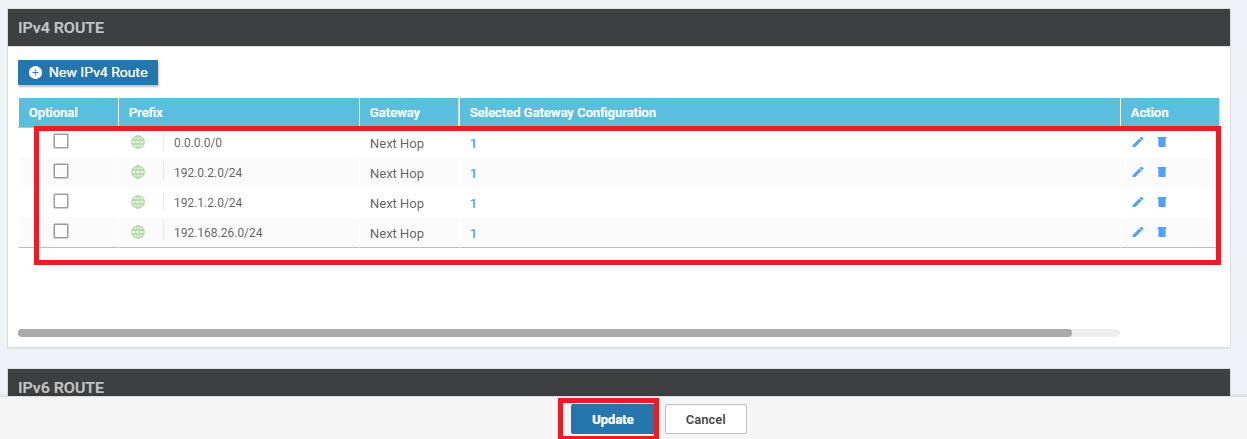
We will be adding 2 more routes. Repeat steps 12 to 15 for the routes enumerated below, using the images as reference. These routes and the ones in the previous steps are being added to maintain BFD sessions on the MPLS link in our SD-WAN network and to ensure that the TLOC extension configured before works as expected (hence the 192.168.26.0/24 route shown below). The 192.0.2.0/24 and 192.1.2.0/24 routes being added correspond to our MPLS subnets across the SD-WAN Network
Field Global or Device Specific (Drop Down) Value Prefix Global 192.1.2.0/24 Add Next Hop - Address Global 192.0.2.13 Field Global or Device Specific (Drop Down) Value Prefix Global 192.168.26.0/24 Add Next Hop - Address Global 192.0.2.13 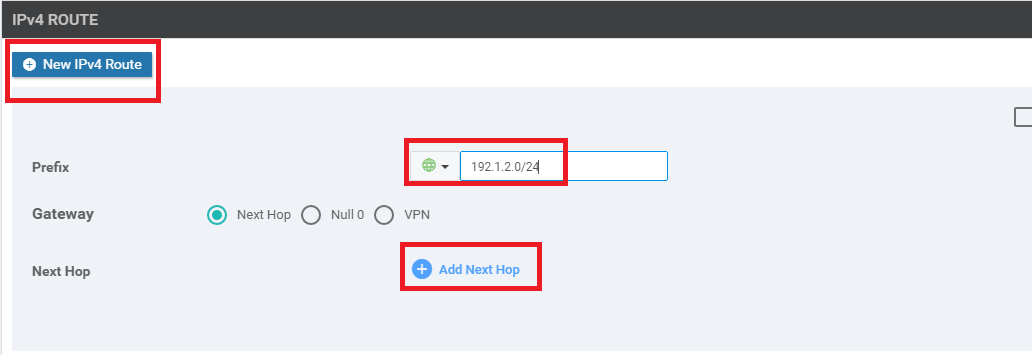
-
Make sure there are 4 routes created, as shown below and click on Update
-
Click on Next and then Configure Devices. You can view the side by side configuration difference, if required. Notice that the default route pointing to the MPLS next hop is being removed and 3 routes are being added in place of it

-
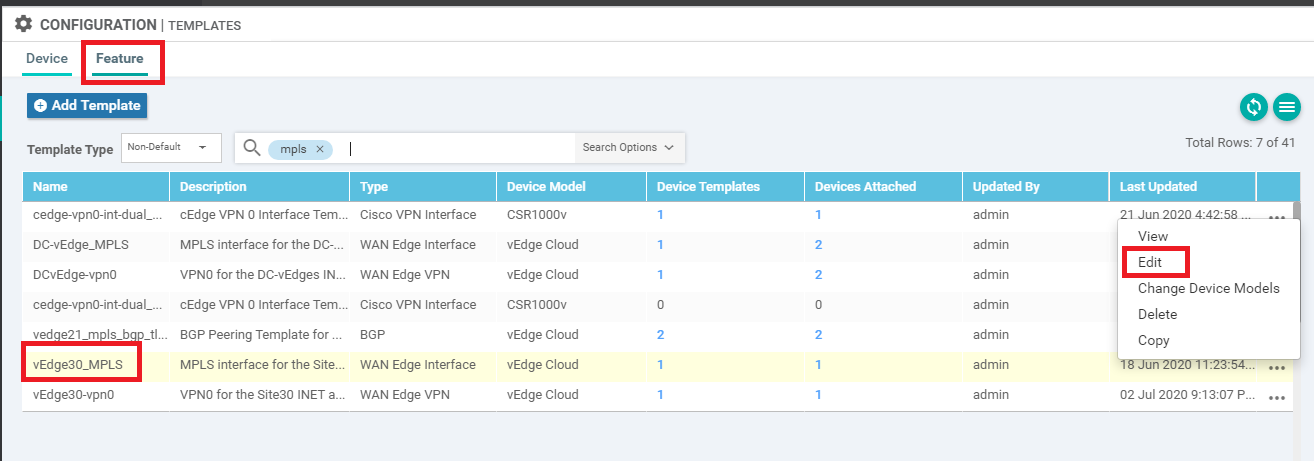
Navigate to the Configuration => Templates => Feature tab and click on the three dots next to vedge30_MPLS. Click on Edit
-
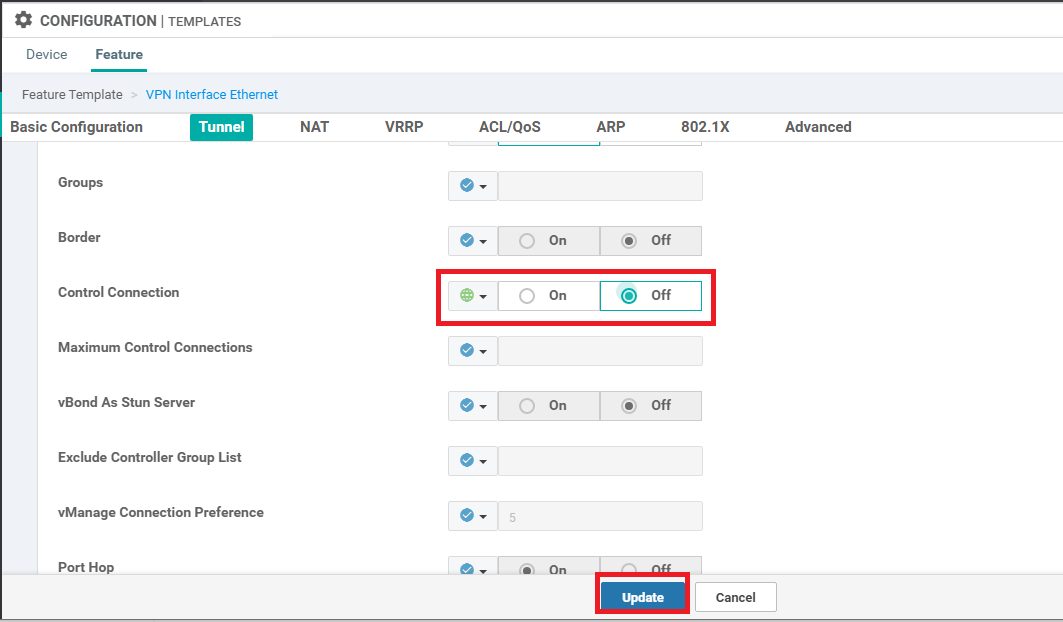
Under Tunnel, set the Control Connection to Off and click on Update. Click on Next and then Configure Devices
-
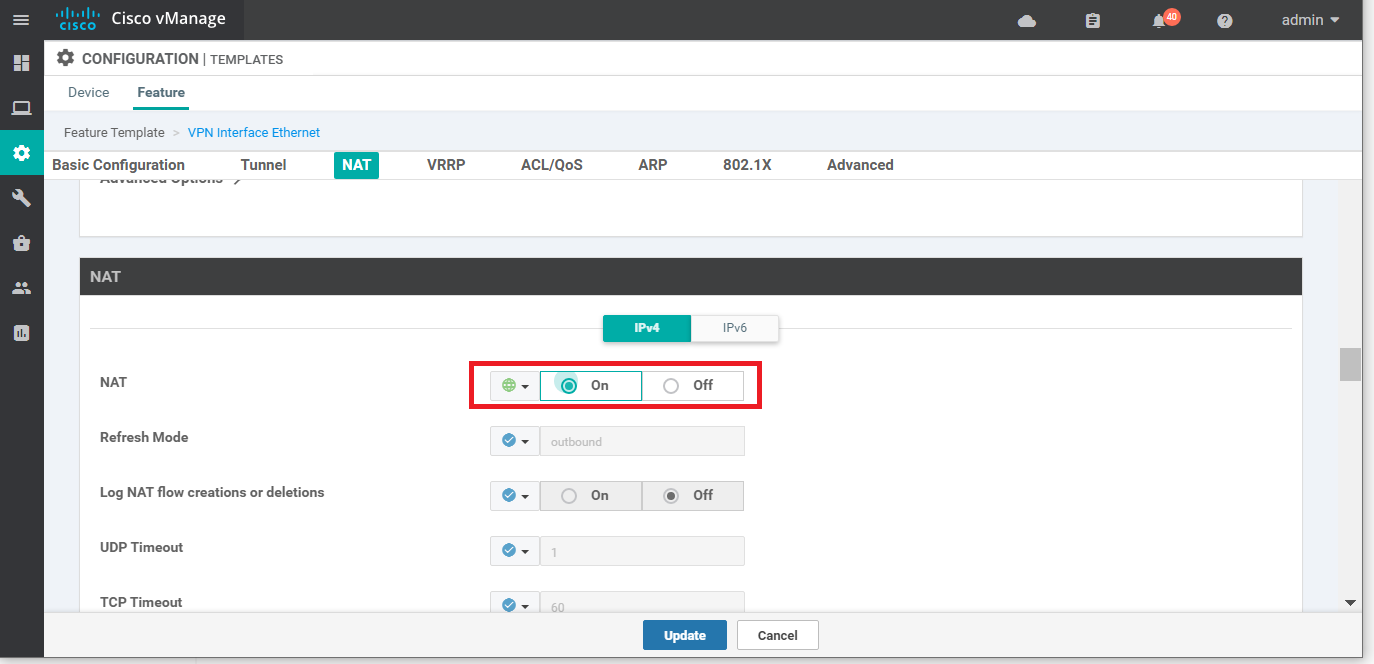
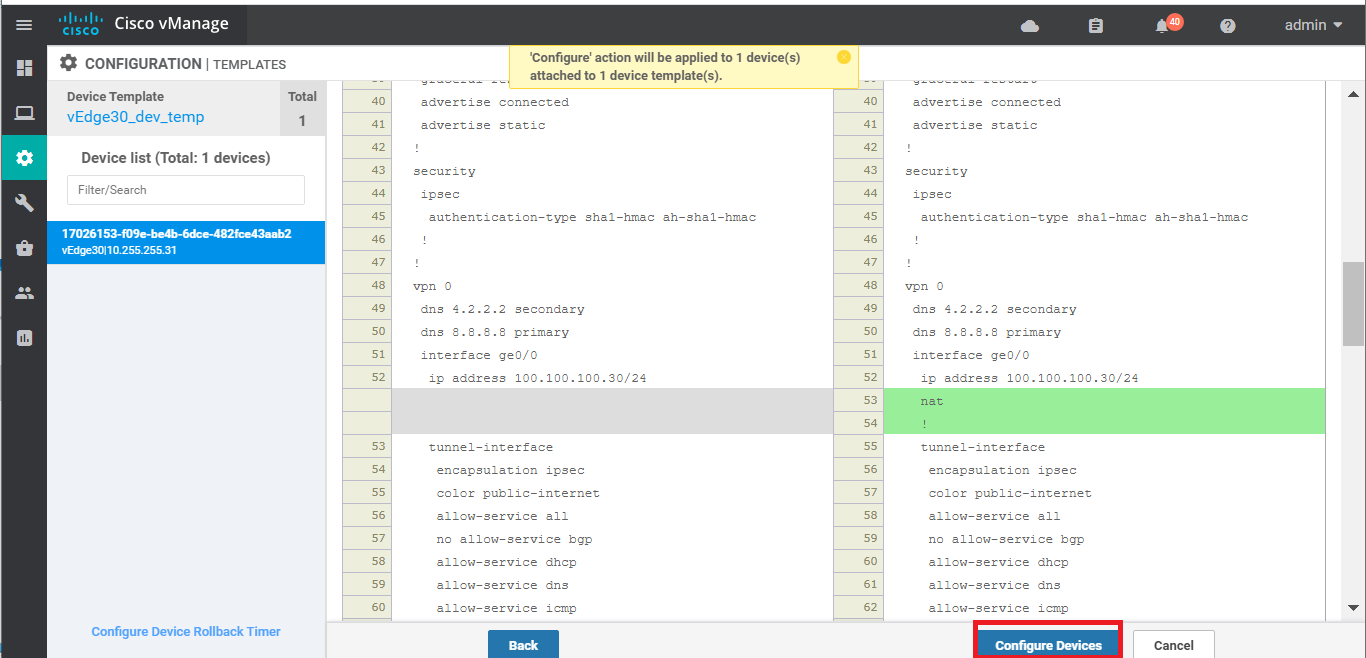
Back at the Configuration => Templates => Feature tab, locate the vEdge30_INET Feature Template. Click on the three dots next to it and choose to Edit. Set NAT to a Global value of On and click on Update. Click Next and Configure Devices on the corresponding screens, viewing the side by side configuration difference if required
-
We will now add a VPN 10 Template for vEdge30 since there will be settings applicable just to this Site for Umbrella connectivity. On Configuration => Templates => Feature tab locate the vedge-vpn10 Template. Click on the three dots next to it and choose Copy
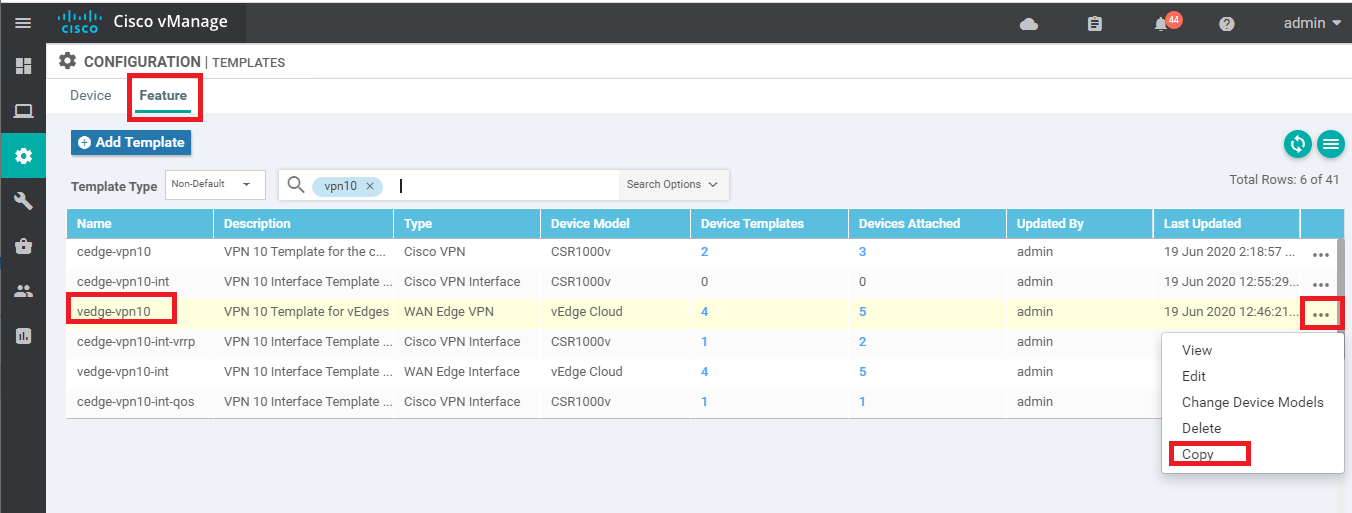
-
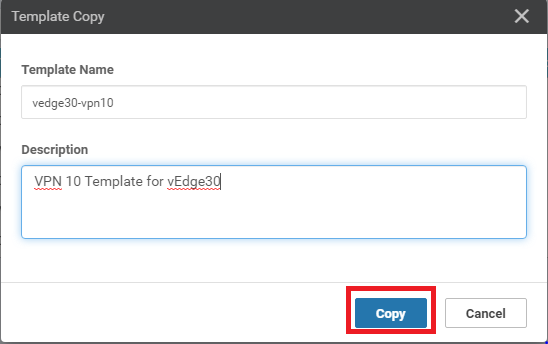
Rename the Template to vedge30-vpn10 and update the description accordingly. Click on Copy
-
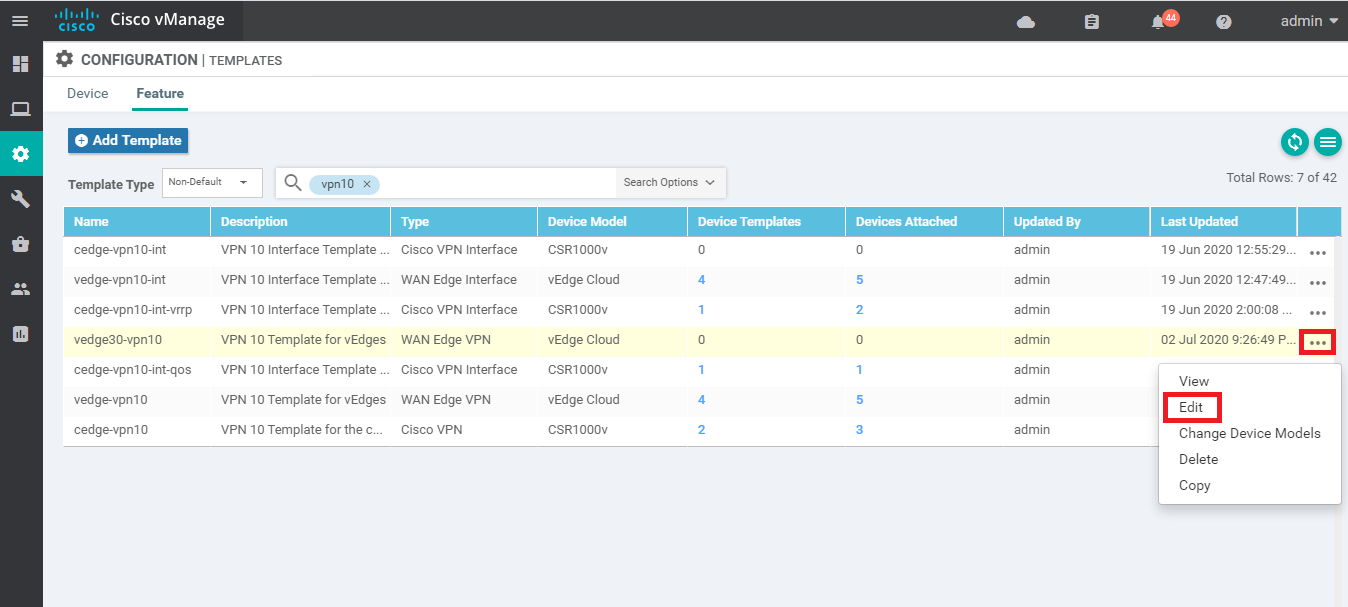
Click on the three dots next to the newly copied template and choose to Edit
-
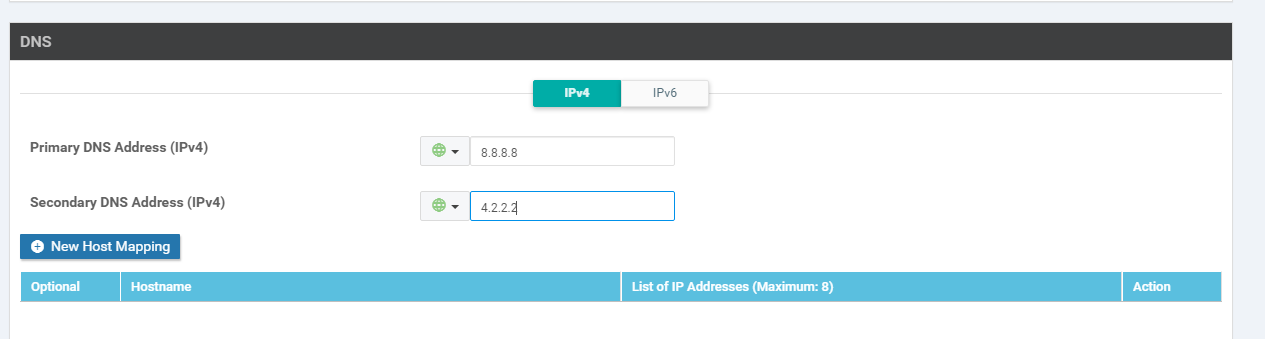
Update the DNS entries to 8.8.8.8 for the Primary DNS Address (IPv4) and 4.2.2.2 for the Secondary DNS Address (IPv4). Click on Update.
-
On the vManage GUI, navigate to Configuration => Templates => Device Tab and locate the vEdge30_dev_temp Template. Click on the three dots next to it and choose to Edit the template
-
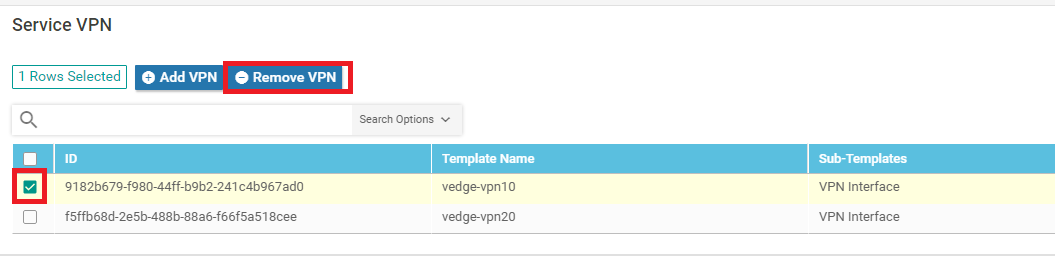
In the Service VPN section, select the vedge-vpn10 Template Name entry and click on Remove VPN. Confirm the removal
-
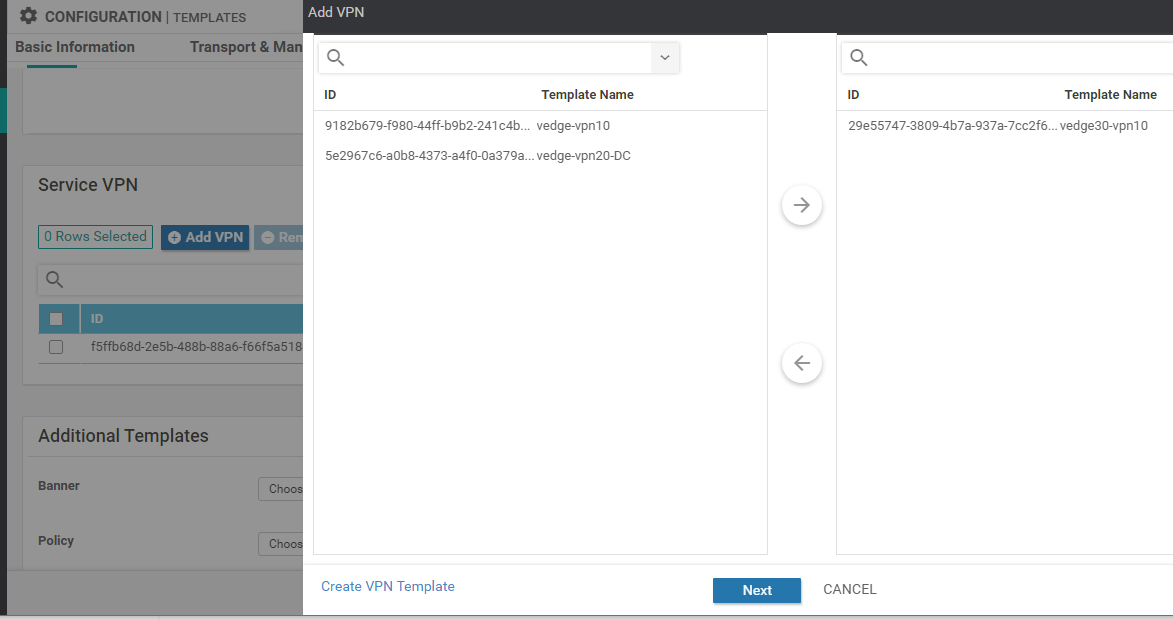
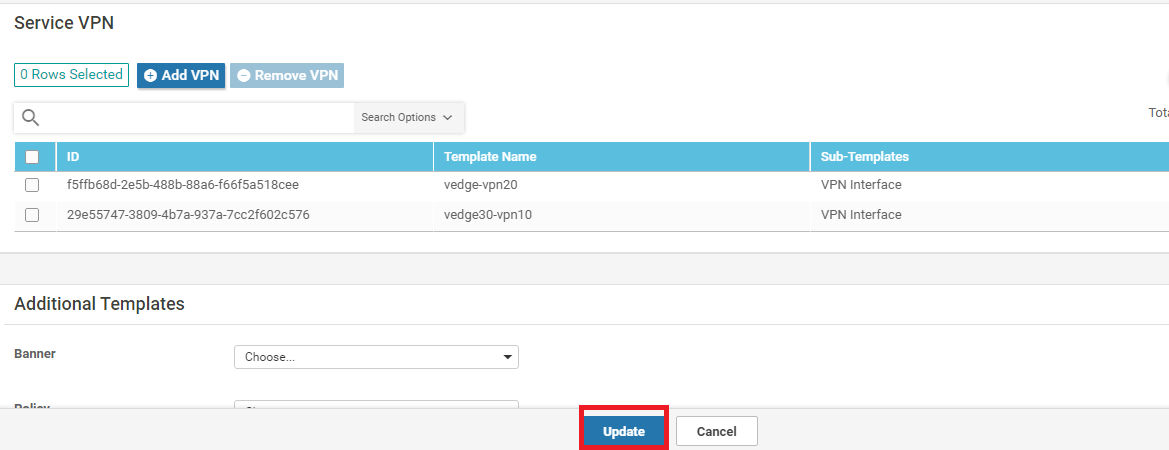
Click on Add VPN under Service VPN and move the vedge30-vpn10 Template to the right hand side. Click on Next
-
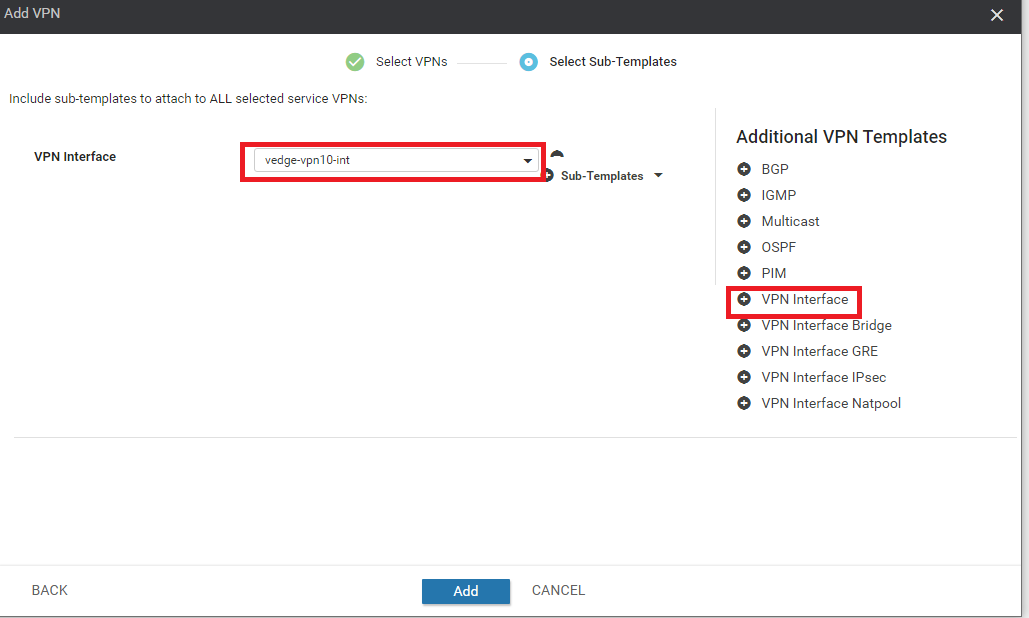
Under Additional VPN Templates click on VPN Interface and select vedge-vpn10-int in the VPN Interface drop-down. Click on Add
-
Back at the Device Template, click on Update followed by Next and Configure Devices
-
Log in to the CentralGW via the saved Putty session (or SSH to 192.168.0.1) using the credentials below. Enter
config tfollowed byinterface gig 2.31and thenip nat insideto allow the VPN 10 subnet at Site 30 to be NAT’d. Typedo wrto save the configuration done on the CentralGWUsername Password admin admin 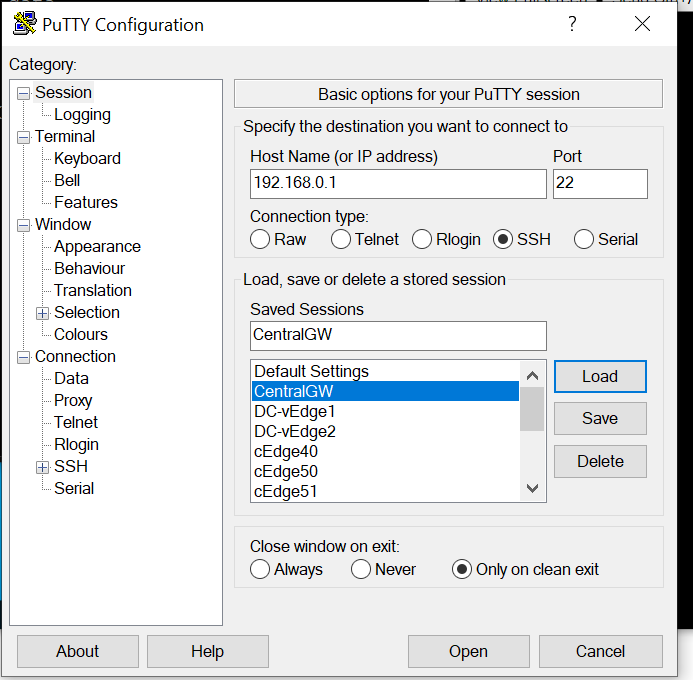

config t
interface gig 2.31
ip nat inside
do wr
This completes the pre-work that we needed to do at Site 30.
-
-
- Enabling Site 30 for DIA
- Life without Cisco Umbrella
- Basic Configuration for Umbrella
- Configuring WAN Edge Umbrella Redirection
- Making Umbrella Ours
- API Keys and AD Configuration
- DC Configuration Download
- AD Connectors
- Roaming Computer Configuration
- Building a DNS Policy
- Setting up IPSEC Tunnels
- Configuring a Firewall Policy
- Configuring a Web Policy
Enabling Site 30 for DIA
To facilitate communication to the Internet from Site 30, we will be enabling DIA at Site 30 for VPN 10.
-
On the vManage GUI, go to Configuration => Policies
-
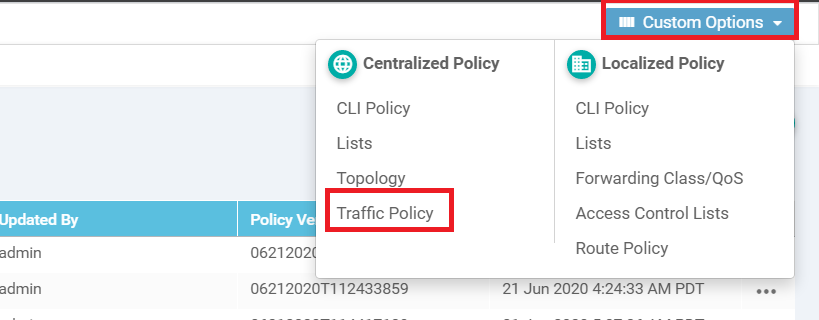
Click on Custom Options in the top right-hand corner and click on Traffic Policy
-
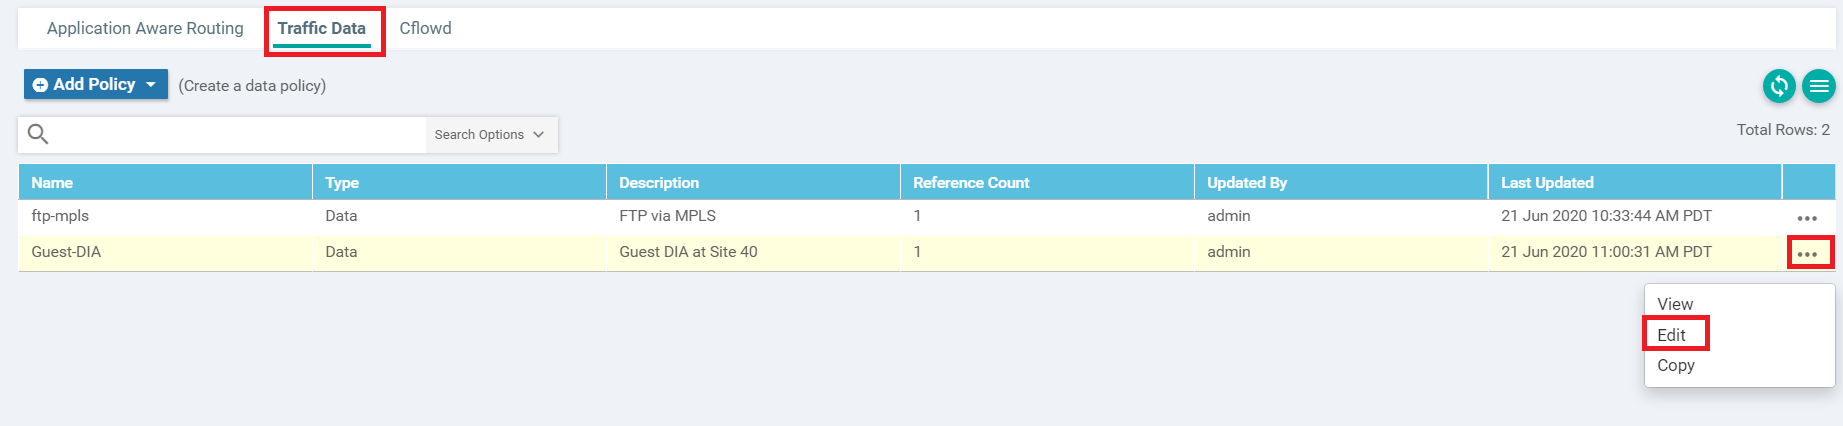
Click on the Traffic Data tab and locate the Guest-DIA Policy. Click on the three dots next to it and choose to Edit
-
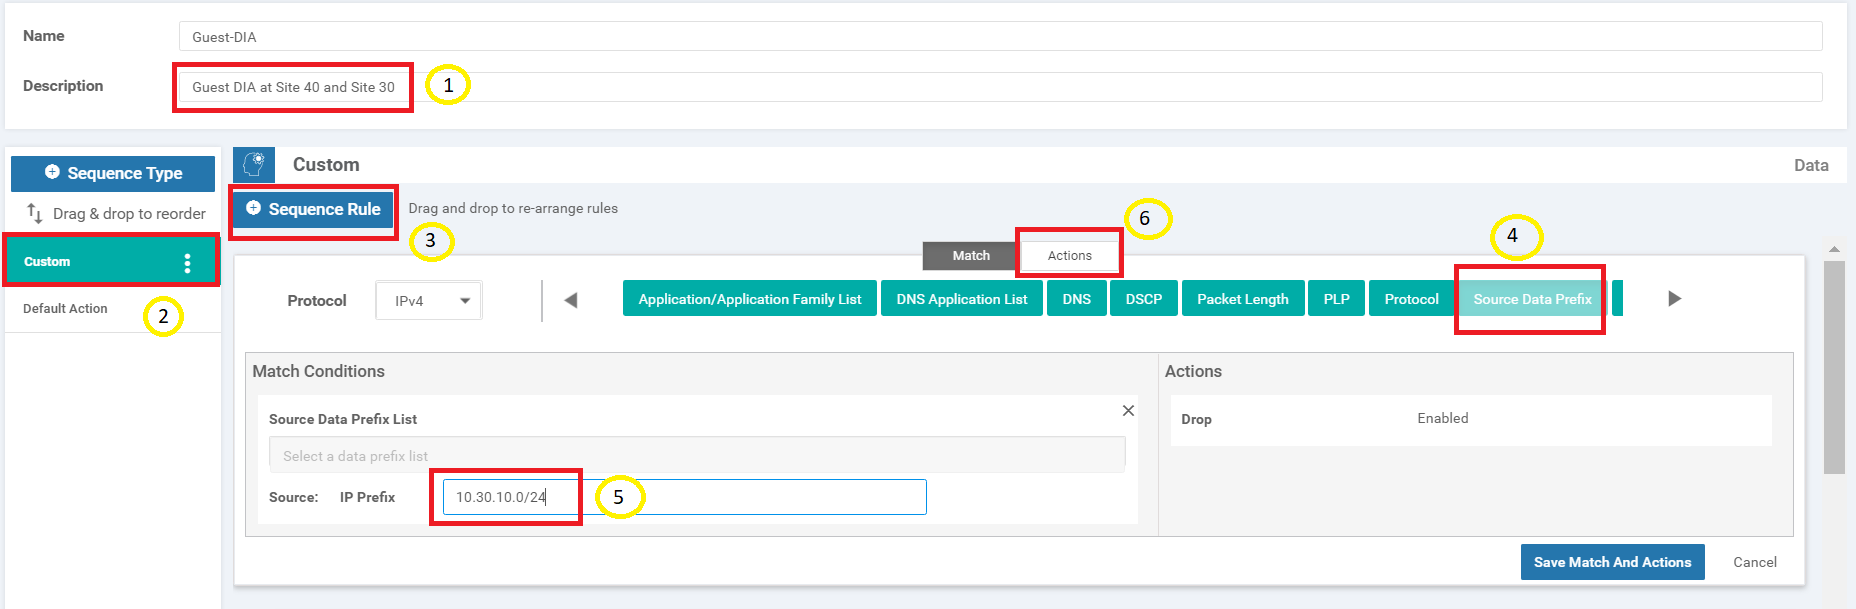
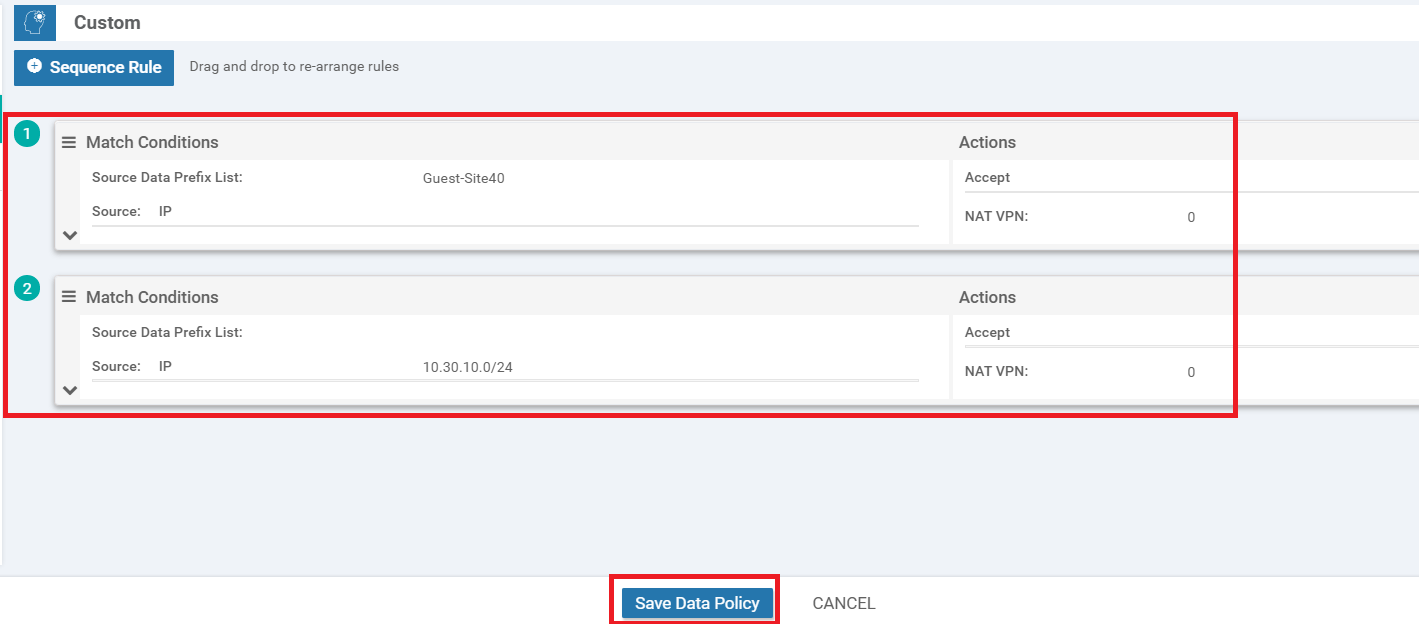
Update the Description to Guest DIA at Site 40 and Site 30 and make sure you’re on the Custom Sequence Type. Click on Sequence Rule to add a new rule and select Source Data Prefix under Match (might need to use the scroll buttons so that the option becomes visible). Enter a Source: IP Prefix of 10.30.10.0/24 and click on Actions
-
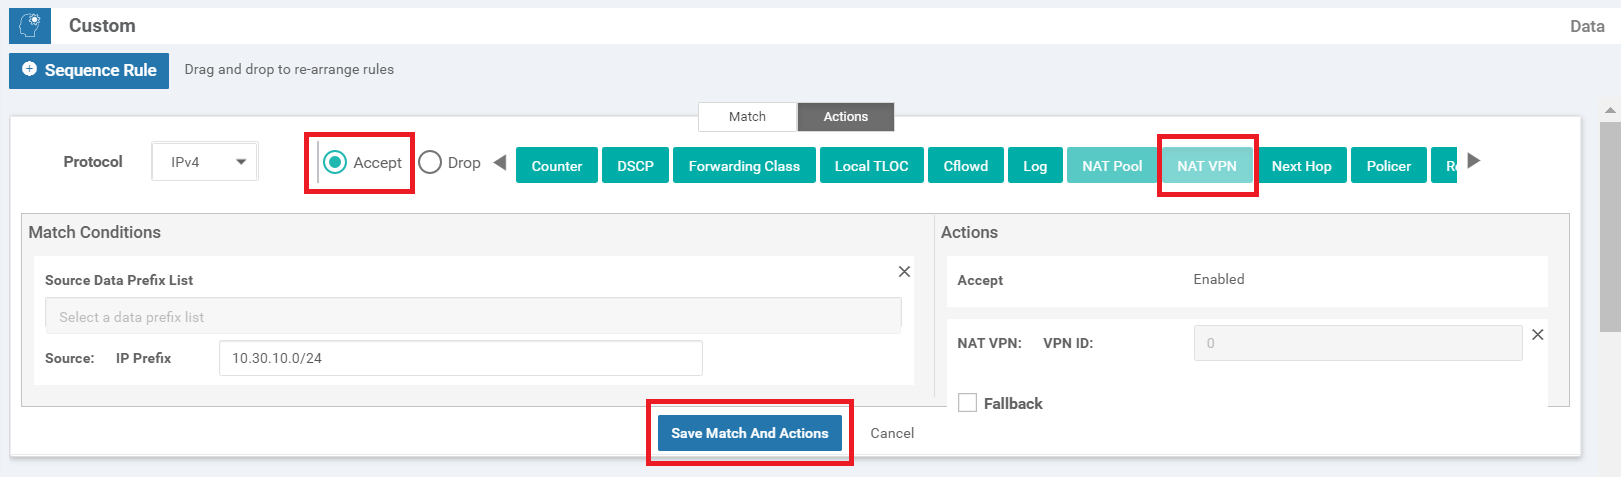
Select the Accept radio button and choose NAT VPN. Click on Save Match and Actions to save this rule
-
Make sure that there are two rules under the Custom Sequence Type. One rule is for Site 40 DIA and the other is for Site 30 VPN 10 (10.30.10.0/24) DIA. Click on Save Data Policy
-
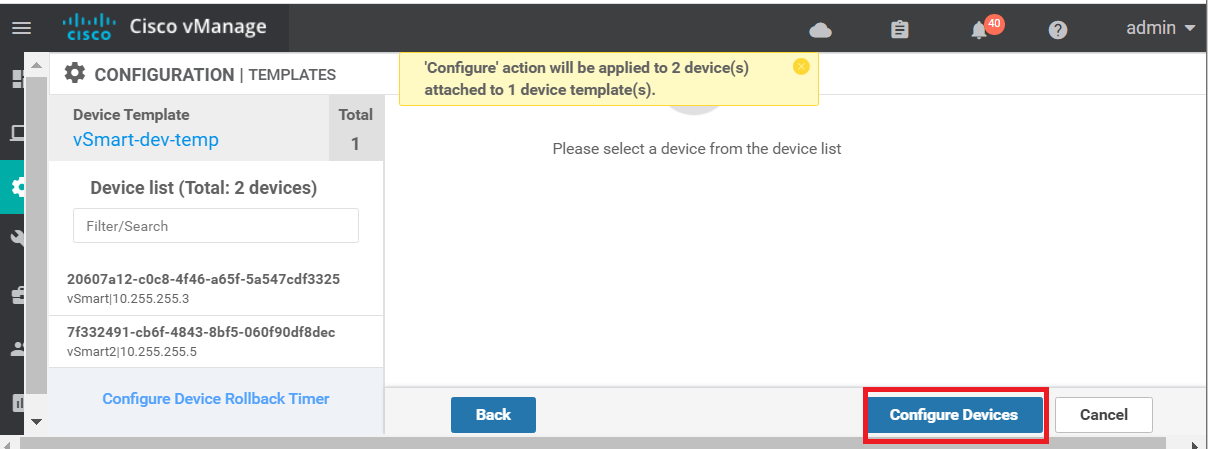
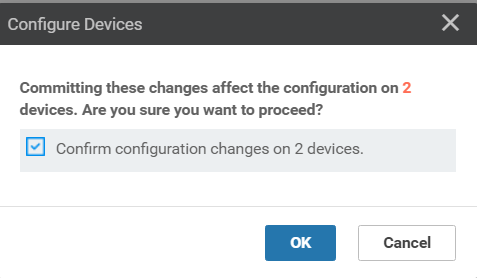
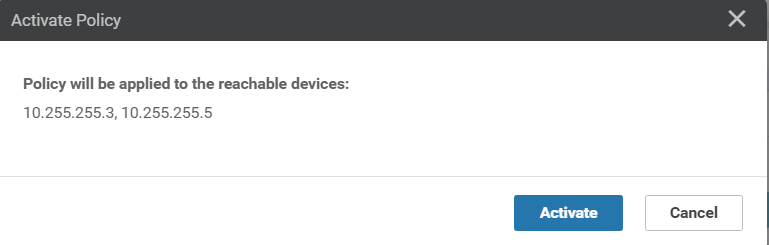
Click on Activate and then Configure Devices. Confirm the configuration change and click on OK

-
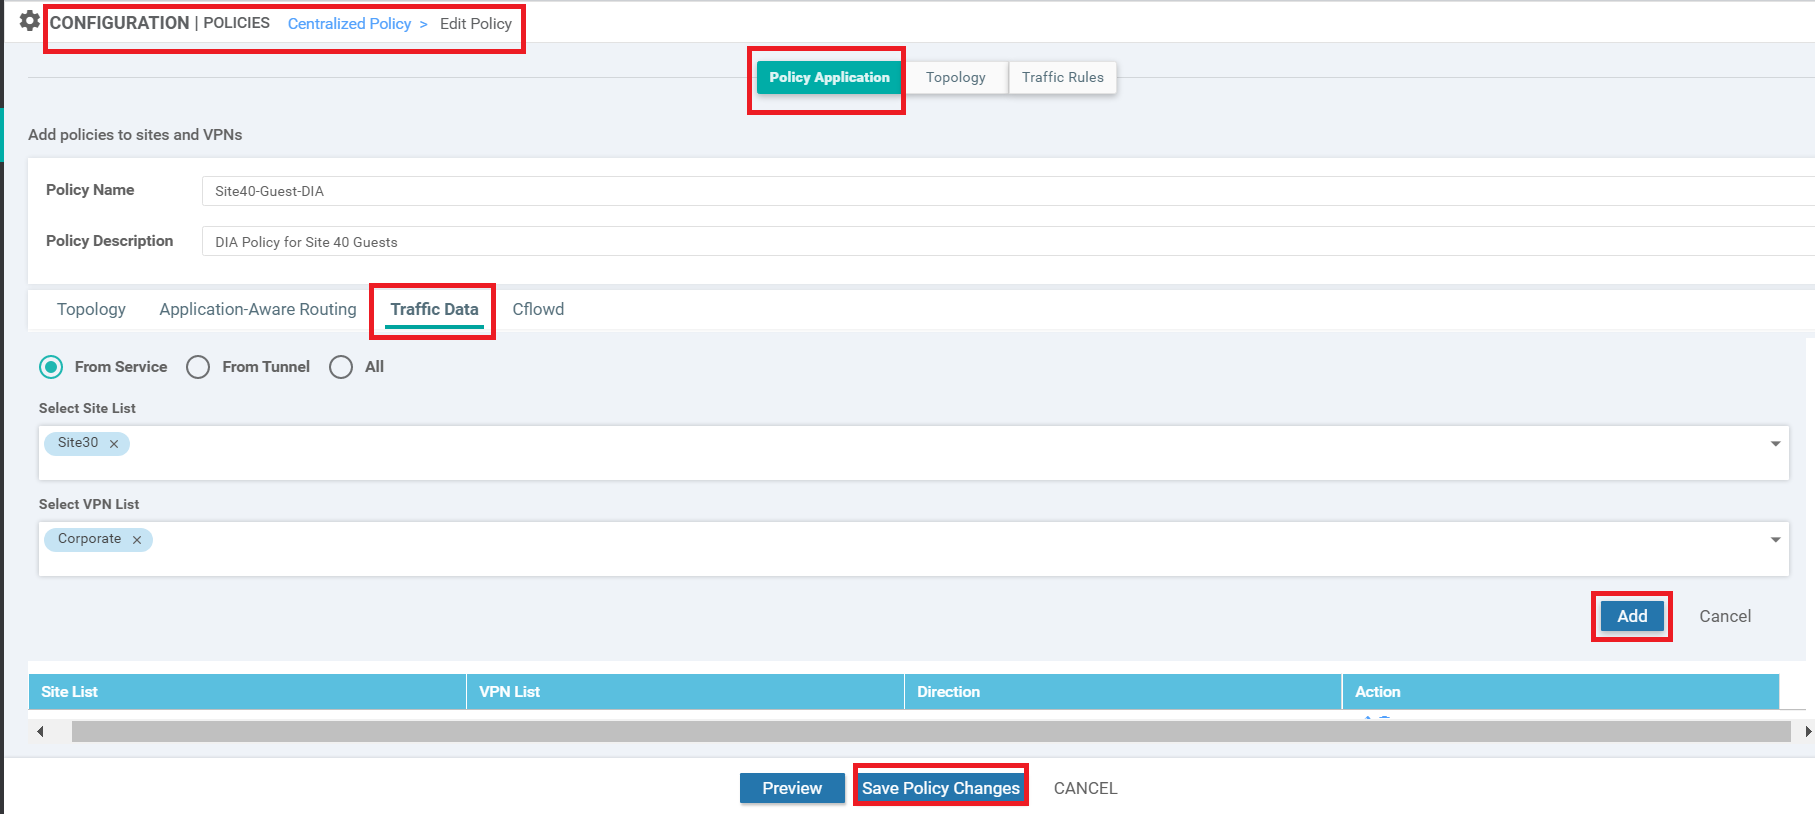
Once the configuration change has been pushed successfully, navigate to Configuration => Policies and click on the three dots next to the Site40-Guest-DIA policy. Choose to Edit it. Make sure you’re on the Policy Application page and click on the Traffic Data tab. Click on New Site List and VPN List. Leave the From Service radio button checked and click on the Select Site List box. Choose Site30. Click on the Select VPN List box and choose Corporate. Click on Add. Click on Save Policy Changes to save the changes we just made
-
Choose to Activate the configuration
-
Go to the Site 30 PC via your chosen connection method (Guacamole/RDP/vCenter Console) and open Command Prompt (Start => type cmd => click on Command Prompt). Type
ping 8.8.8.8and hit Enter. Pings should work. To verify DNS resolution, typeping www.cisco.comand hit Enter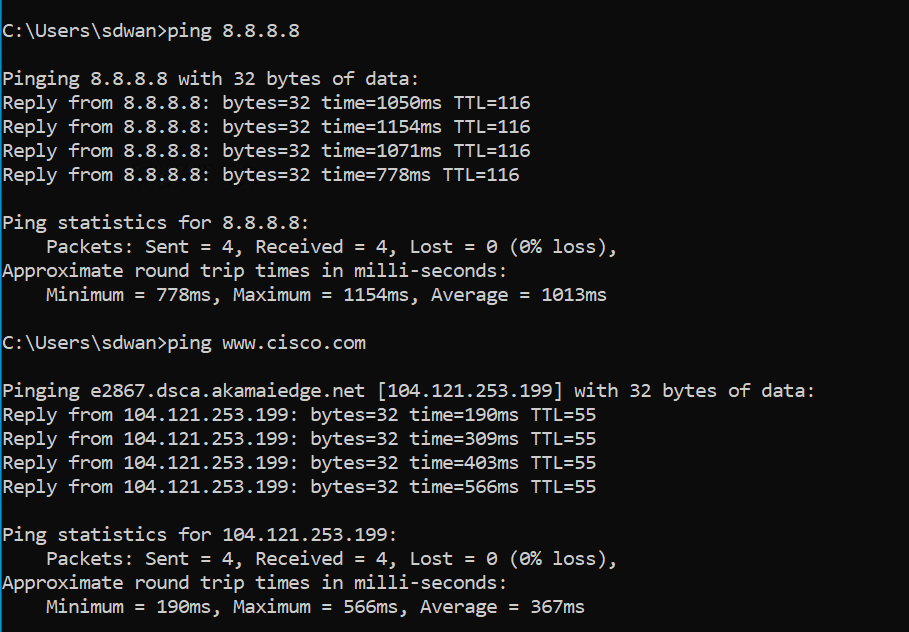
We have enabled DIA at Site 30 for VPN 10. This will be used to showcase DNS security provided by Umbrella. Once we proceed through the lab activity and have set up Tunnels to Umbrella, the DIA configuration will be removed to force traffic out the tunnels.
-
-
-
- Life without Cisco Umbrella
- Basic Configuration for Umbrella
- Configuring WAN Edge Umbrella Redirection
- Making Umbrella Ours
- API Keys and AD Configuration
- DC Configuration Download
- AD Connectors
- Roaming Computer Configuration
- Building a DNS Policy
- Setting up IPSEC Tunnels
- Configuring a Firewall Policy
- Configuring a Web Policy
Life without Umbrella
As of now, the Site 30 PC has connectivity to the Internet and is pointing to the DNS Server of 10.30.10.50. DNS Queries sent to this DNS Server are redirected to 8.8.8.8 or 4.2.2.2. We will run a quick check from our Site 30 PC to verify that we are NOT connected to Cisco Umbrella as of now.
-
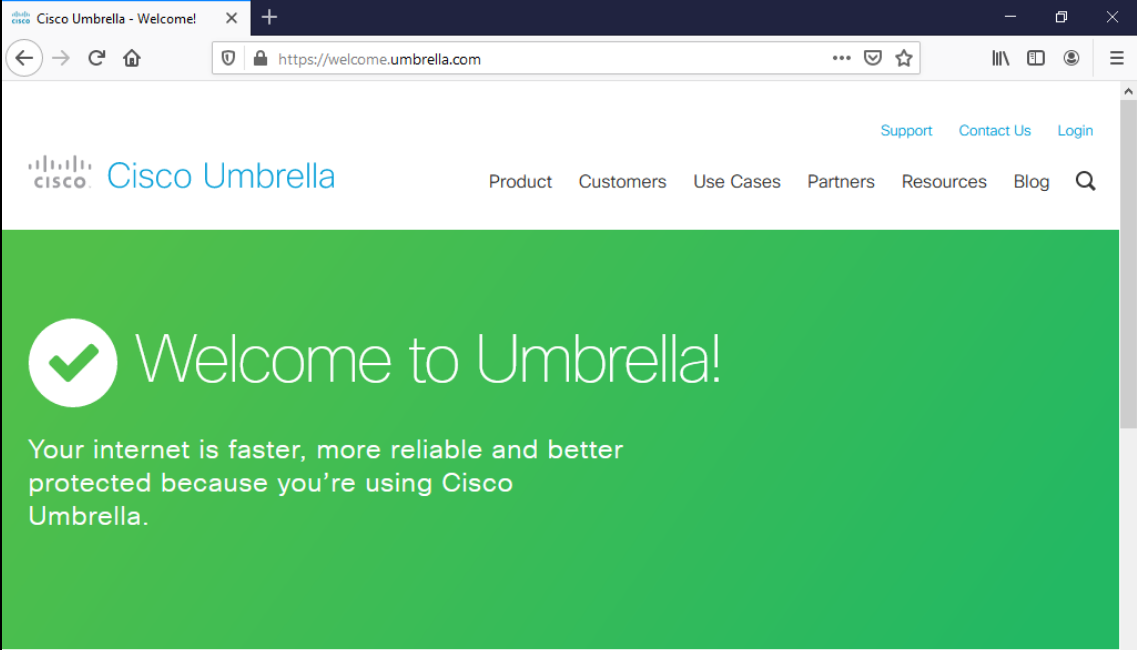
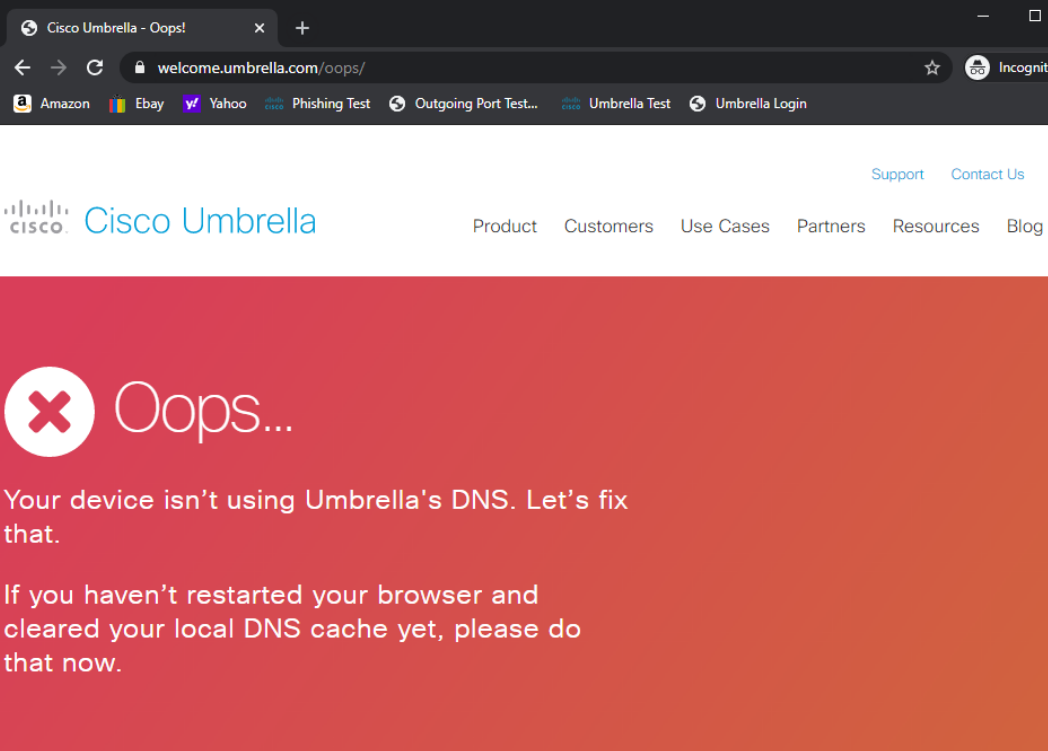
Access the Site 30 PC via your preferred method (Guacamole/RDP/vCenter Console). Click here and go through Step 1 to review how to connect to the Site 30 PC. Open a browser of your choice (Firefox and Chrome should be available) and go to welcome.umbrella.com. You can also use the bookmark for Umbrella Test
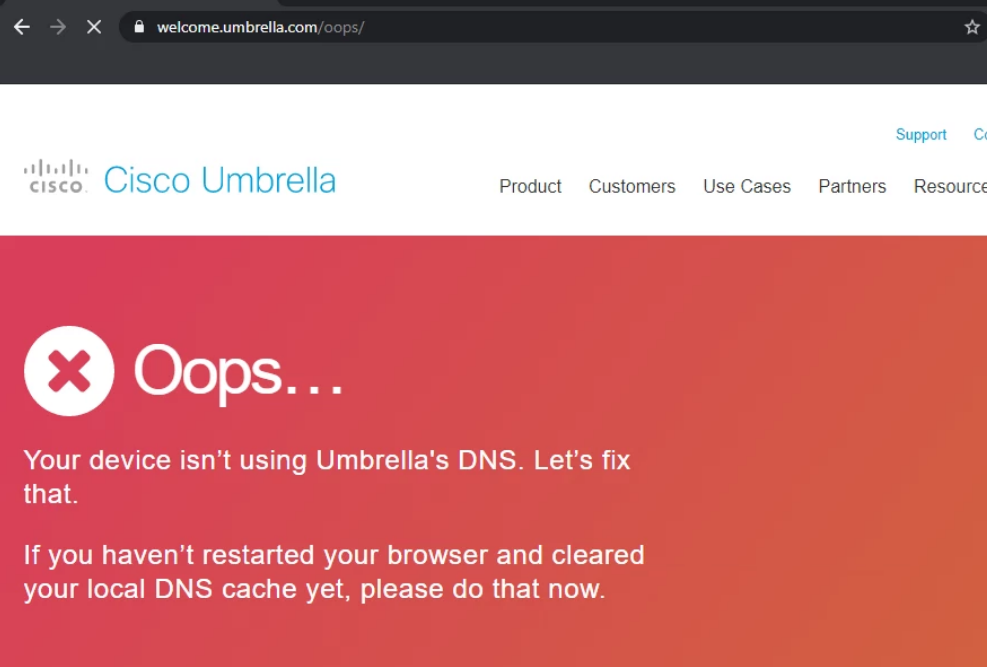
The Umbrella page should display the image shown above. This is an indication that our network isn’t protected by Umbrella (yet).
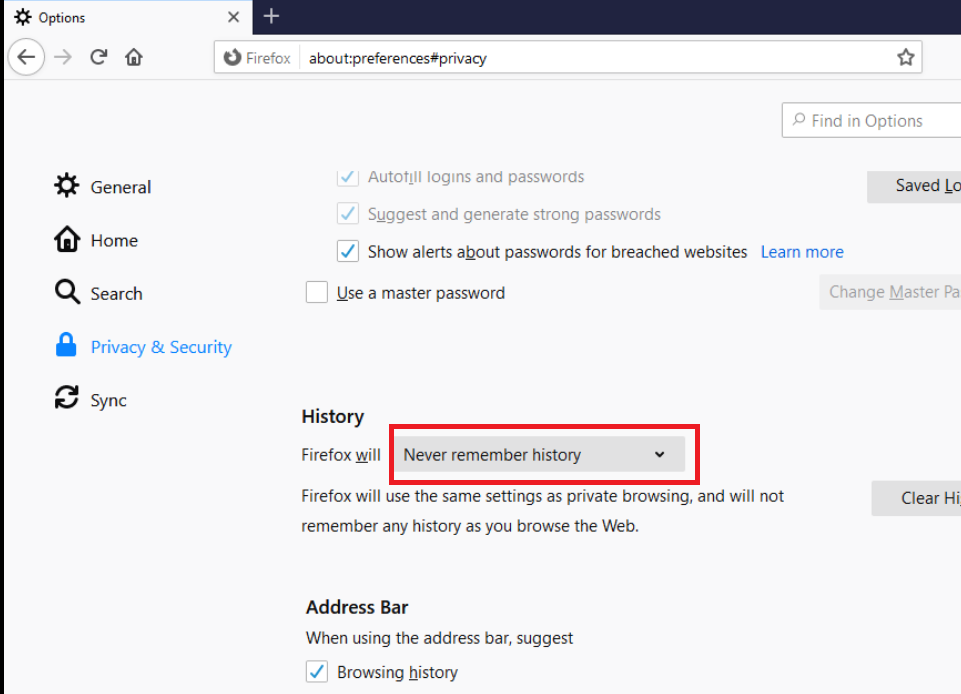
If using Firefox, make sure to change the browser Options for Privacy and Security, setting Firefox to Never remember history. This will require a browser restart
-
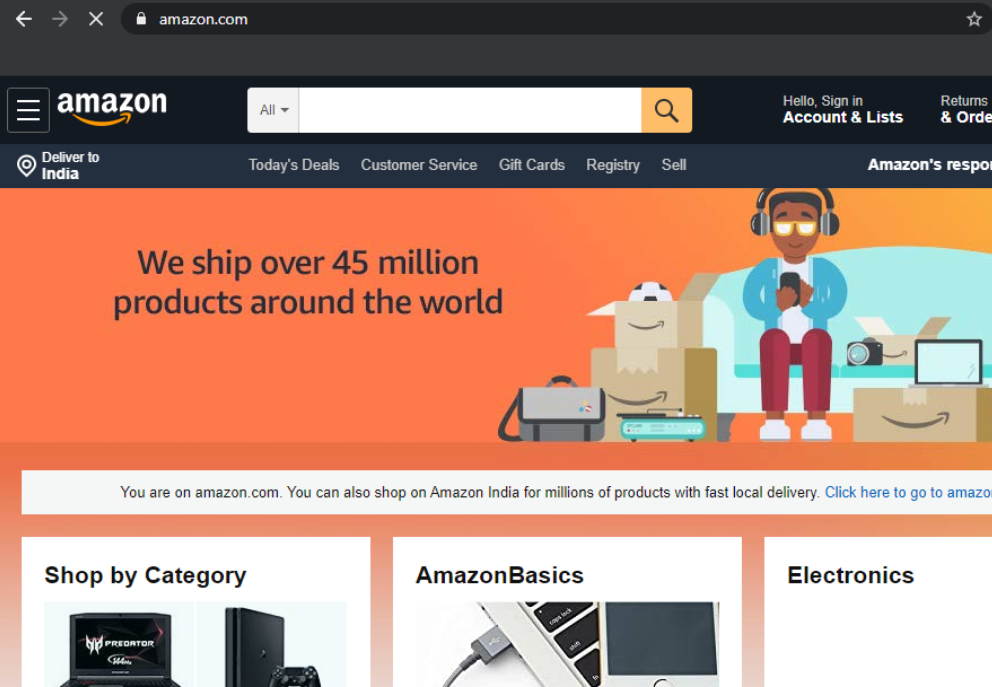
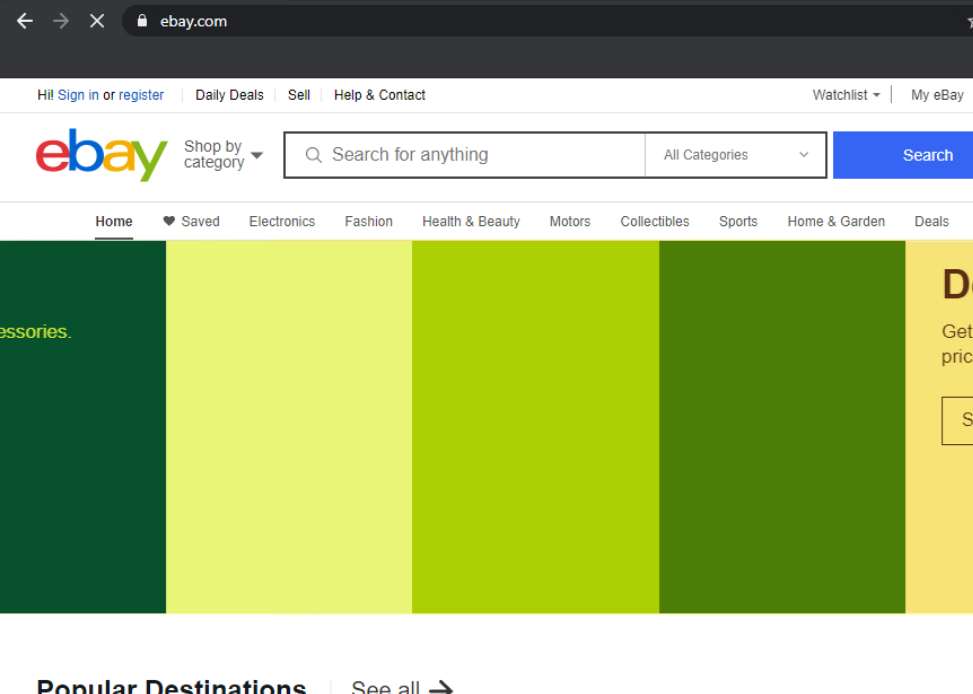
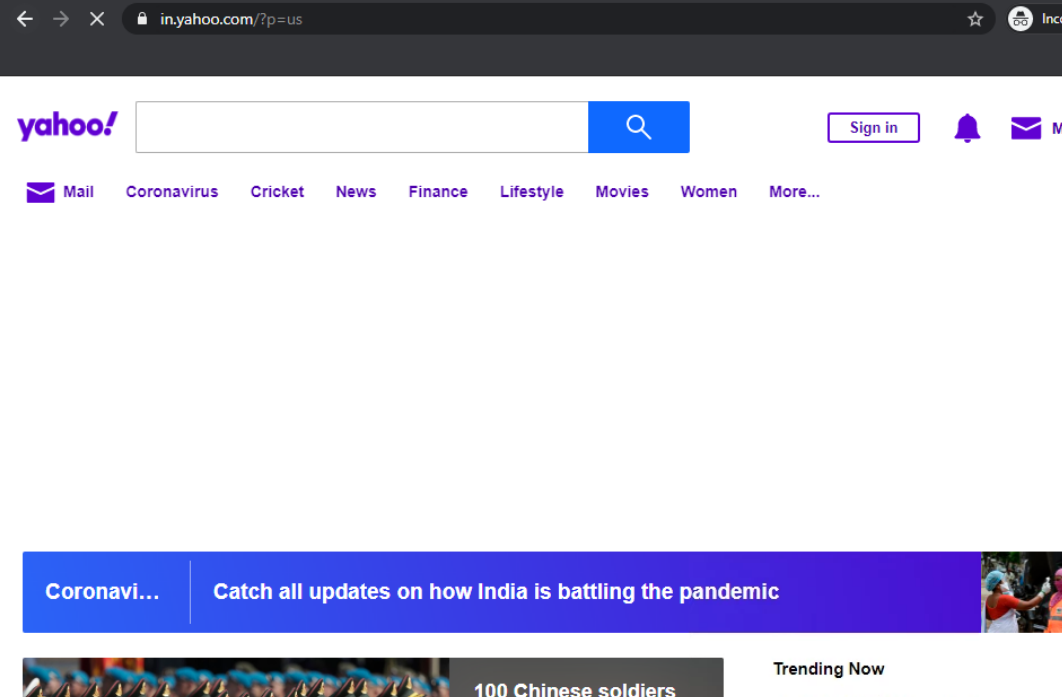
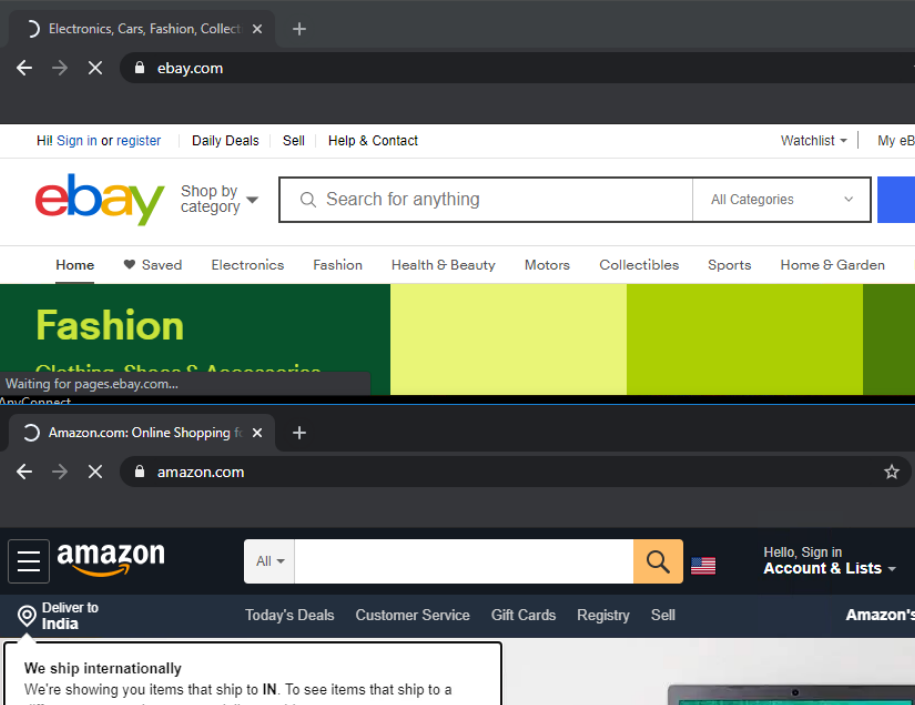
Access websites like www.amazon.com, www.ebay.com and www.yahoo.com by typing them out in the browser or by using the handy bookmarks available. All the sites should be accessible since we don’t have any sort of access control/filtering enabled as of now
-
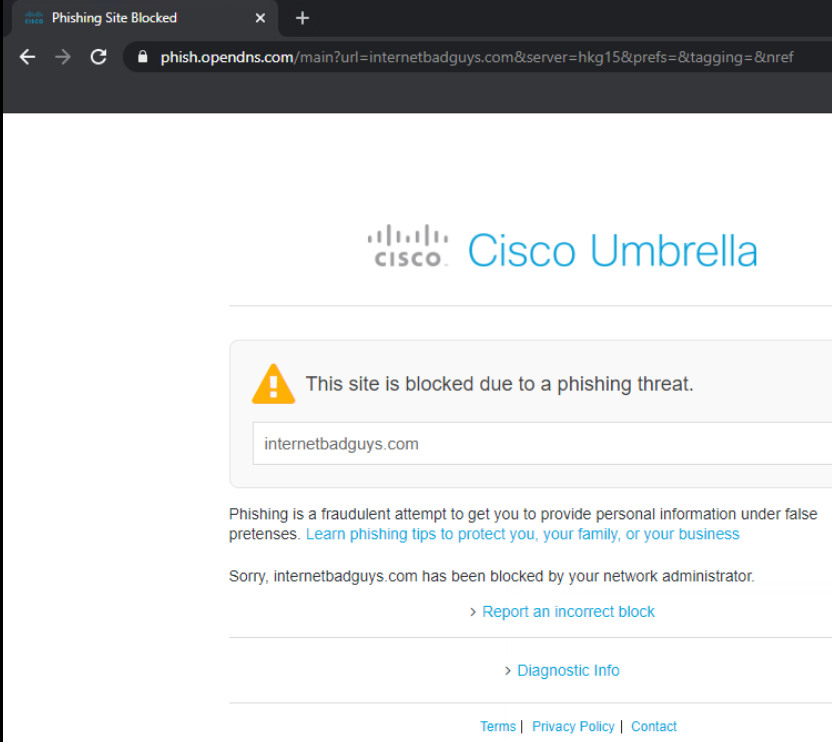
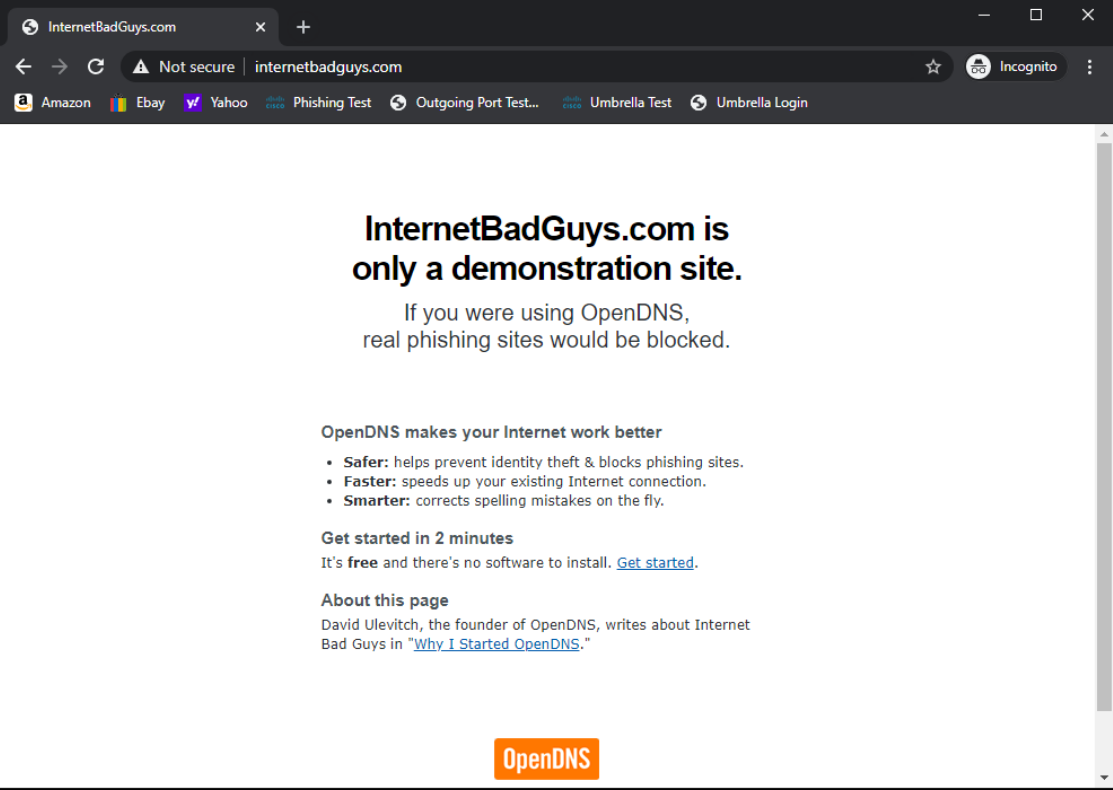
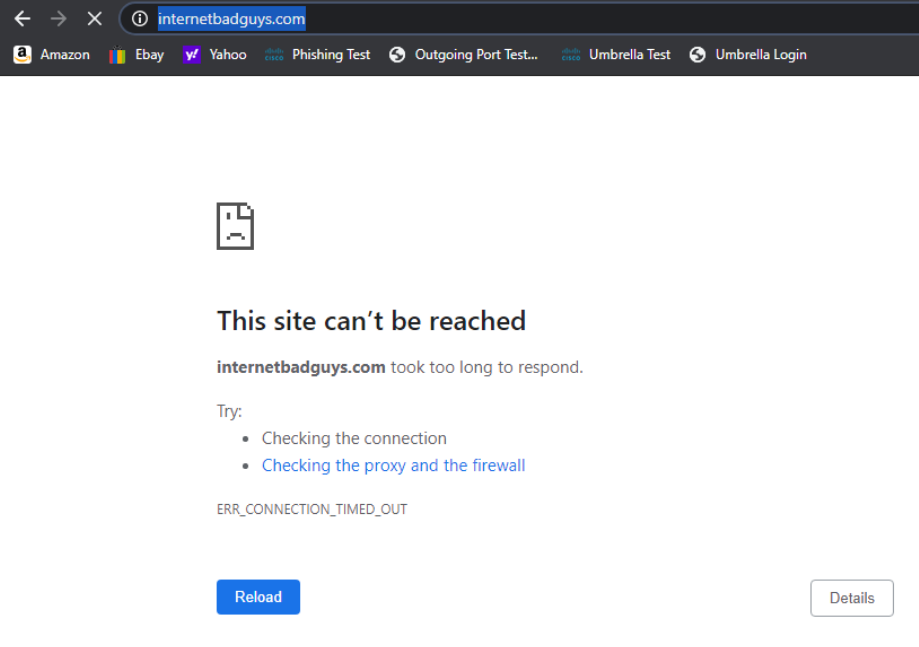
Access internetbadguys.com by typing it out in the browser or using the bookmark. This is a website that simulates a phishing attack. Since we aren’t protected, the website pops right up
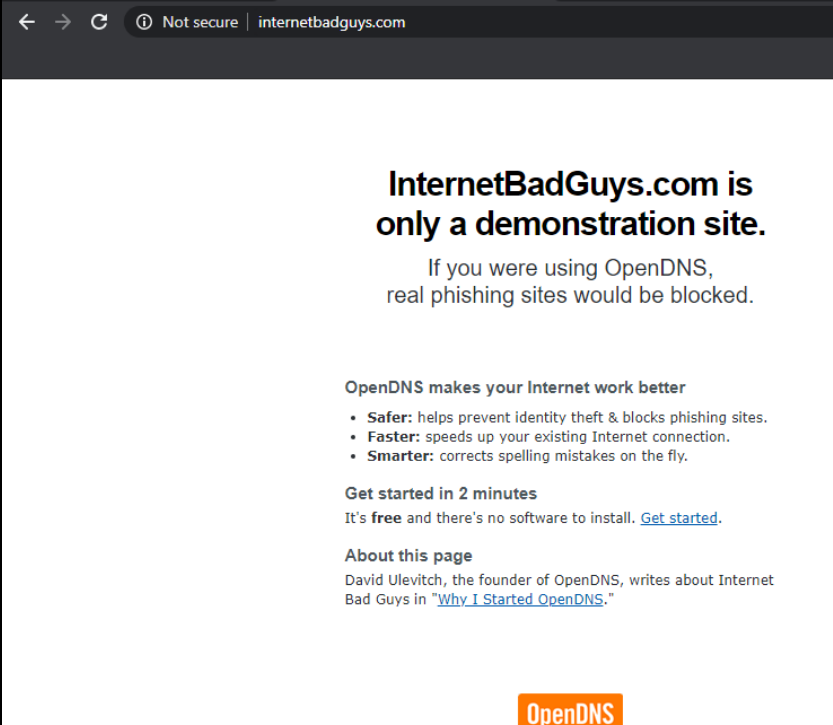
Life without Umbrella doesn’t look too good since we are open to the simplest of phishing attacks. We will be incorporating a fundamental layer of protection in our network followed by a more elaborate DNS Policy, Cloud Delivered Firewall and Secure Web Gateway solution.
-
-
-
-
- Basic Configuration for Umbrella
- Configuring WAN Edge Umbrella Redirection
- Making Umbrella Ours
- API Keys and AD Configuration
- DC Configuration Download
- AD Connectors
- Roaming Computer Configuration
- Building a DNS Policy
- Setting up IPSEC Tunnels
- Configuring a Firewall Policy
- Configuring a Web Policy
Basic Configuration for Umbrella
Let’s start off by giving some basic DNS-layer Security to our devices.
-
Connect to the sdwan-sjc/ghi-ad-podX machine by logging in to Guacamole (10.2.1.20X:8080/guacamole if connected to the GHI DC and 10.1.8.20X:8080/guacamole if connected to the SJC DC, where X is your POD number) with the credentials given below and click on the PODX-AD option.
Alternatively, you can RDP to 10.2.1.18X if connected to the GHI DC and 10.1.8.18X if connected to the SJC DC (where X is your POD number) from the Jumphost. RDP to the AD PC will only work from the Jumphost
Connection Method Username Password Guacamole sdwanpod C1sco12345 RDP swatsdwanlab\Administrator C1sco12345 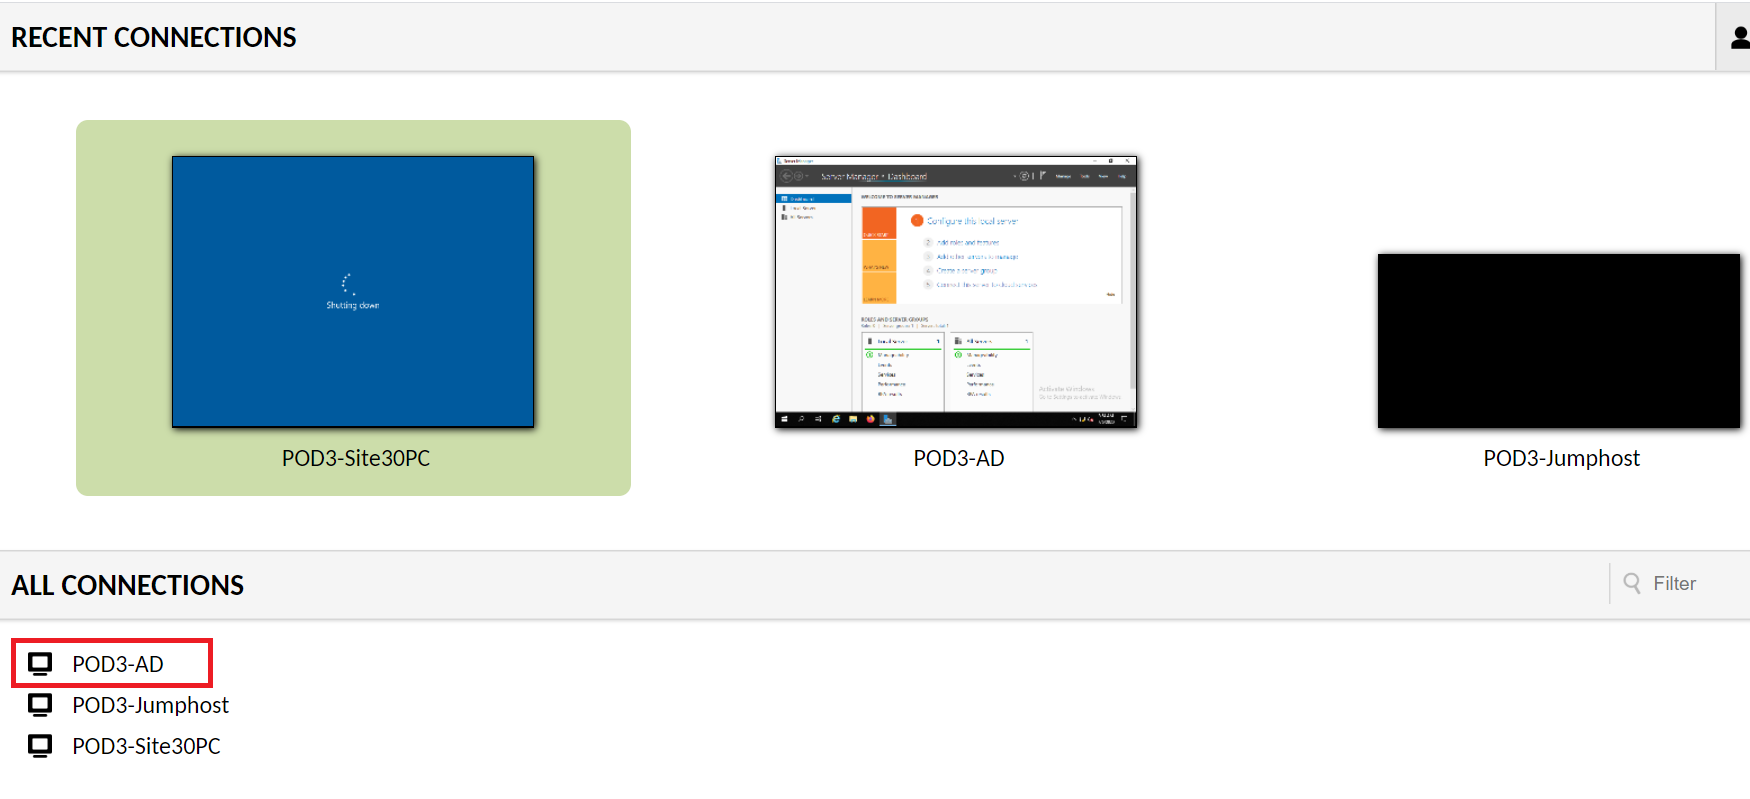
vCenter (accessible via the bookmark or 10.2.1.50/ui if connected to the GHI DC and 10.1.1.50/ui if connected to the SJC DC and the credentials provided for your POD) can also be used to console to the AD PC
-
Depending on the connection method, you may need to enter credentials again to log in to the AD PC. Please enter the credentials shown below, if prompted
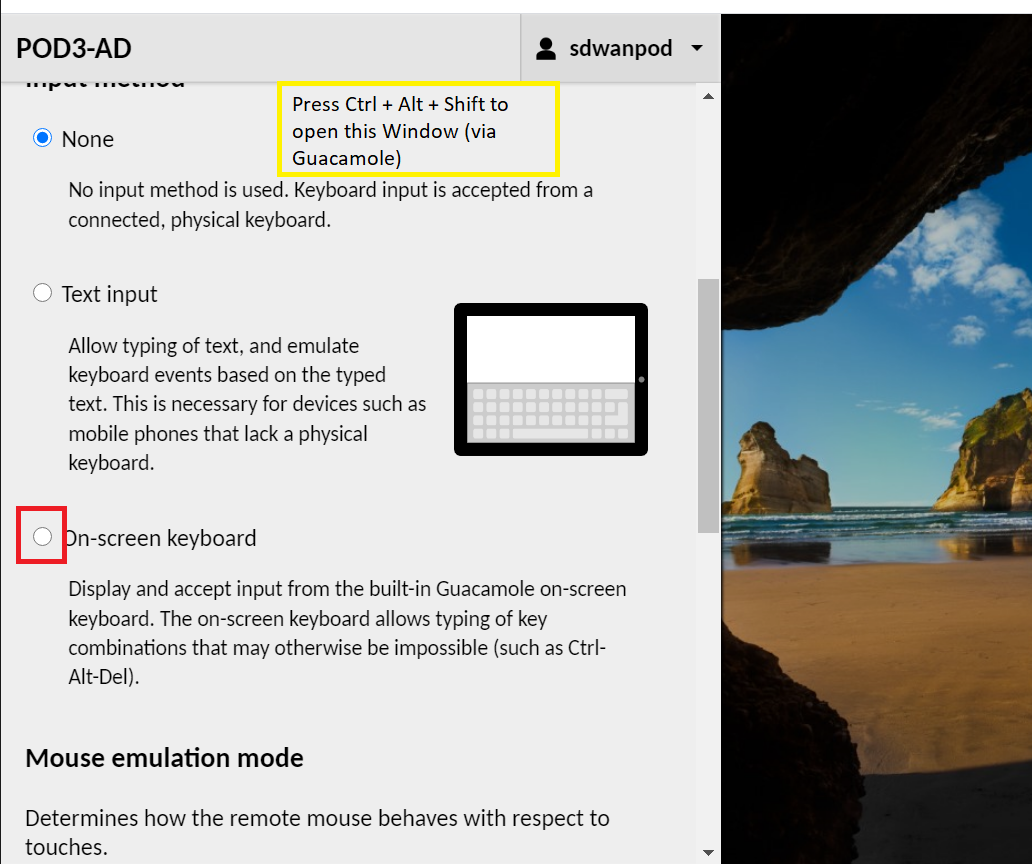
Connection Method Username Password Guacamole Not Required Not Required RDP swatsdwanlab\Administrator C1sco12345 vCenter swatsdwanlab\Administrator C1sco12345 If using Guacamole to access the AD PC, you will be notified to press Ctrl + Alt + Del to unlock the computer. Guacamole doesn’t have an option to send key combinations. We use the Guacamole virtual keyboard to send Ctrl + Alt + Del. While on the Guacamole window, press Ctrl + Alt + Shift together. This will open the Guacamole settings window. Choose On-screen keyboard under Input Method and it should display the virtual keyboard. Using the mouse, click on Ctrl, then Alt, then Del
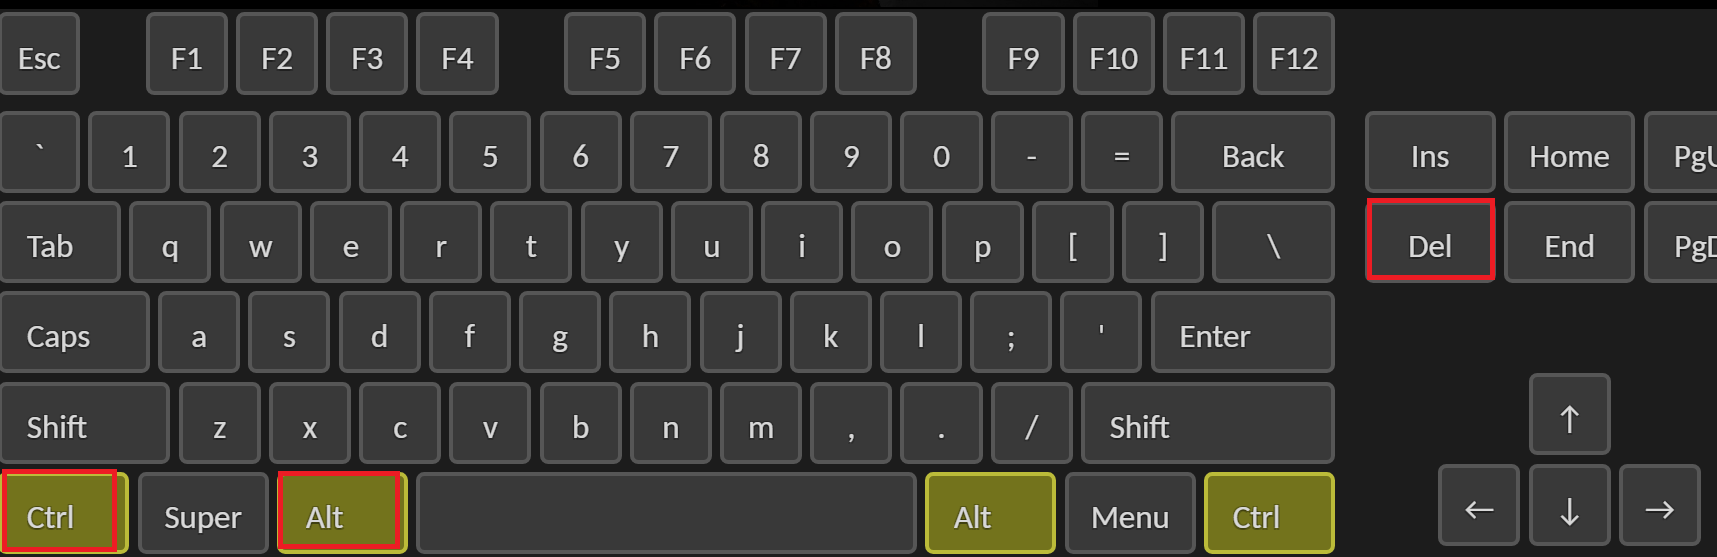
This will bring you to the login screen. Press Ctrl + Alt + Shift on your keyboard to bring up the Guacamole settings window again and choose None for the Input Method
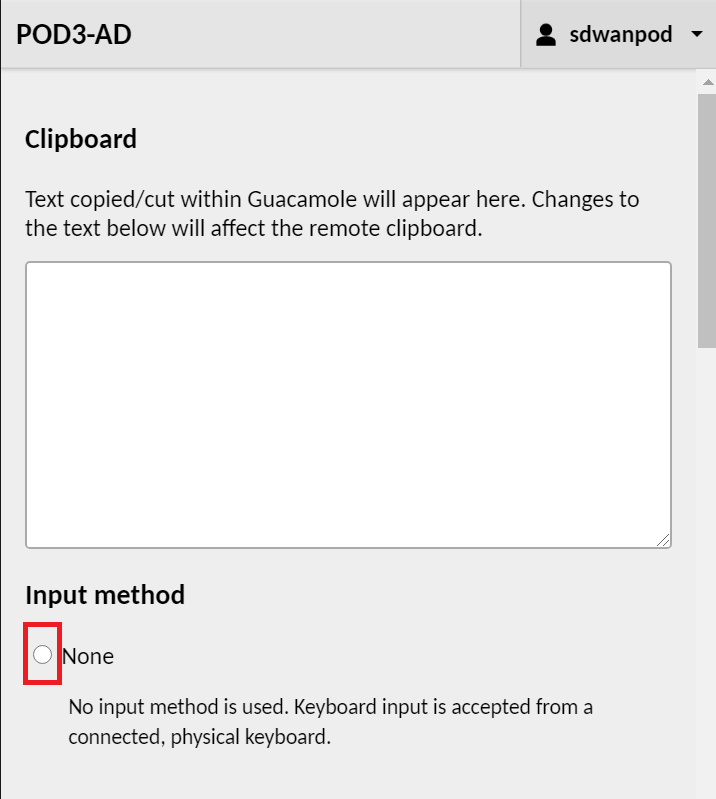
This will remove the virtual keyboard from the screen and you can continue typing like normal to enter the password.
-
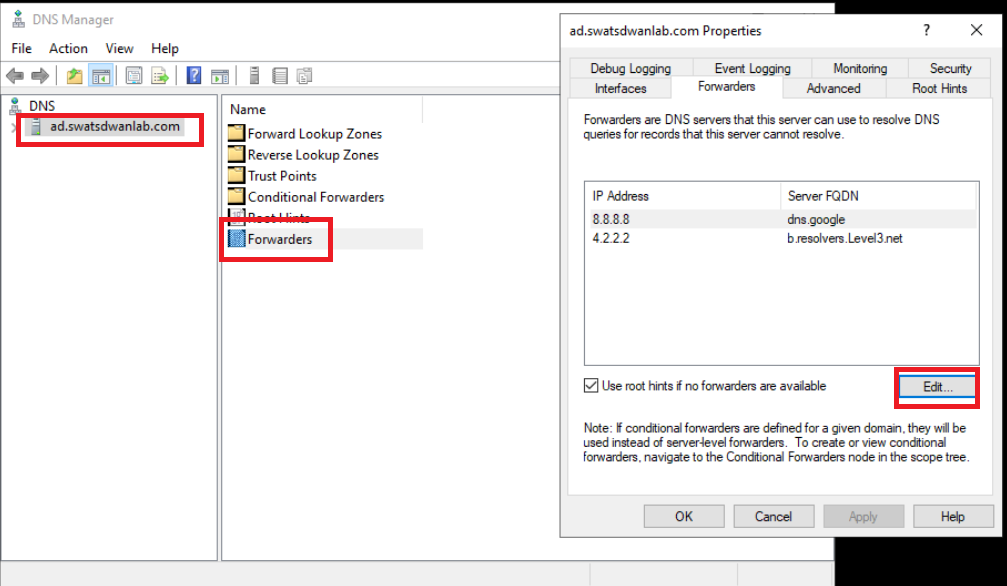
Once logged in to the AD PC, click on Start and search for DNS. Open the DNS application

-
Select ad.swatsdwanlab.com and double-click Forwarders. There will be two Forwarders listed (8.8.8.8 and 4.2.2.2). Click on Edit
-
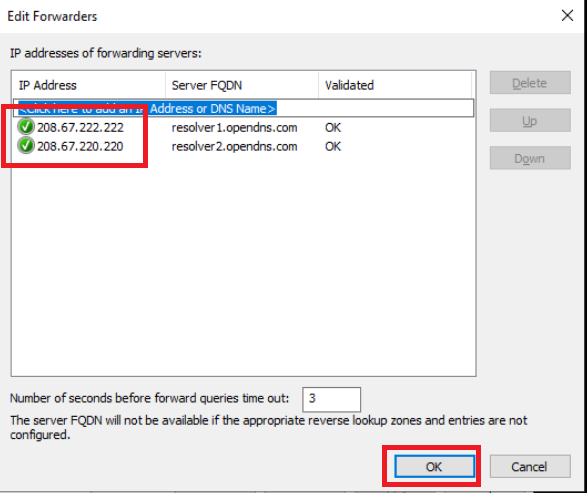
Change the Forwarder IPs to 208.67.222.222 and 208.67.220.220. Make sure no other Forwarders are present on this window. Click on OK
-
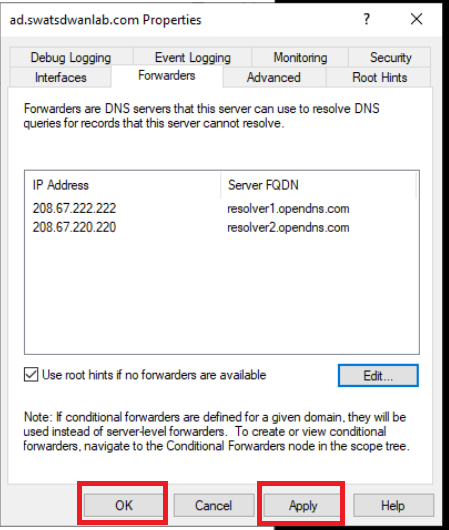
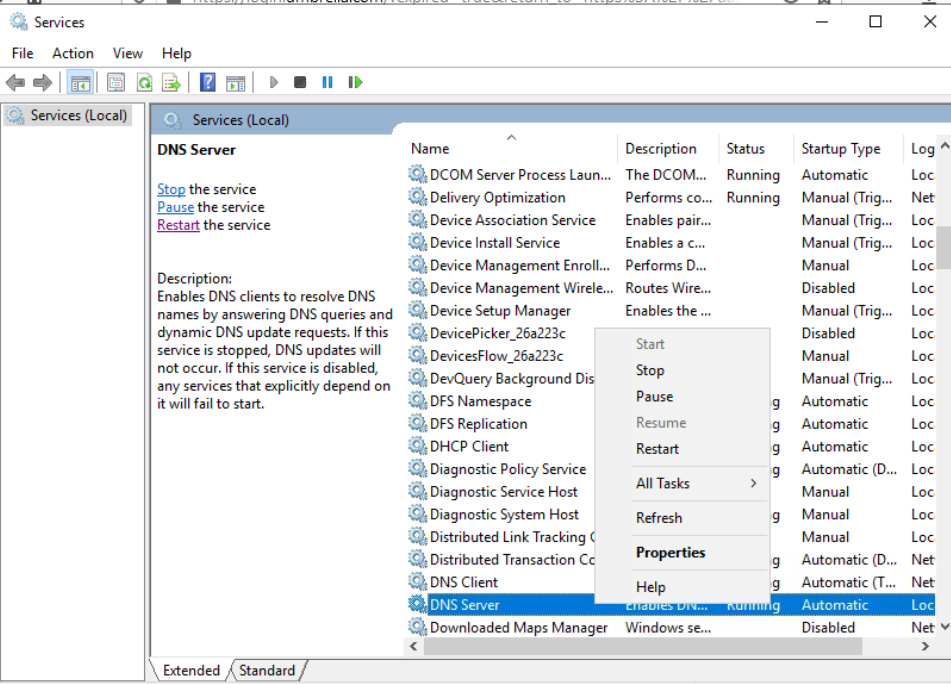
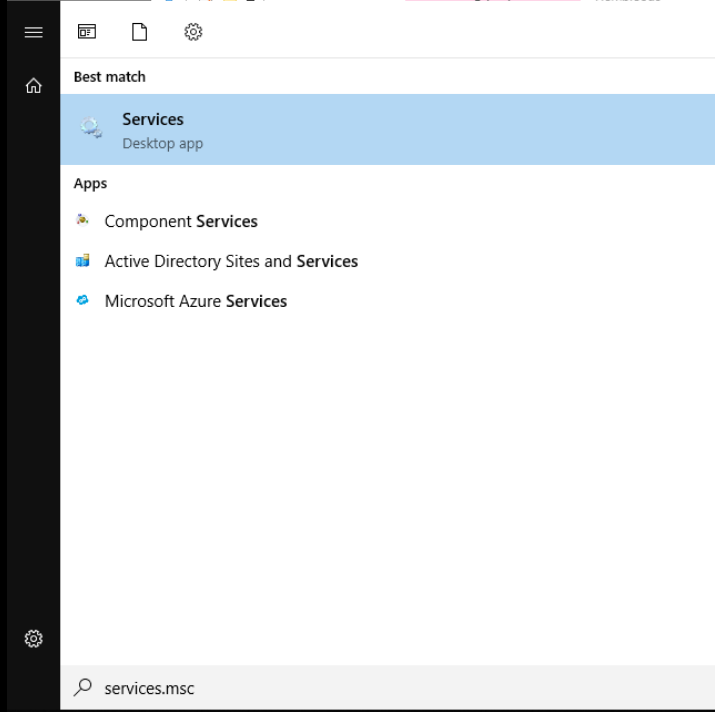
Click on Apply and then OK to apply the configuration change. Click on Start and type services.msc. Hit Enter and look for the DNS Server service. Right click on it and restart the service
-
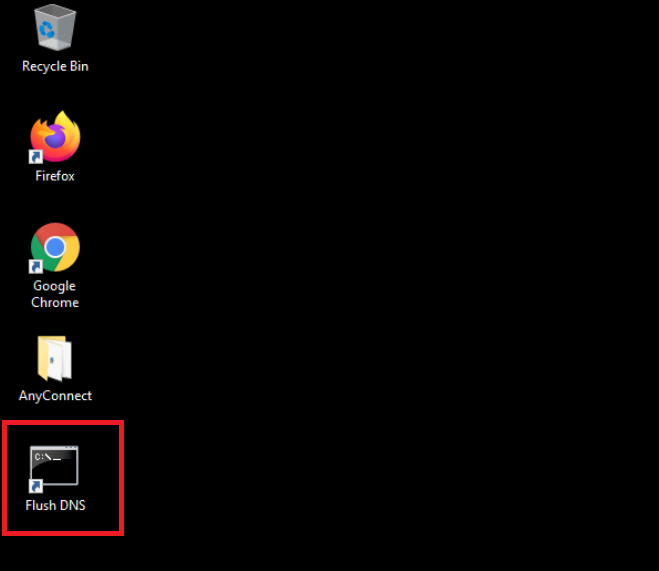
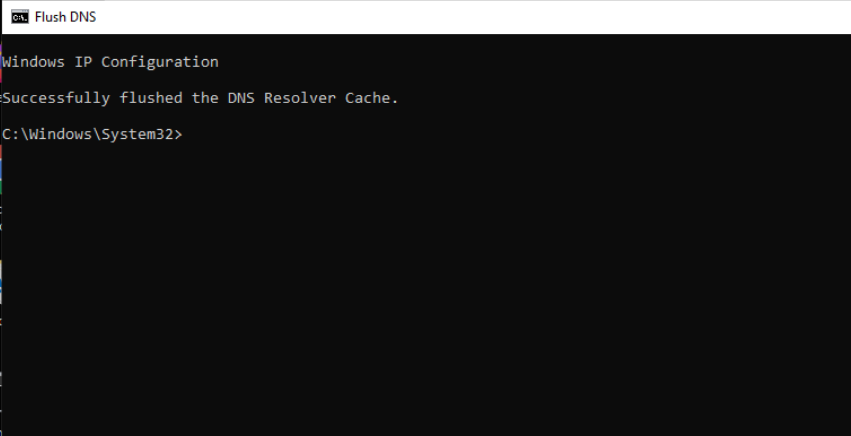
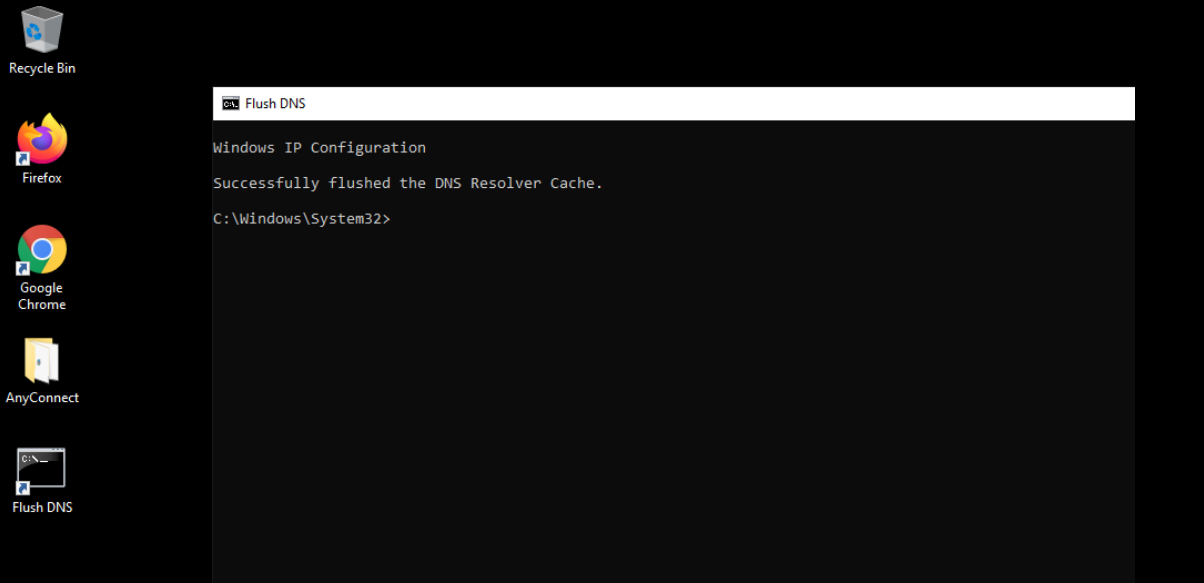
Head back to the Site 30 PC and click on the Flush DNS shortcut on the Desktop

-
Close any open browsers and re-open the browser. Go to welcome.umbrella.com or use the Umbrella Test bookmark. We should see a Welcome to Umbrella page
-
Access to amazon.com and ebay.com should still be intact, since we haven’t applied any policies yet
-
Enter internetbadguys.com in the browser and the traffic will be blocked. We have thus got a fundamental layer of security by simply pointing our DNS Server to the OpenDNS resolvers
-
-
-
-
-
- Configuring WAN Edge Umbrella Redirection
- Making Umbrella Ours
- API Keys and AD Configuration
- DC Configuration Download
- AD Connectors
- Roaming Computer Configuration
- Building a DNS Policy
- Setting up IPSEC Tunnels
- Configuring a Firewall Policy
- Configuring a Web Policy
Configuring WAN Edge Umbrella Redirection
In this section we will first bypass our Umbrella configuration and then enforce redirection to Umbrella by the WAN Edge. vEdge30 will intercept DNS queries and redirect them to Umbrella.
-
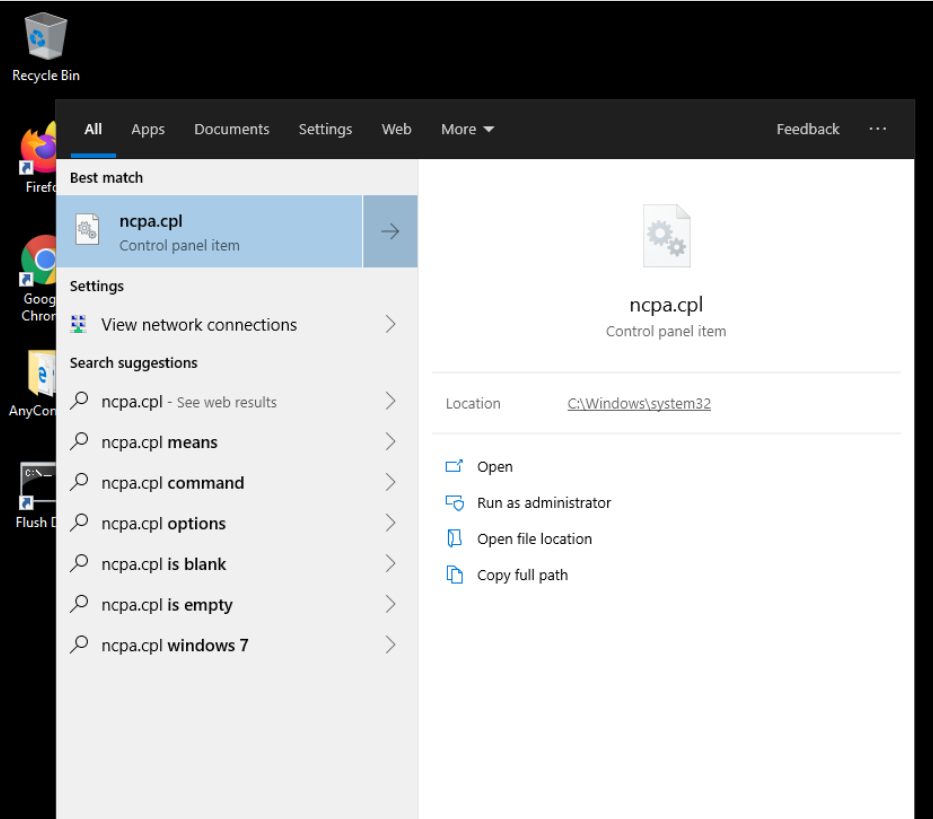
Access the Site 30 PC via your preferred method (Guacamole/RDP/vCenter Console) and log in. Click here and go through Step 1 to review how to connect to the Site 30 PC. Click on Start and search for ncpa.cpl. Open the Network Connections
-
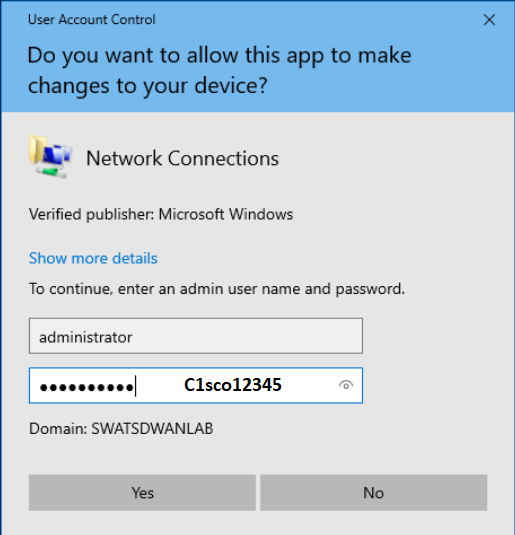
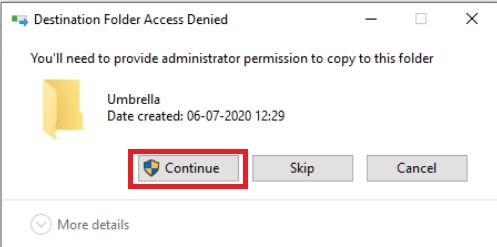
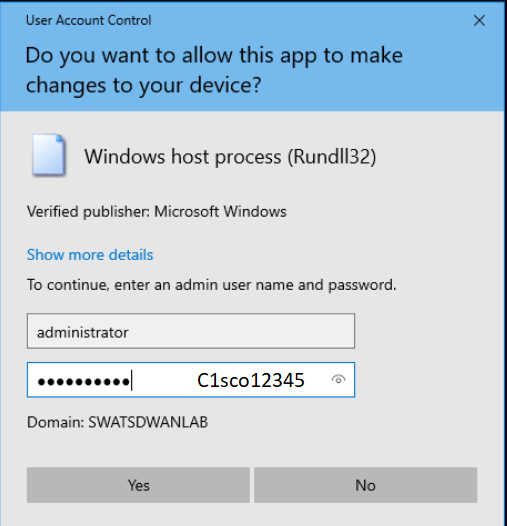
Right click on Ethernet0 and click on Properties. Enter the credentials and click on Yes to proceed
Username Password administrator C1sco12345 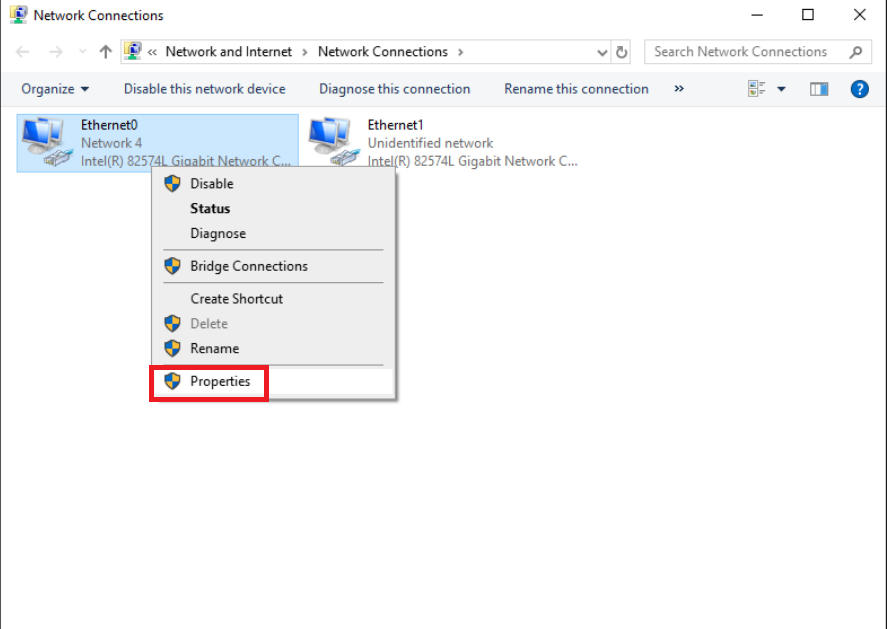
-
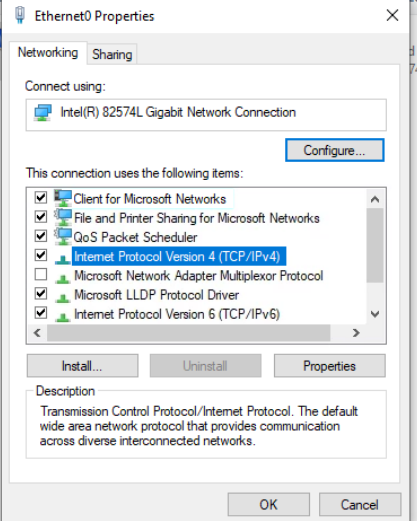
Double click Internet Protocol version 4 (TCP/IPv4) and select the Use the following DNS Server Addresses radio button. Enter DNS Server addresses of 8.8.8.8 and 4.2.2.2. Click on OK on all subsequent windows to apply the configuration change
-
Double click the Flush DNS shortcut on the Site 30 PC desktop and click on the Umbrella Test bookmark in Google Chrome (or go to welcome.umbrella.com) and we will be notified that the system is not protected by Umbrella. Attempt to access internetbadguys.com again (you can use the Phishing Test bookmark). The site should be accessible since we have bypassed Umbrella
 Note: Through this configuration change, we have bypassed the Umbrella DNS Servers completely and thereby circumvented any Umbrella Policies that might be applicable to the organization. We will now ensure that the WAN Edge at Site 30 intercepts DNS queries and redirects them to Umbrella.
 -
Log in to the Umbrella portal from your Jumphost by accessing a browser and navigating to login.umbrella.com. Enter the credentials for your POD and click on Log In
Username Password ghi.pod0X@gmail.com if connected to the GHI DC or slc.pod0X@gmail.com if connected to the SJC DC
X is your POD number
e.g. ghi.pod05@gmail.com is the username for GHI POD 5C1sco@12345 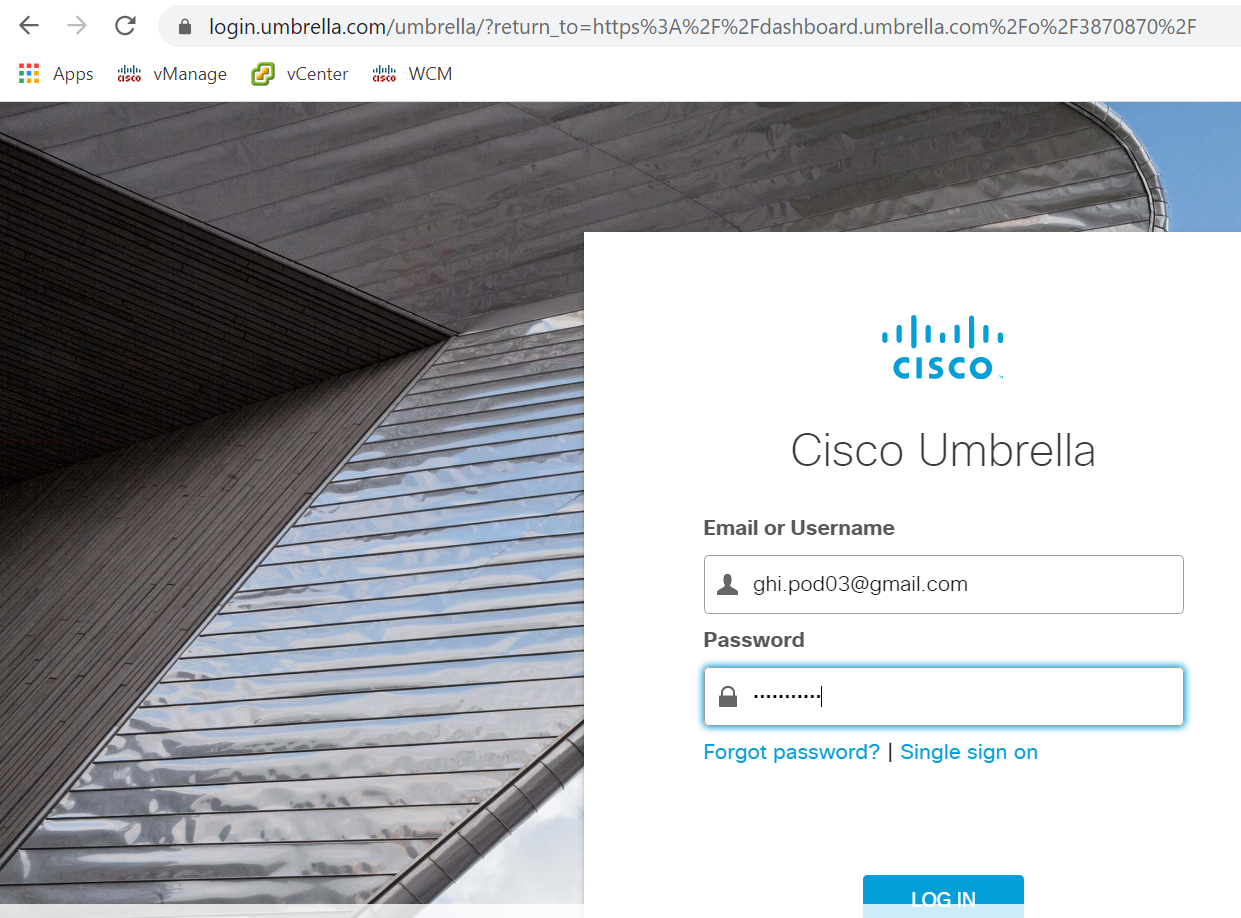
-
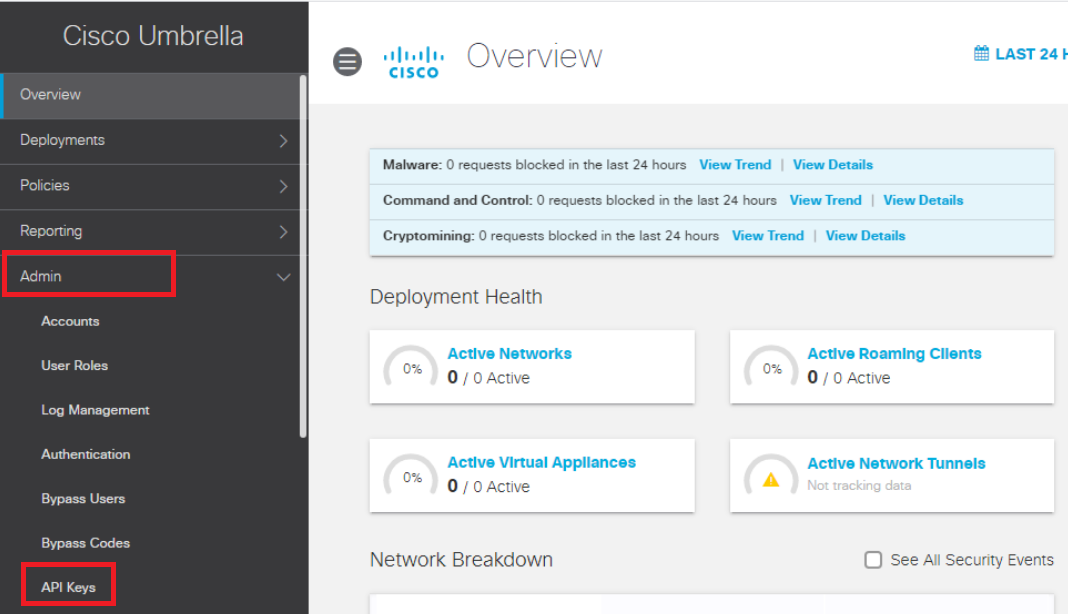
Click on Admin in the left navigation bar and then on API Keys to create new API keys

-
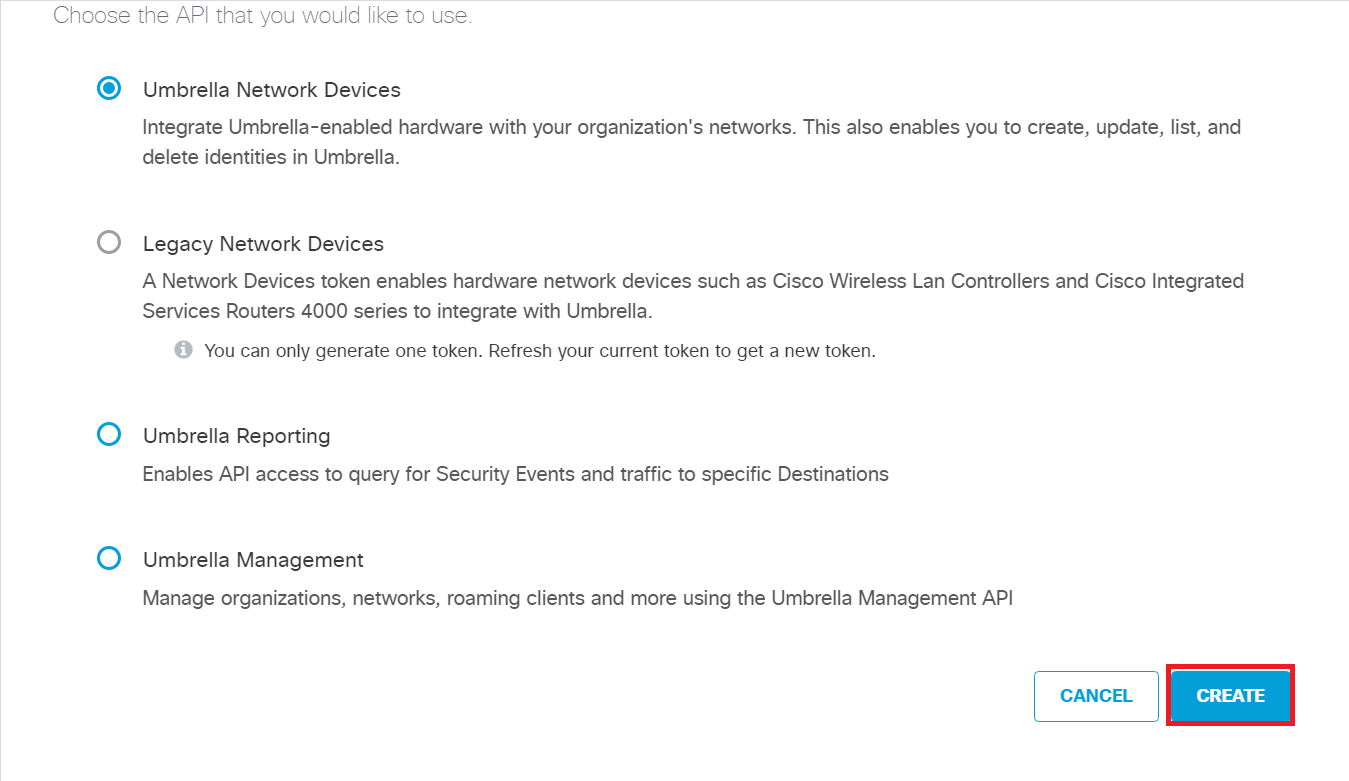
Click on Create and choose Umbrella Network Devices. Click on Create in the bottom right hand corner

-
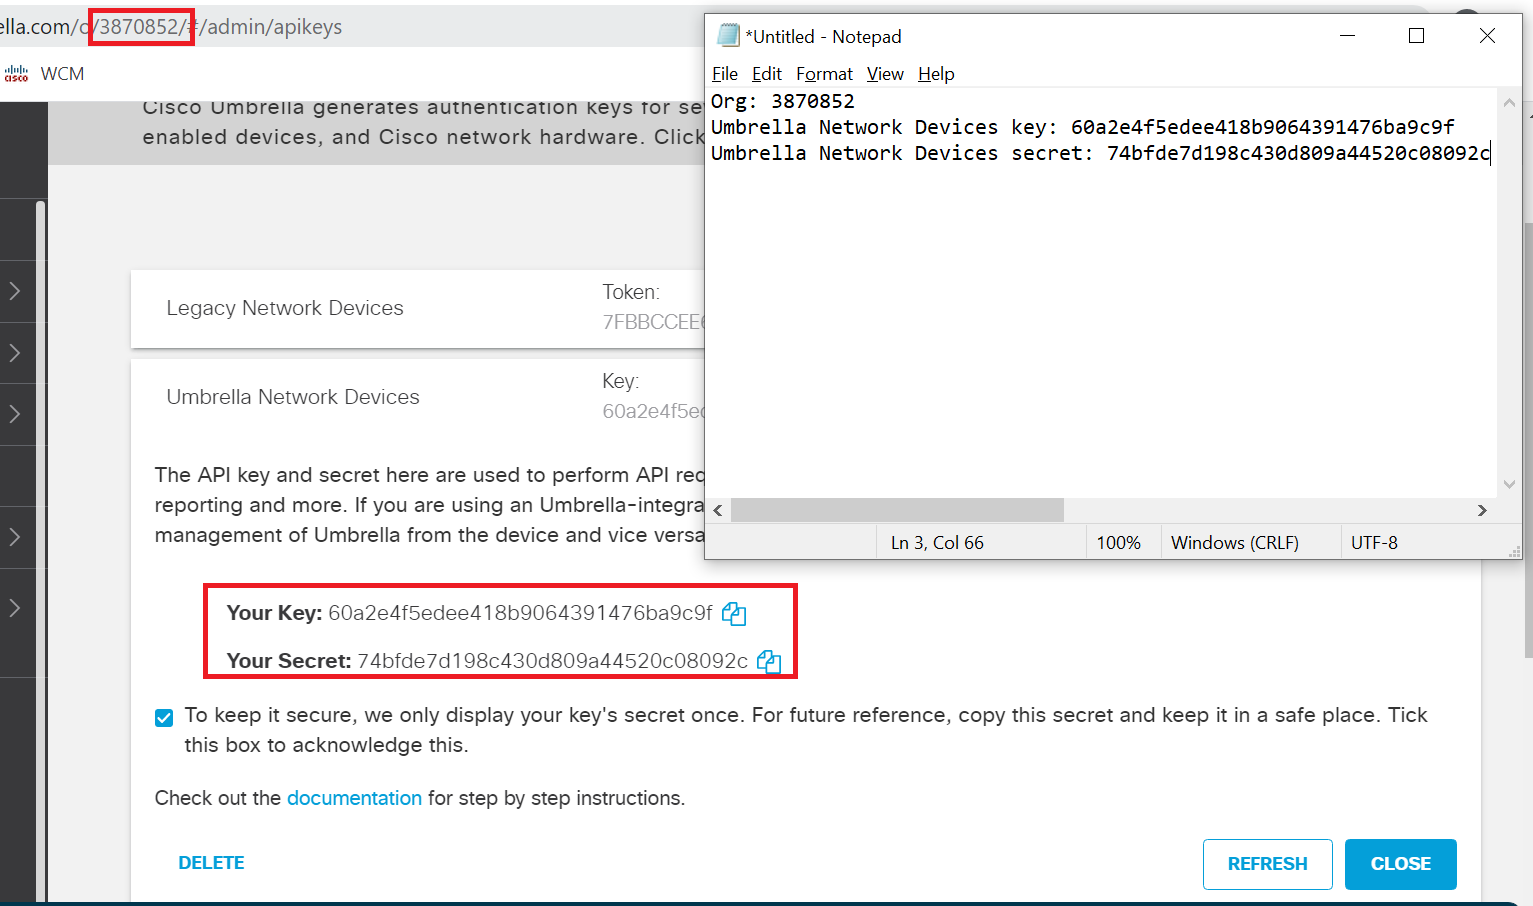
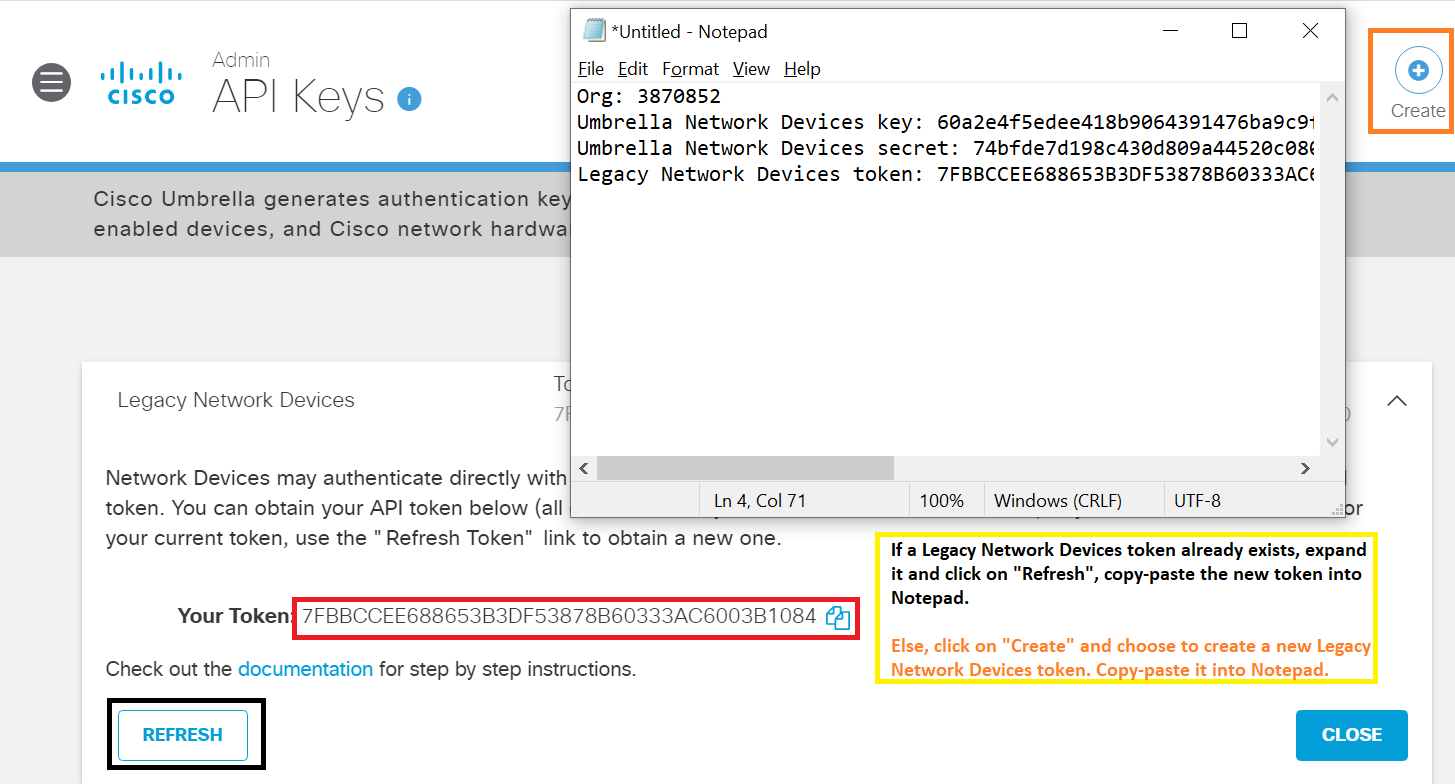
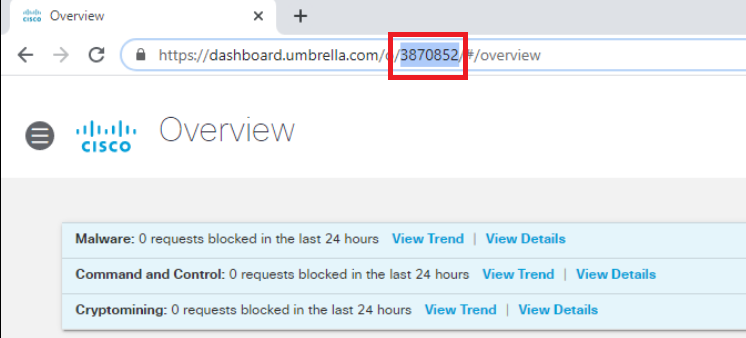
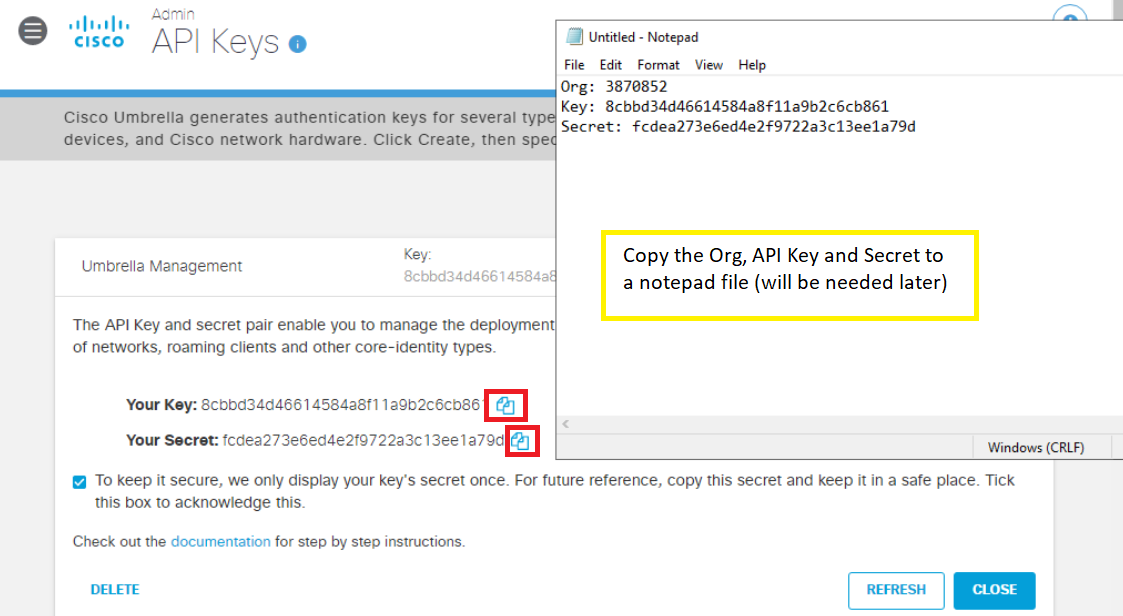
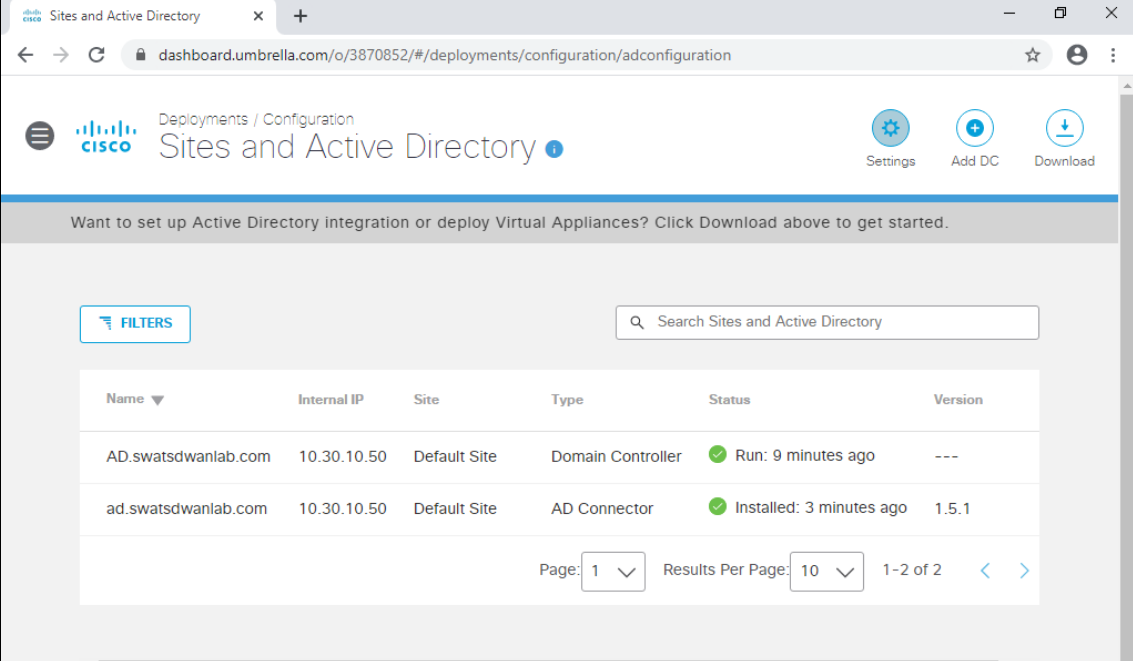
Open Notepad and copy-paste the Organization ID, Key and Secret. Check the checkbox agreeing to keep the secret secure and click on Close. The Organization ID can be found in the URL (3870852 in this sample screenshot)
Important: Make sure that the Key and Secret are copied to notepad before proceeding since the Secret is visible on this page only.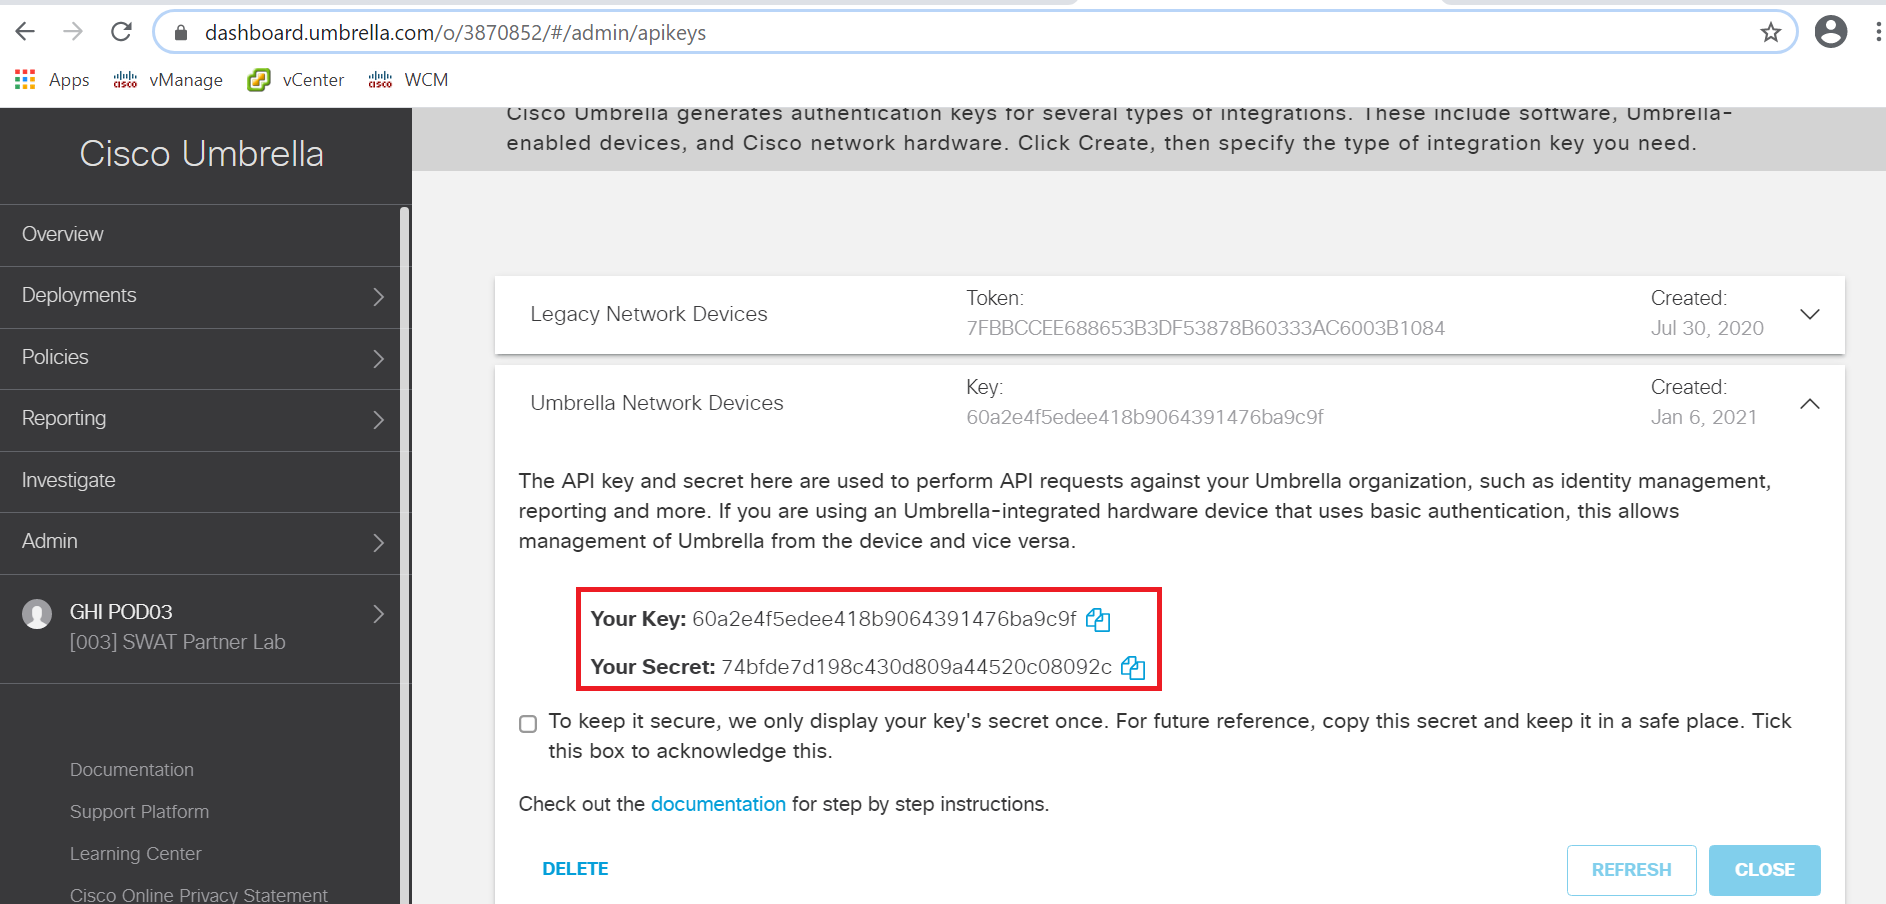
-
If you see an API Key already created for Legacy Network Devices, expand the section and click on Refresh. Copy-paste the token to Notepad. If the API Key for Legacy Network Devices doesn’t exist, click on Create and select the Legacy Network Devices radio button. Click on Create again
-
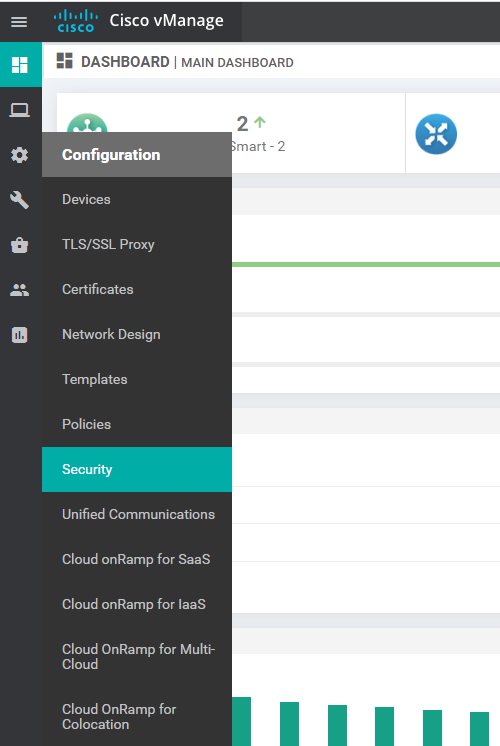
Log in to vManage and navigate to Configuration => Security
-
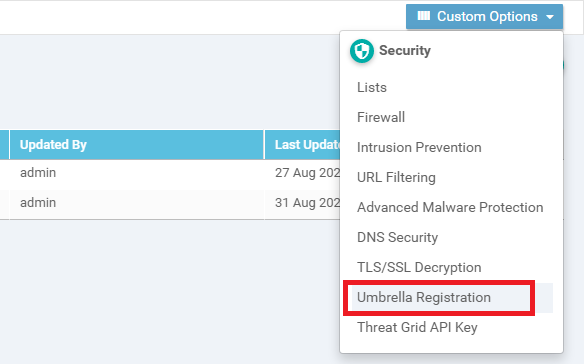
Click on Custom Options in the top right corner and choose Umbrella Registration
-
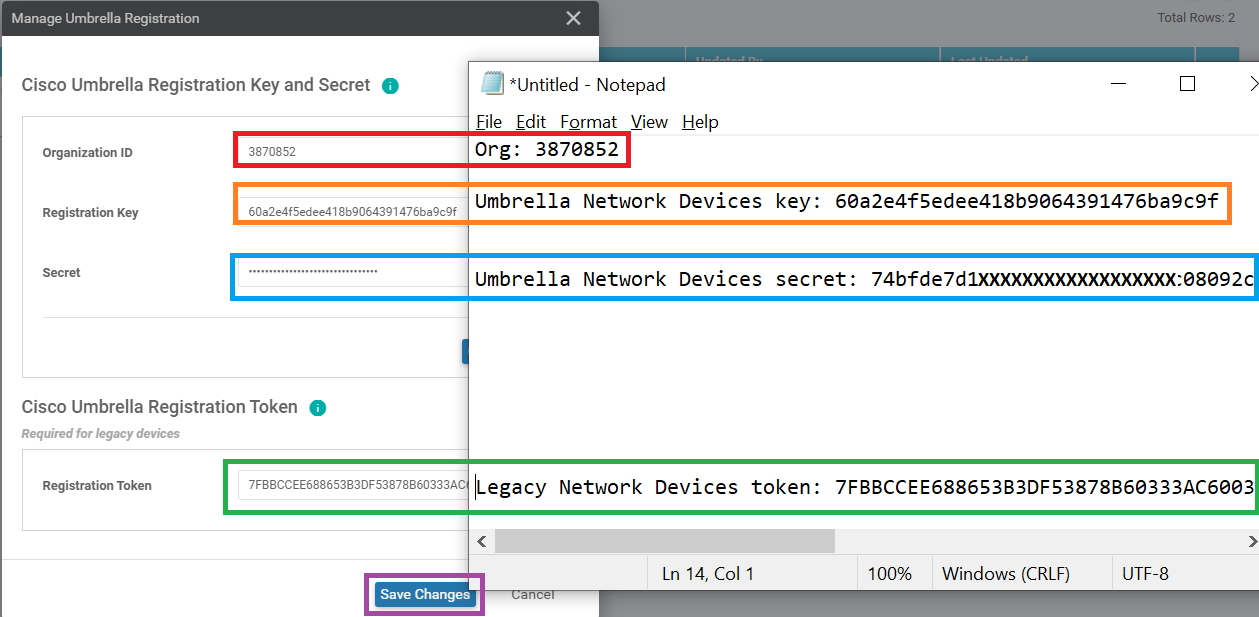
Copy-paste the Organization ID, Umbrella Network Devices Key, Umbrella Network Devices Secret and Legacy Network Devices Token in the corresponding fields. Click on Save Changes
-
Go to Configuration => Security and choose to Add Security Policy. Click on Custom and choose Proceed
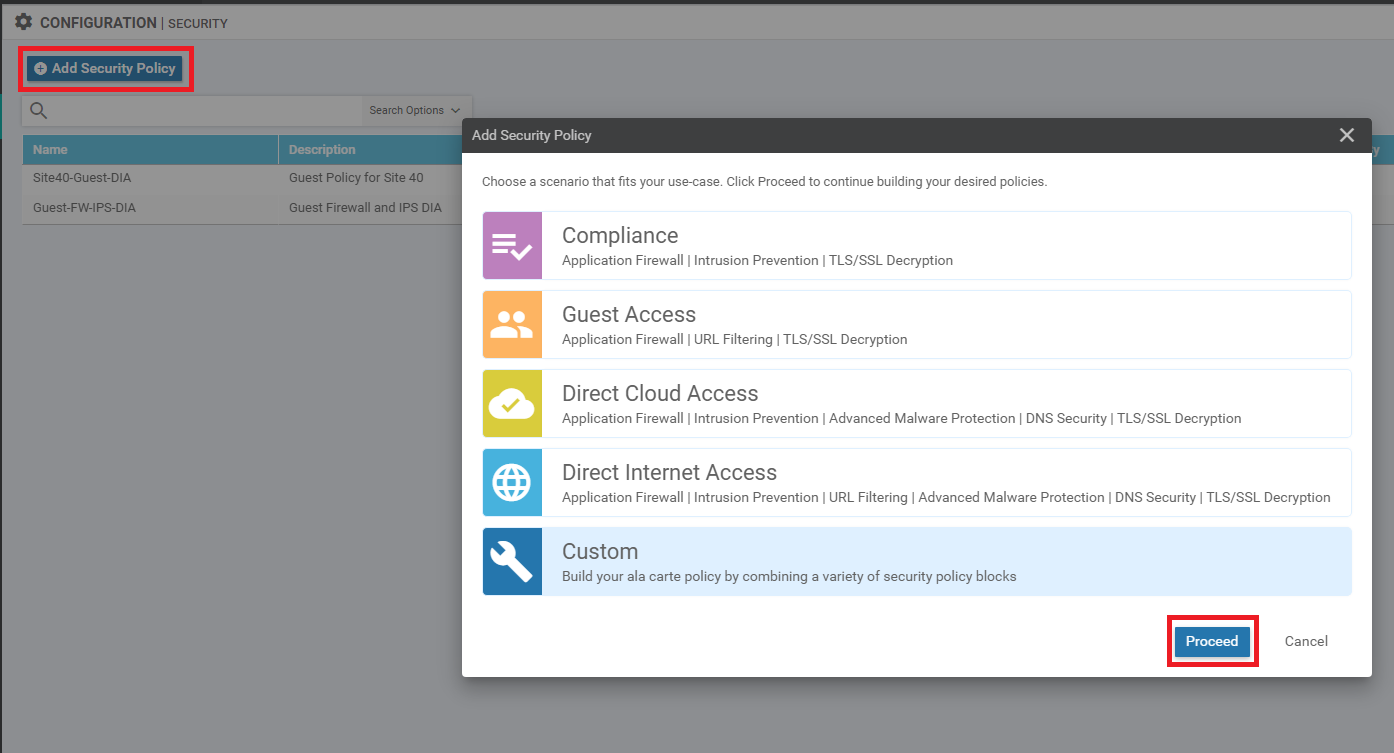
-
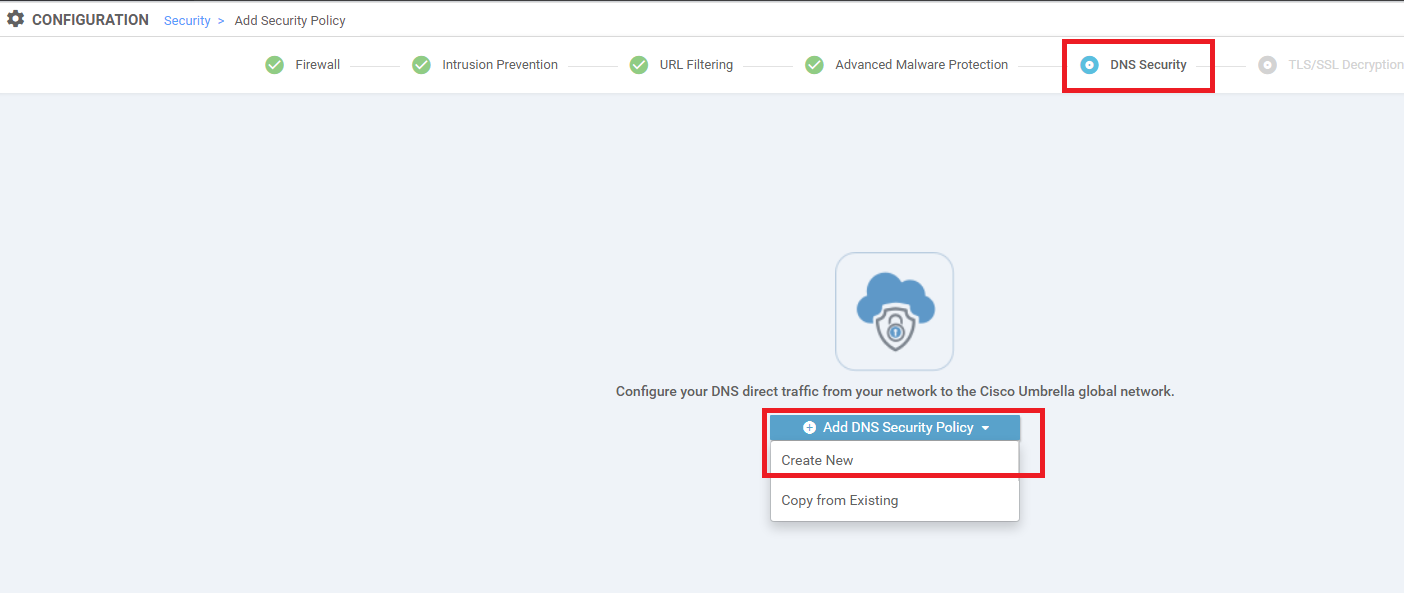
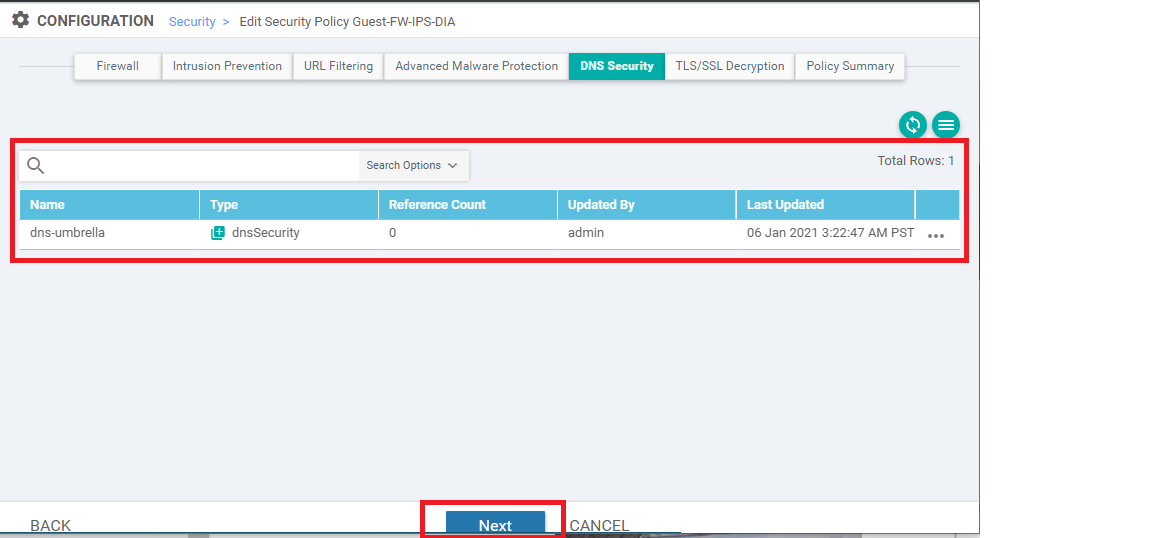
Click Next till you’re at the DNS Security tab and click on Add DNS Security Policy. Click on Create New
-
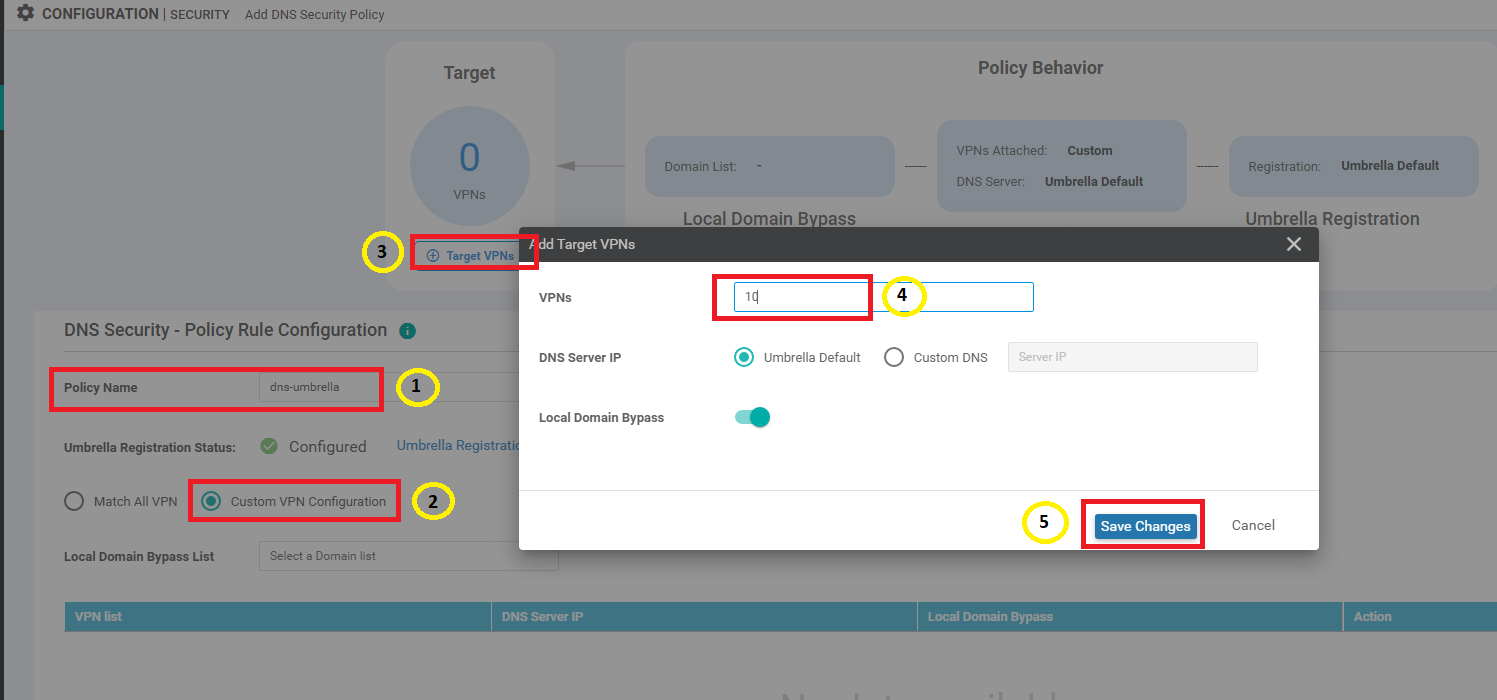
Enter the Policy Name as dns-umbrella and select the Custom VPN Configuration radio button. Click Got It and then click on Target VPNs and enter the VPN as 10. Click on Save Changes
-
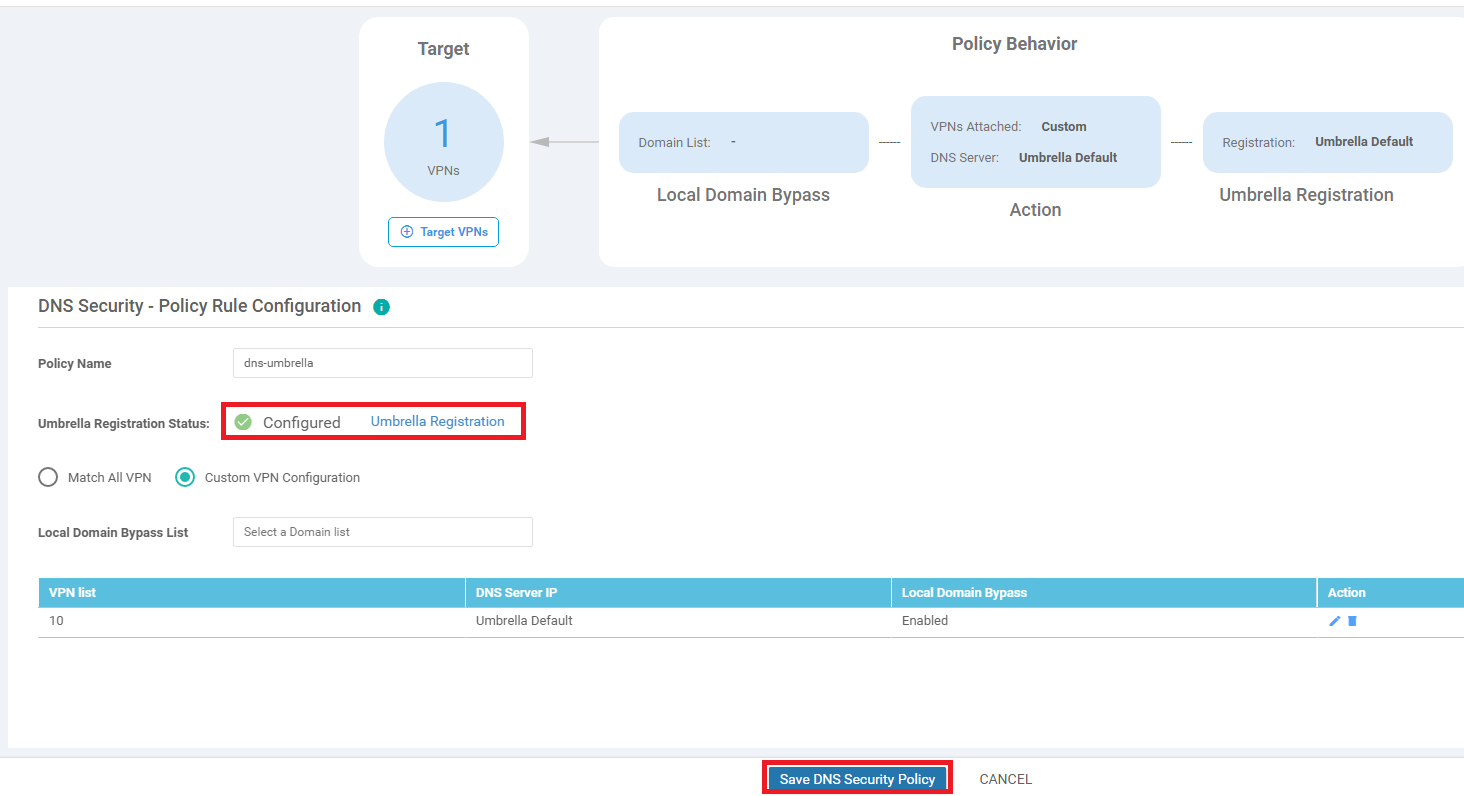
Make sure the DNS Policy has the Umbrella Registration Status as Configured and click on Save DNS Security Policy. Also ensure that VPN 10 is listed in the configuration
-
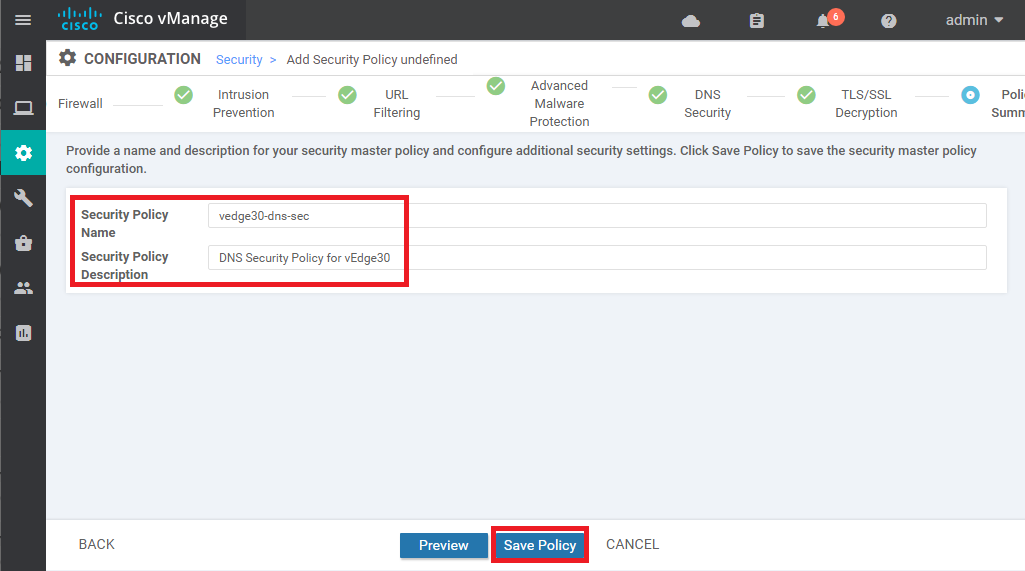
Back at the main Security Policy, click Next till you’re at the Policy Summary page and give the Policy a name of vedge30-dns-sec with a Description of DNS Security Policy for vEdge30. Click on Save Policy
-
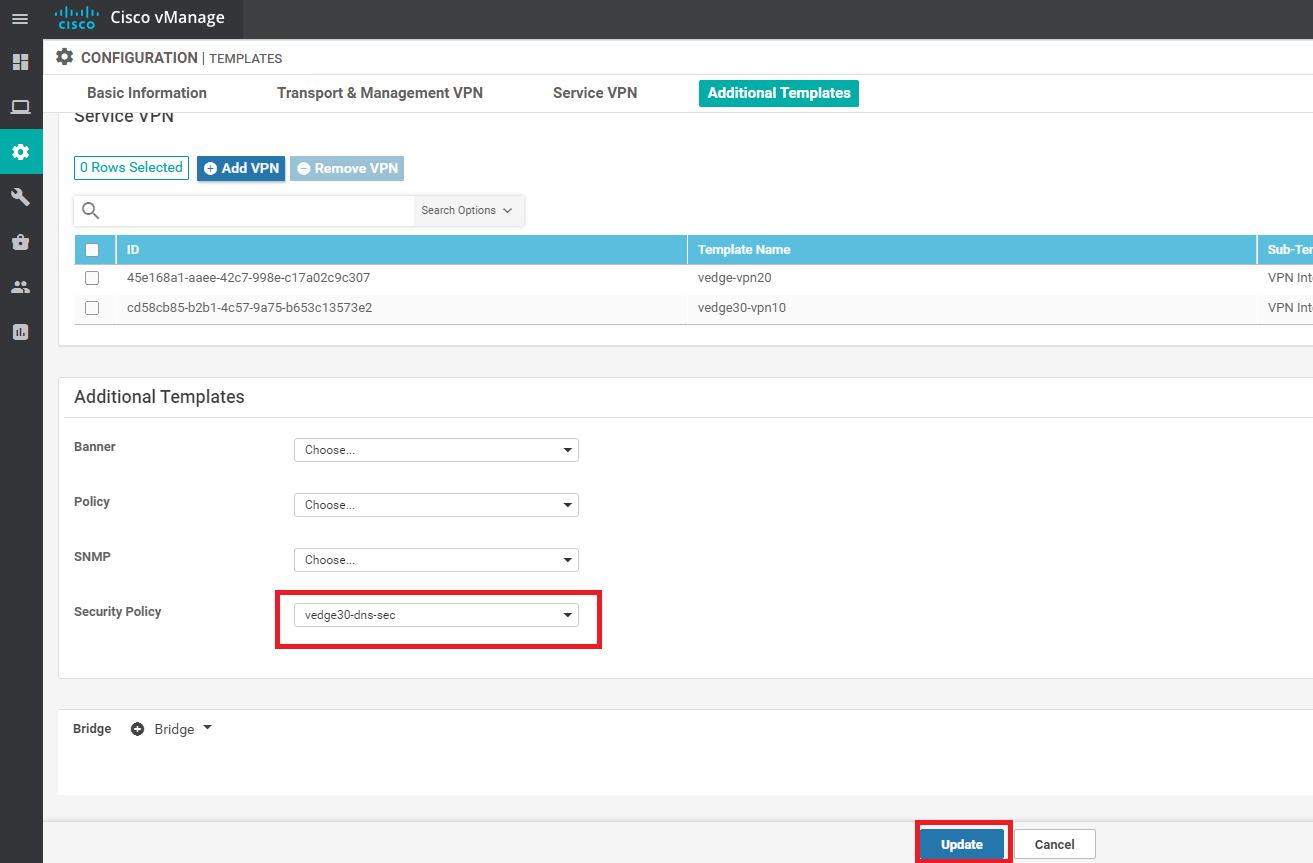
Navigate to Configuration => Templates and locate the vEdge30_dev_temp. Click on the three dots next to it and choose to Edit the Template

-
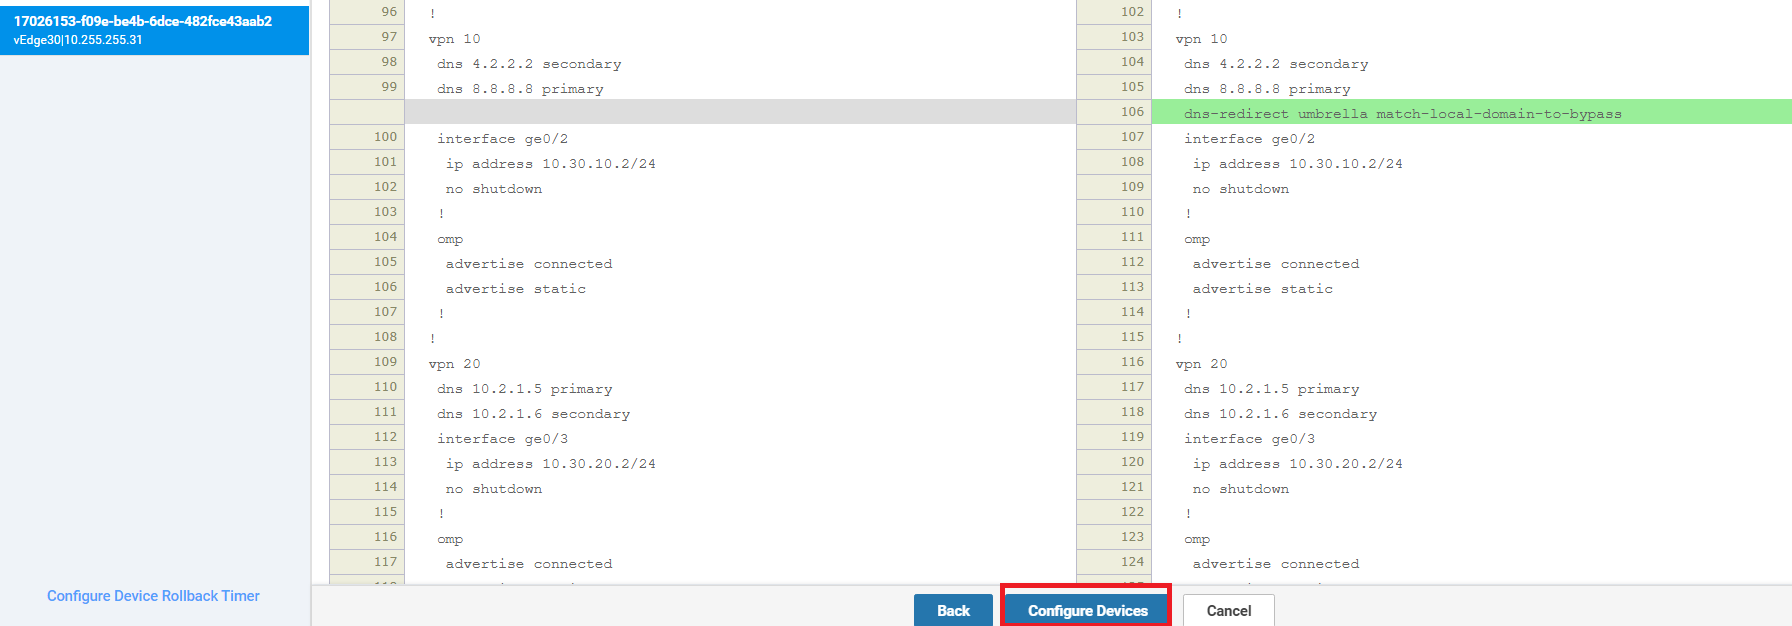
Scroll down to the Additional Templates section and select the Security Policy as vedge30-dns-sec. Click on Update
-
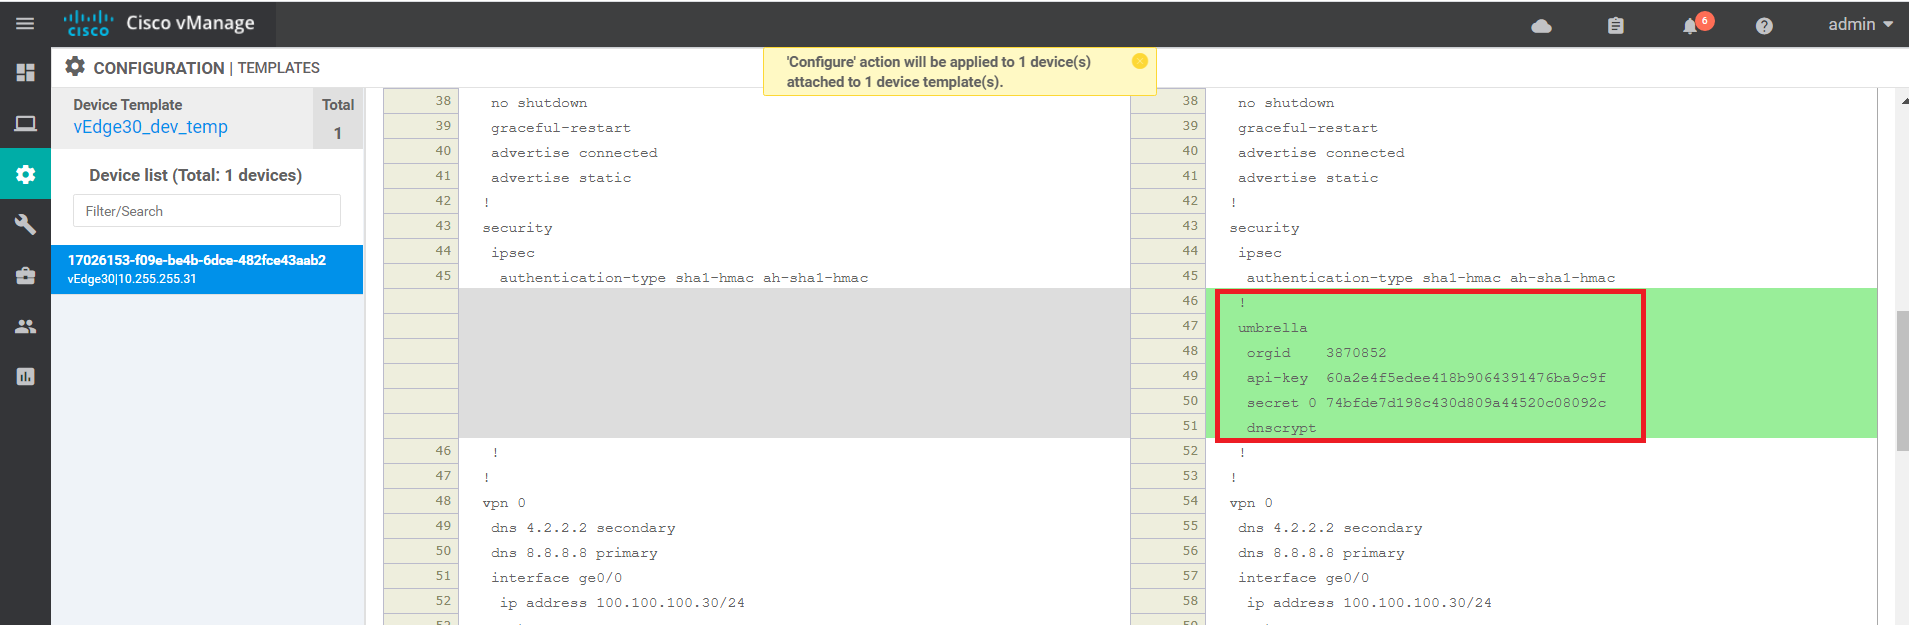
Click on Next and then Configure Devices. You can view the side by side configuration if needed
-
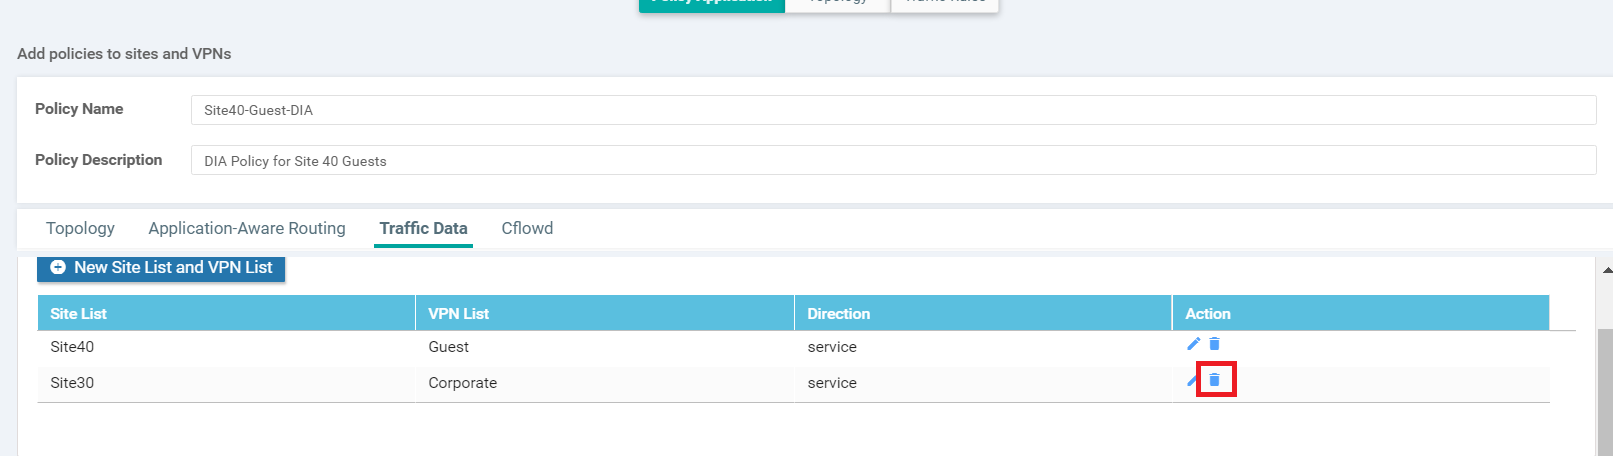
EDNS functionality on the vEdges might not work due to the Centralized Data Policy which has been created for DIA. We will remove Site30 from the Centralized Data Policy and add a NAT Route for VPN 10 at Site 30. Click on Configuration => Policies and locate the Site40-Guest-DIA policy. Click on the three dots next to it and click on Edit
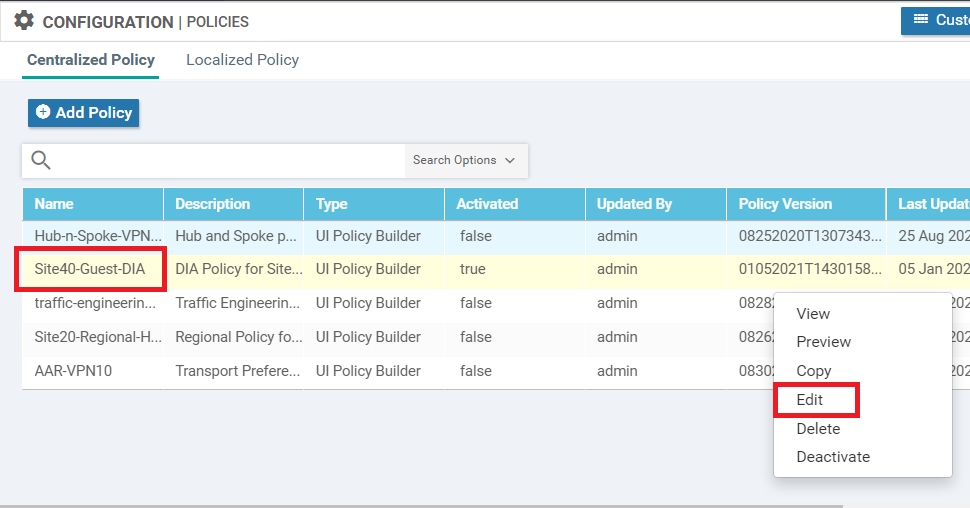
-
Under Policy Application, go to the Traffic Data tab and click on the delete icon next to the Site30 Site List
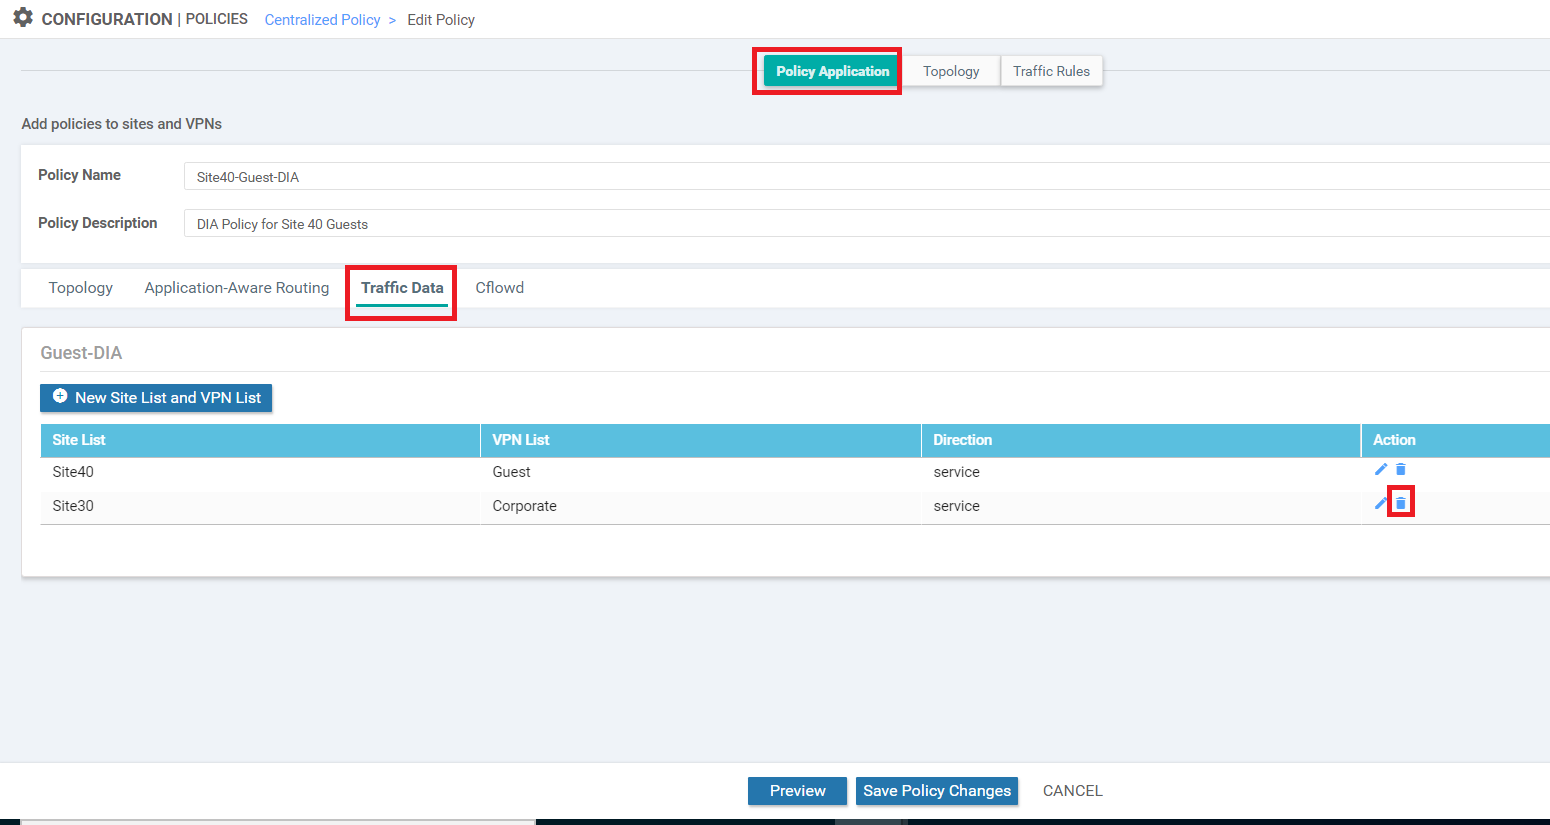
-
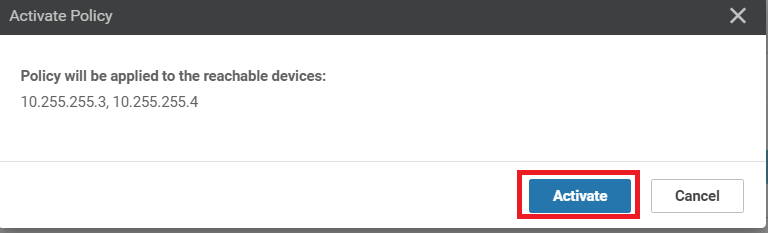
Click on Save Policy Changes and Activate the policy

-
Navigate to Configuration => Templates => Feature Tab and locate the vedge30-vpn10 feature template. Click on the three dots next to it and click on Edit

-
Scroll down to the IPv4 Route section and click on New IPv4 Route. Enter the details as enumerated below. Make sure you click on Add and then click on Update
Field Value Prefix 0.0.0.0/0 Gateway VPN Enable VPN Global - On 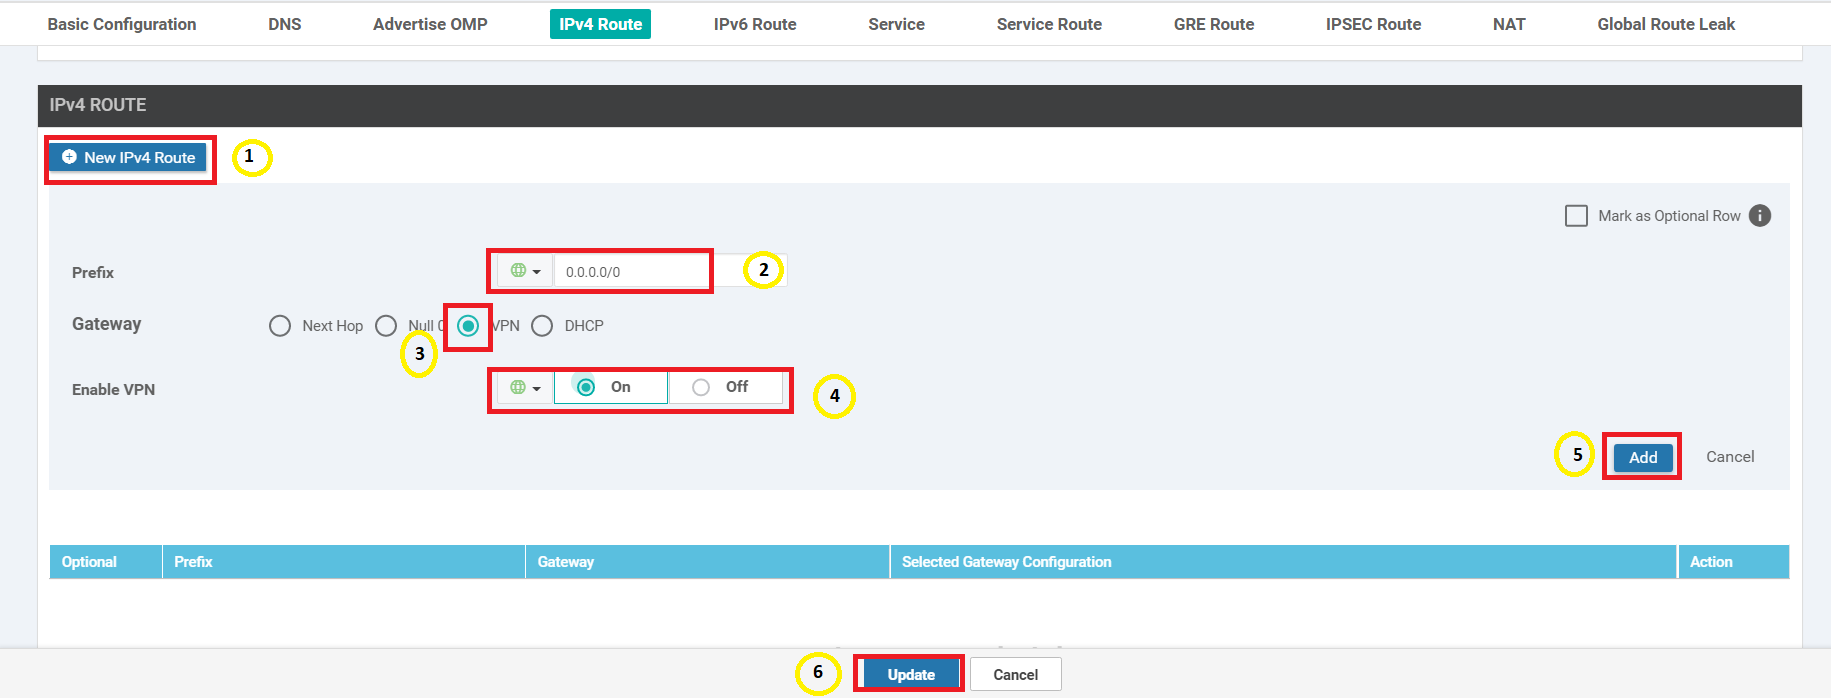
-
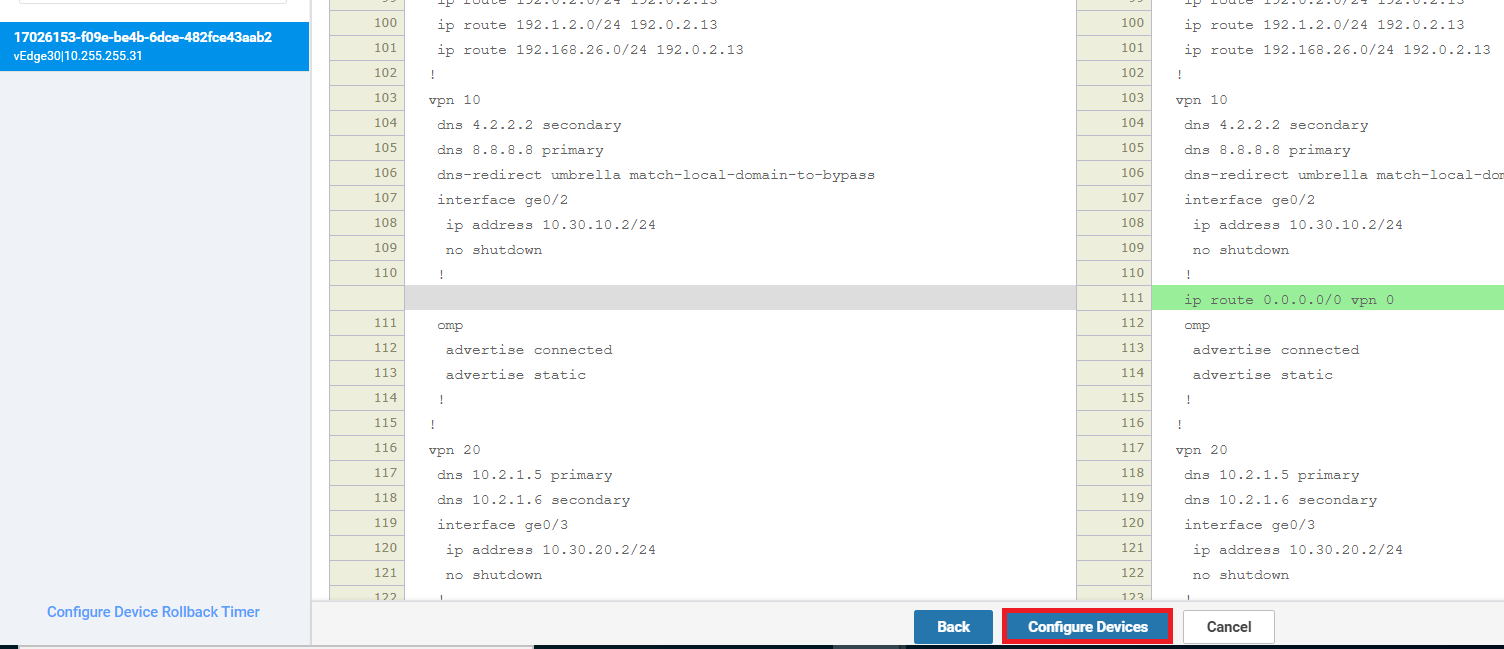
Click on Next and Configure Devices
-
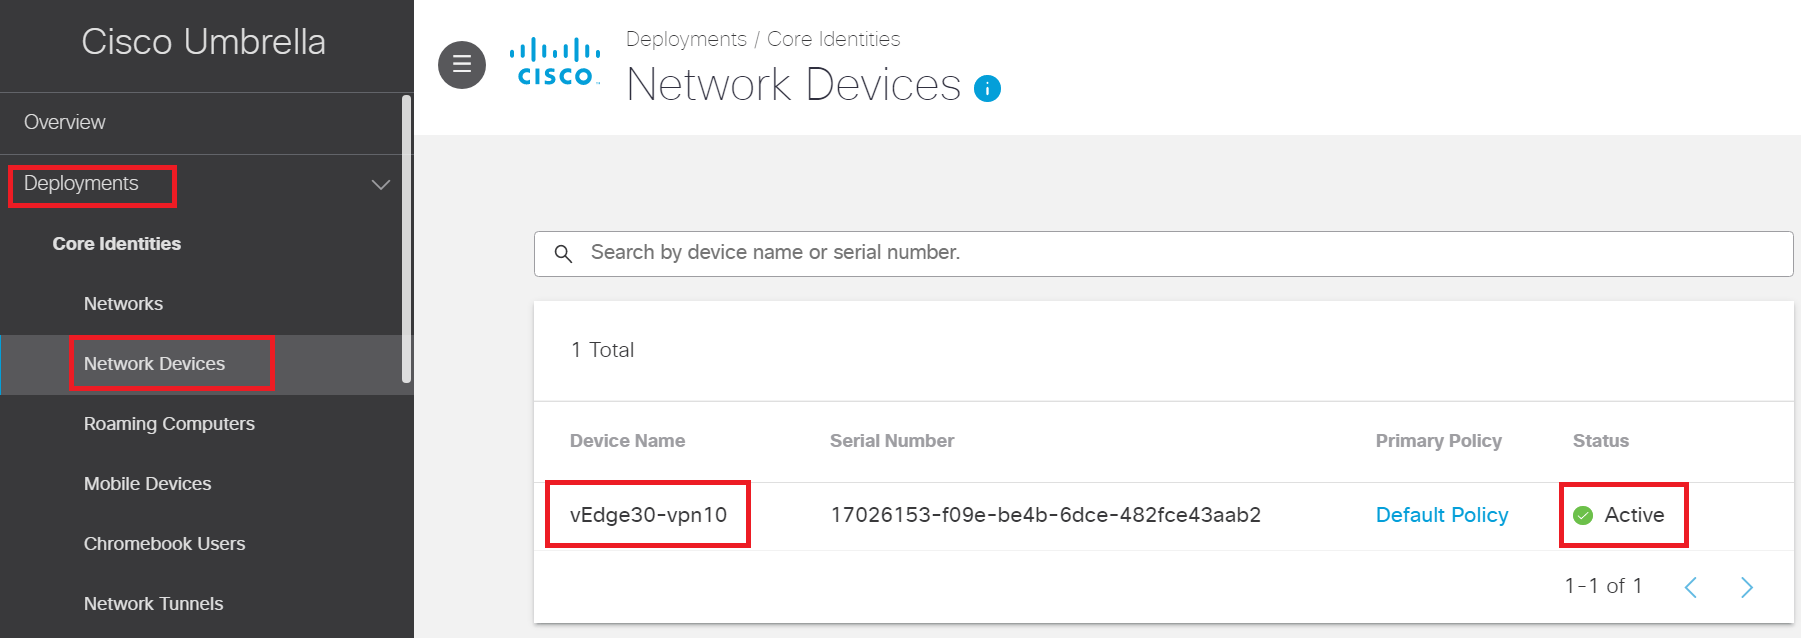
At this point, vEdge30 will register to the Umbrella portal as a Network Device. Log in to the Umbrella portal and go to Deployments => Network Devices. You should see a device showing up over there, with the Device Name vEdge30-vpn10. The Status should be Active (might take a few minutes to reflect the correct status)
-
Log in to CLI of vEdge30 via the saved session in Putty (or SSH to 192.168.0.30) using the credentials enumerated below. Run the commands
show umbrella config-stateandshow umbrella device-id. We should see a public key along with resolver addresses (the Umbrella addresses) and the VPN which is redirecting traffic to Umbrella in the show umbrella config-state. The show umbrella device-id indicates that the device successfully registered with Umbrella, receiving a Response Code of 201. A Device ID is reported for this deviceUsername Password admin admin 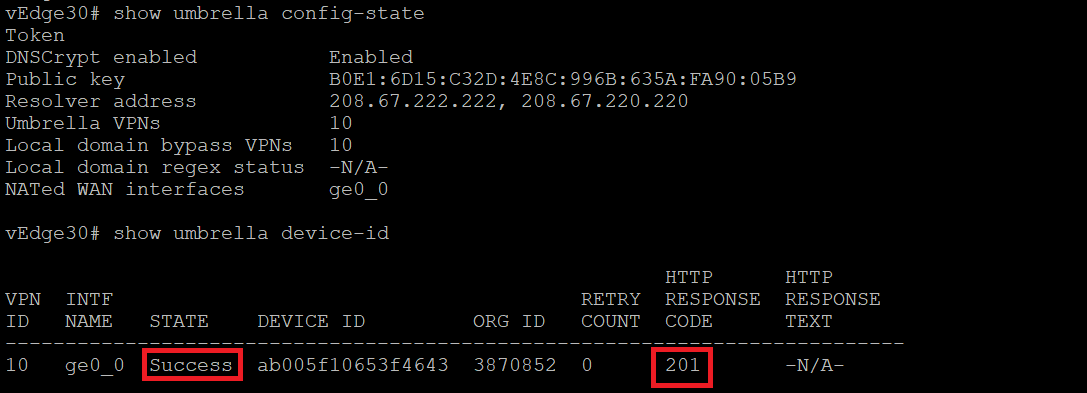
show umbrella config-state show umbrella device-id -
Run
show umbrella dnscrypt, to see the certificate state as Valid and in a Successful state. The state might be Init/SockCreated temporarily (in case there are issues with the certificates, create an NTP feature template on vManage and point it to pool.ntp.org as the NTP server. Associate the NTP Feature Template with the vEdge30_dev_temp)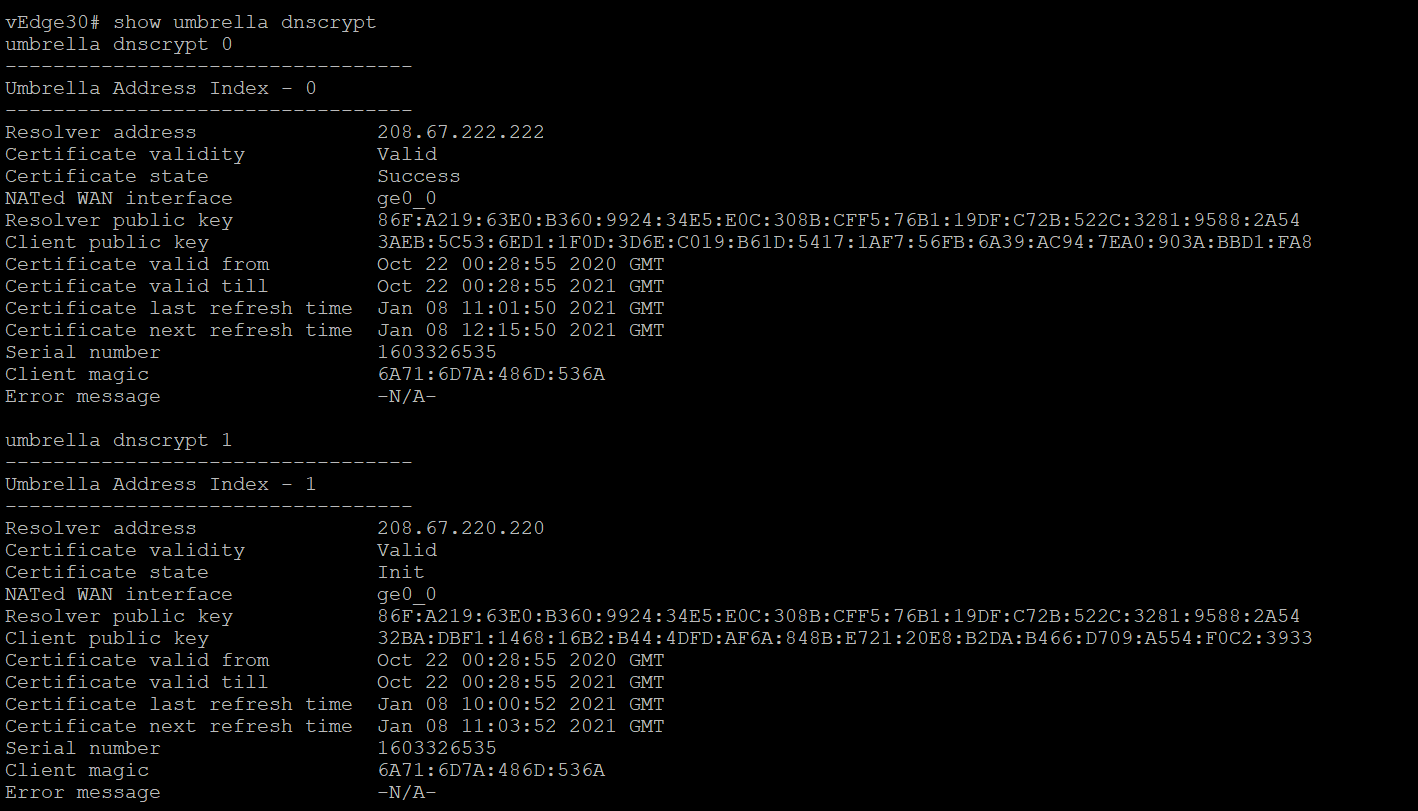
show umbrella dnscrypt -
To verify registration via the CLI, issue
show umbrella-overview. To view the data statistics, issueshow umbrella-oper-dp stats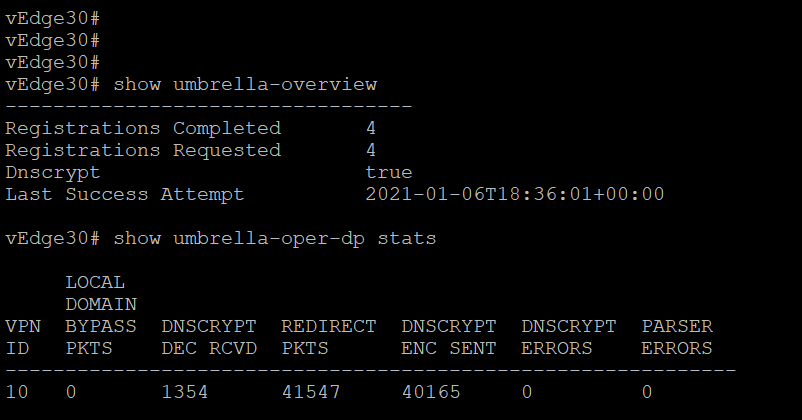
show umbrella-overview show umbrella-oper-dp stats -
Access the Site 30 PC and clear the DNS Cache via the shortcut on the desktop. Open Chrome and click on the Phishing Test bookmark (or access internetbadguys.com). The site should not load
-
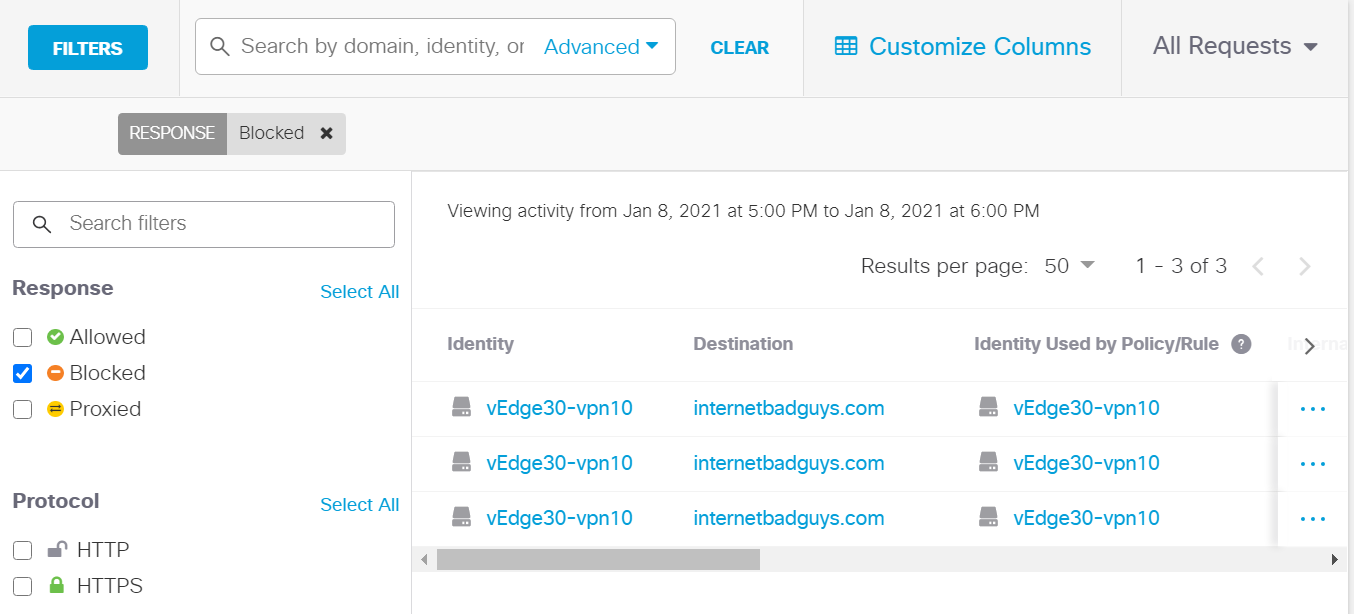
On the Umbrella portal, navigate to the Overview page and scroll down. We should see a spike in Total Blocks and Security Blocks (takes 5 minutes to reflect)
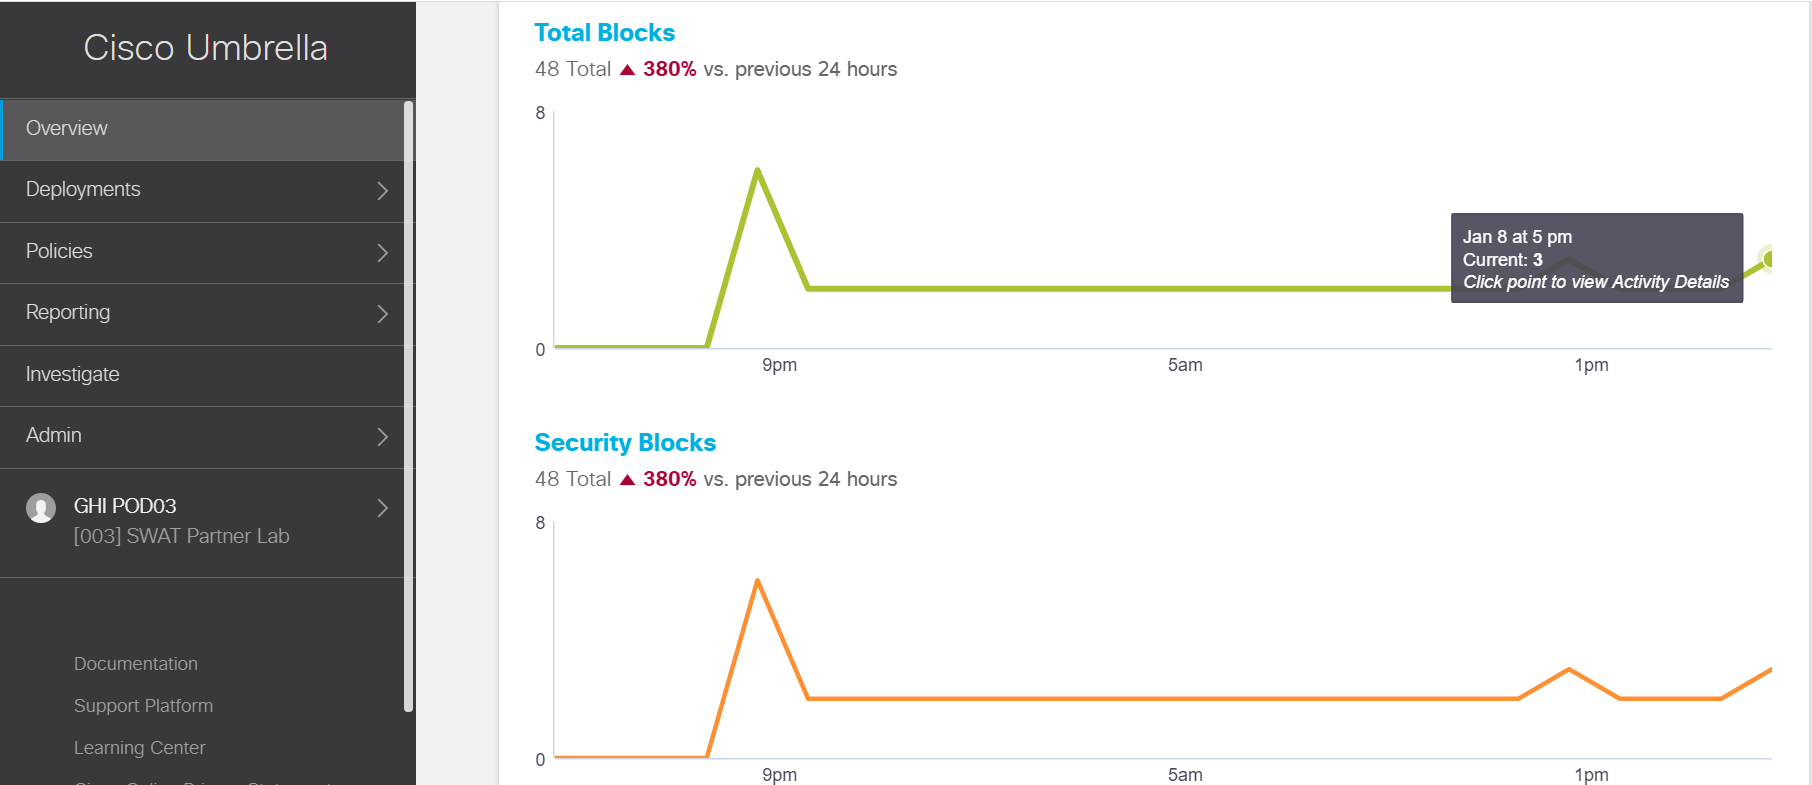
-
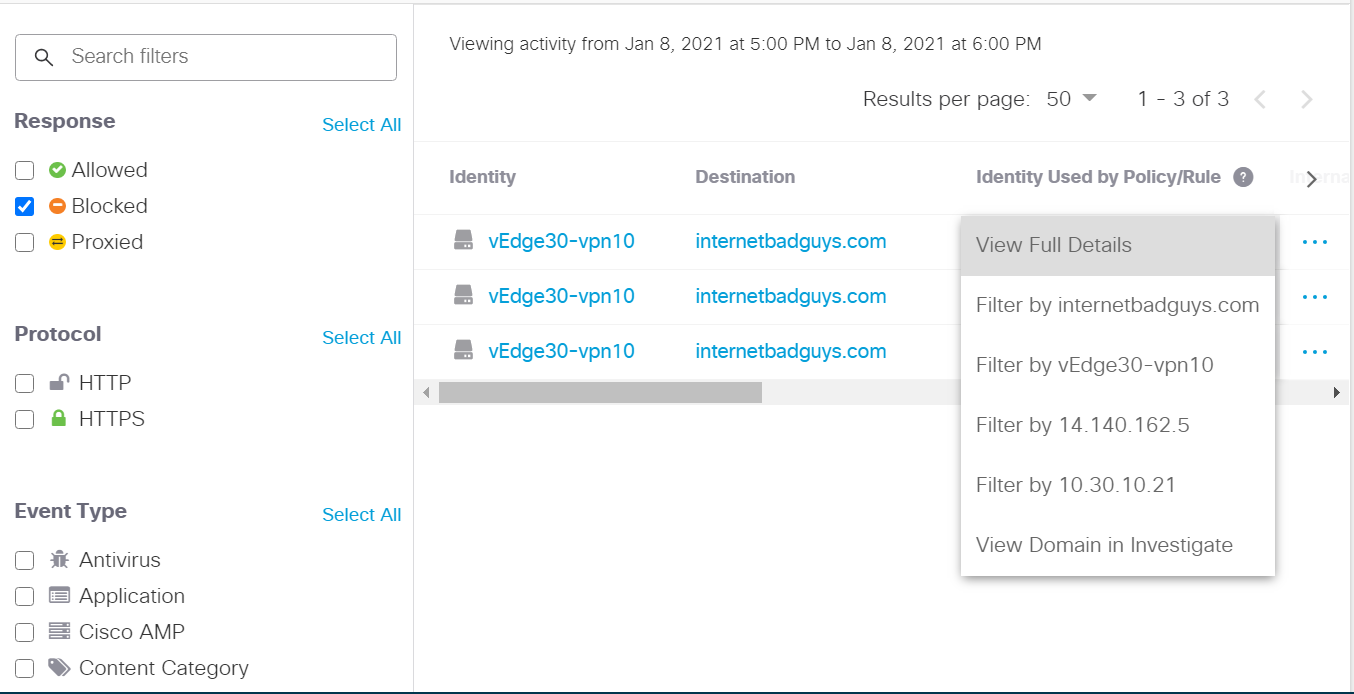
Mouse over the latest spike and you should see the timestamp of it. Click on the spike to see details of it. Click on the three dots next to any of the blocks and choose View Full Details
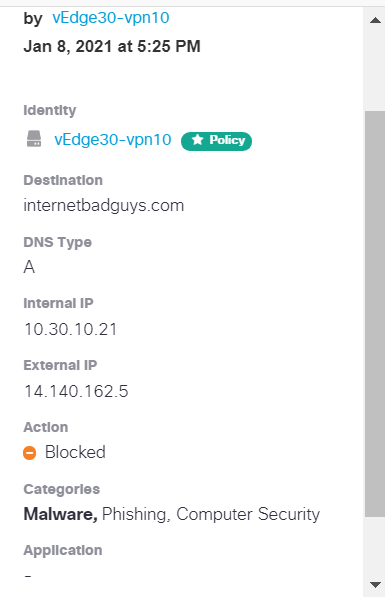
We thus see that although the Site 30 Client has got a DNS server pointing to 8.8.8.8 and 4.2.2.2, vEdge30 intercepts the DNS Query and redirects it to Umbrella, potentially enforcing any Umbrella DNS Policies for that Organization.
-
-
-
-
-
-
- Making Umbrella Ours
- API Keys and AD Configuration
- DC Configuration Download
- AD Connectors
- Roaming Computer Configuration
- Building a DNS Policy
- Setting up IPSEC Tunnels
- Configuring a Firewall Policy
- Configuring a Web Policy
Making Umbrella ours
The previous section ensured that DNS queries were redirected to Umbrella, giving us a basic layer of protection. To apply custom DNS policies, we will need to ensure that our setup can be uniquely identified by Umbrella, post which DNS Policies can be set up for the organization. Umbrella can be used to identify traffic coming from a public IP/IP Range. This helps with creating custom policies for a particular organization. In our lab, multiple devices will be talking to the outside world via the same Public IP, hence this approach will not work for us.
Instead, we can get extremely granular and apply a policy to a specific user/group of users based on identities used to uniquely identify them. We can also pinpoint individual workstations by leveraging Cisco AnyConnect, thereby encompassing Roaming Computers in our DNS policies.
API Keys and AD Configuration
Three pieces of the puzzle that uniquely identify our Enterprise Network on Umbrella are given below:
-
Organization (this is a numeric string, allocated by Umbrella. Not to be confused with the SD-WAN organization name)
-
API Key
-
Secret
-
From your Jumphost, open a browser and go to login.umbrella.com. Login using the username/password for your POD
Username Password ghi.pod0X@gmail.com if connected to the GHI DC or slc.pod0X@gmail.com if connected to the SJC DC
X is your POD number
e.g. ghi.pod05@gmail.com is the username for GHI POD 5C1sco@12345 
-
Once logged in, the URL will contain your Organization ID. It will vary per POD. Copy it in a notepad file on the Jumphost since we will be needing it later
-
API Keys and the Secret needs to be generated on Umbrella. Navigate to Admin => API Keys. If the sidebar isn’t visible, click on the menu icon (three horizontal lines) next to the Cisco Logo
-
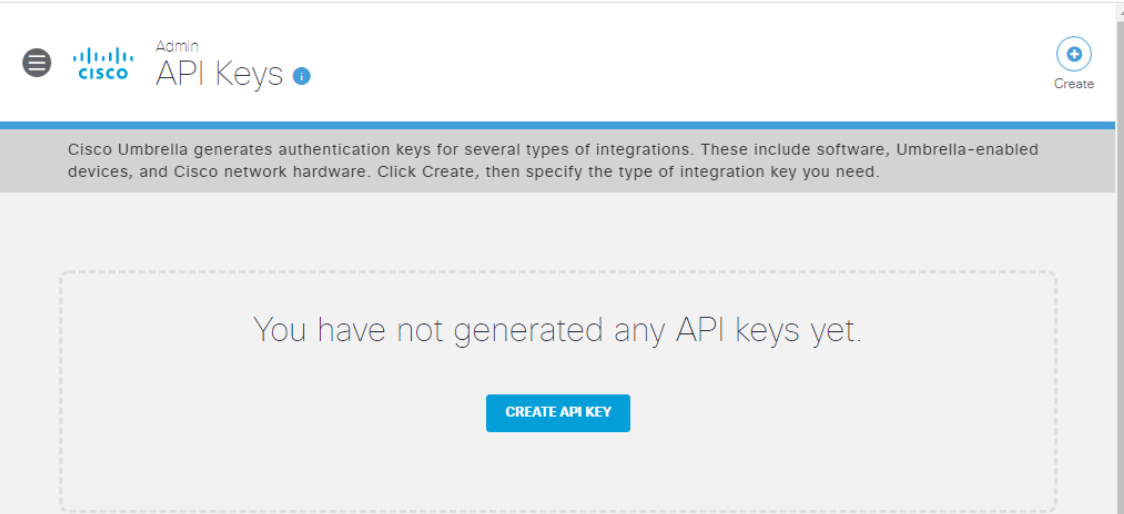
Click on Create API Key
-
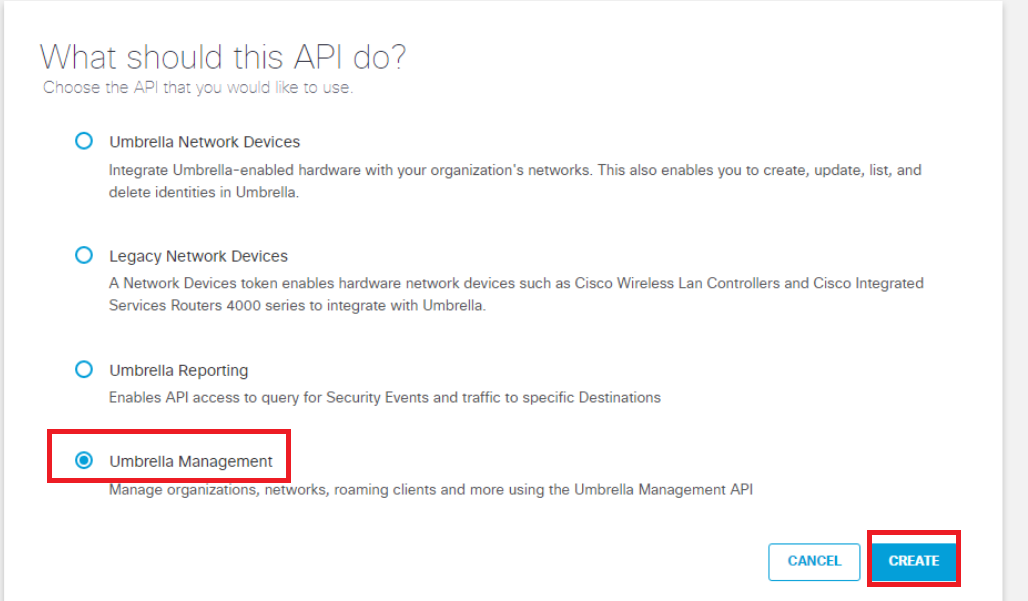
Select the radio button next to Umbrella Management and click on Create
-
This will generate the API Key and Secret. Click on the copy icon next to each and paste it in the notepad which contains the Organization ID. Save this notepad file on the Desktop of the Jumphost, giving it any name
Important: Make sure that the Key and Secret are copied to notepad before proceeding since the Secret is visible on this page only.Put a check mark next to the To keep it secure… statement and click on Close
 Tip: If the key needs to be re-generated (usually required if the secret is misplaced), the Refresh button will allow you to generate a new API Key and Secret.
 -
Log in to the AD PC (10.2.1.18X if connected to the GHI DC and 10.1.8.18X if connected to the SJC DC) via your preferred method (Guacamole/RDP/vCenter Console) and click on Start. Search for Active Directory Users and Computers and open the App
-
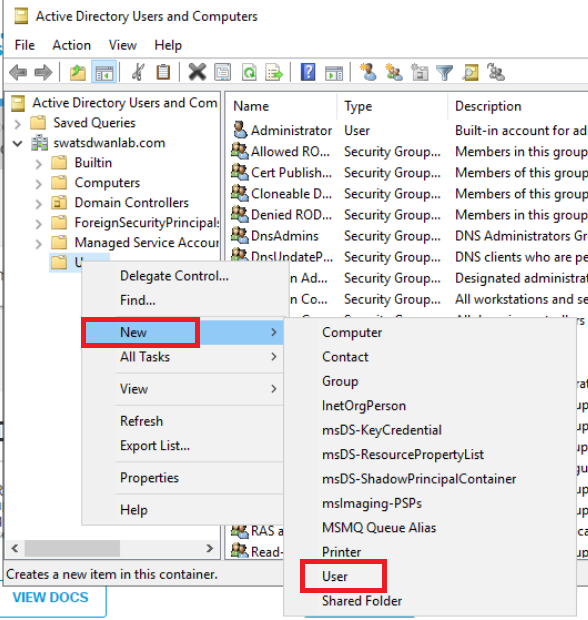
Make sure swatsdwanlab.com is expanded and right click on Users. Click on New and click on User to create a new user
-
Populate the fields as shown in the table below and click on Next
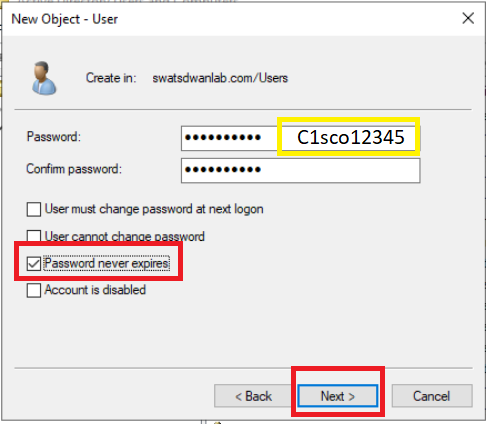
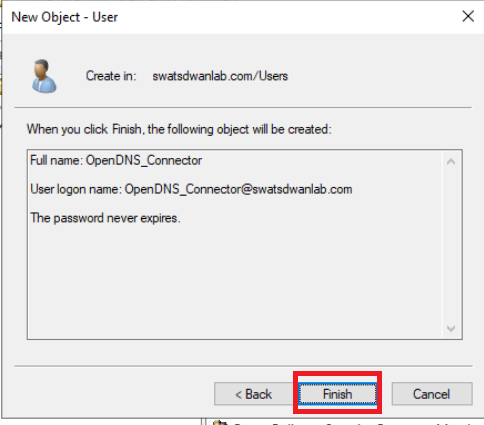
Field Value First Name OpenDNS_Connector User logon name OpenDNS_Connector Note: The User logon name field had to match with what is given here in previous versions of vManage. The name can now be populated as a custom value, if required, but we will use the default logon name.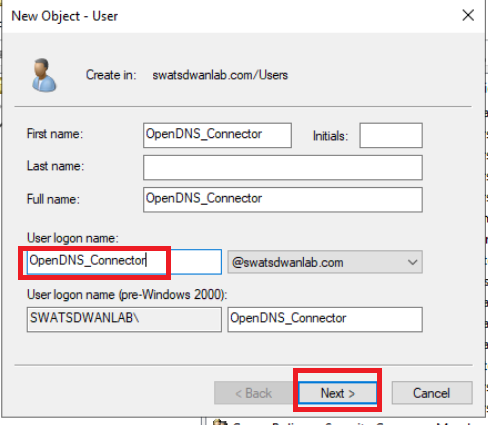
-
Enter a password of C1sco12345 in the Password and Confirm Password fields. Uncheck User must change password at next logon and check Password never expires. If you check Password never expires directly, it will automatically uncheck User must change password at next logon but will give a notification prompt (choose OK). Click on Next and then Finish
-
The user we just created needs to be a part of certain Groups in order to function properly. Right click on the newly created OpenDNS_Connector user and click on Add to a group
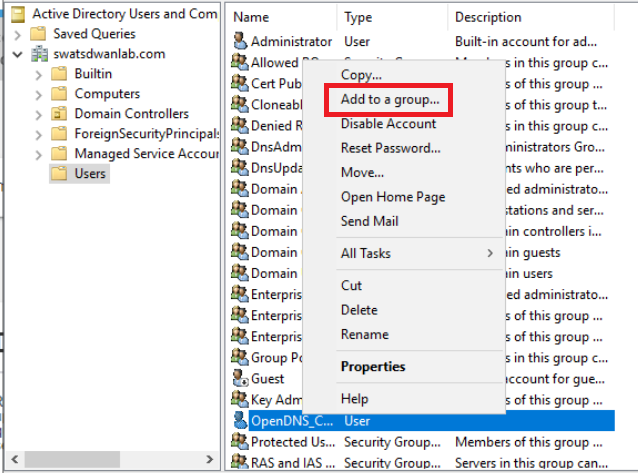
-
Add the user to the following groups and click on OK:
- Event Log Readers
- Distributed COM Users
- Enterprise Read-only Domain Controllers
Note: Enter the first few characters of the Group you want to add this User to and click on Check Names. That should auto-populate the Group or give you a selection to choose the group.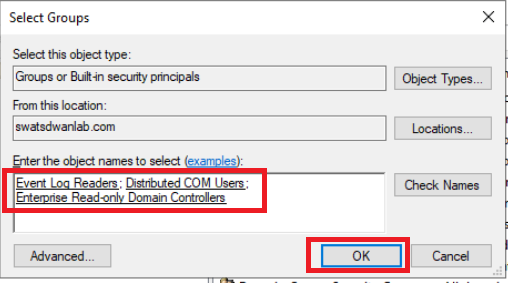
-
Click on OK to confirm the addition of the user to the Groups

We have generated the API Key and Secret which will be needed later in the integration with Cisco Umbrella. We have also set up an AD User which will be required for AD Connector functionality.
-
-
-
-
-
-
- Making Umbrella Ours
-
- DC Configuration Download
- AD Connectors
- Roaming Computer Configuration
- Building a DNS Policy
- Setting up IPSEC Tunnels
- Configuring a Firewall Policy
- Configuring a Web Policy
DC Configuration Download
To uniquely identify our SD-WAN network, we will be connecting AD to Umbrella and syncing AD Groups and Users. This is done by downloading and running a configuration script on the Domain Controller (all read-write DCs) and by deploying an AD Connector. A user is required for the AD Connector to work - this was created in the previous section.
-
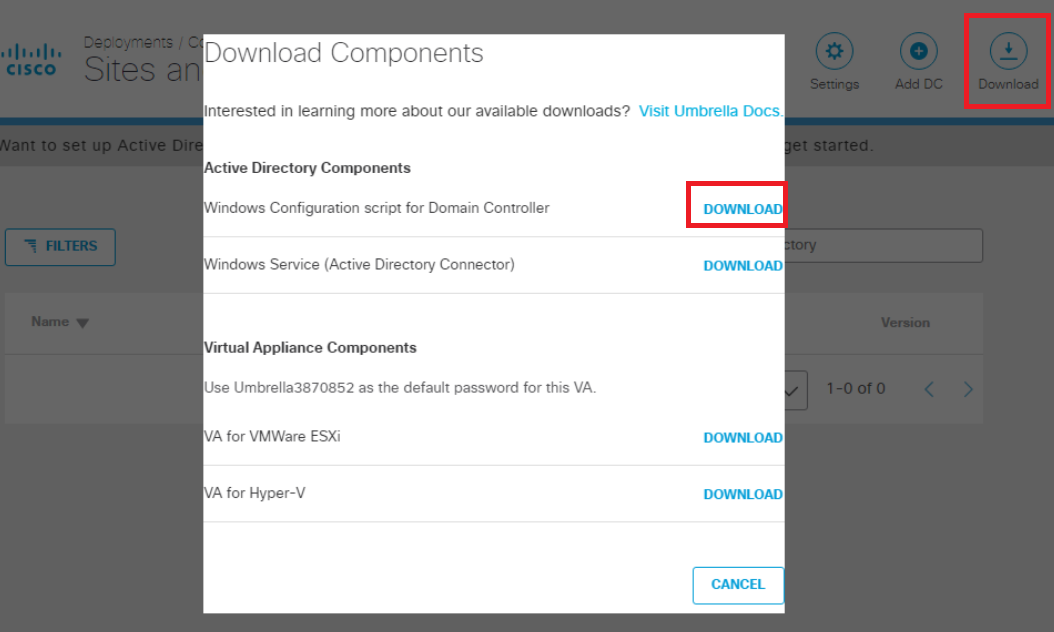
From your AD PC, open a browser and go to login.umbrella.com. Login using the username/password for your POD. Go to Deployments => Configuration => Sites and Active Directory
Username Password ghi.pod0X@gmail.com if connected to the GHI DC or slc.pod0X@gmail.com if connected to the SJC DC
X is your POD number
e.g. ghi.pod05@gmail.com is the username for GHI POD 5C1sco@12345 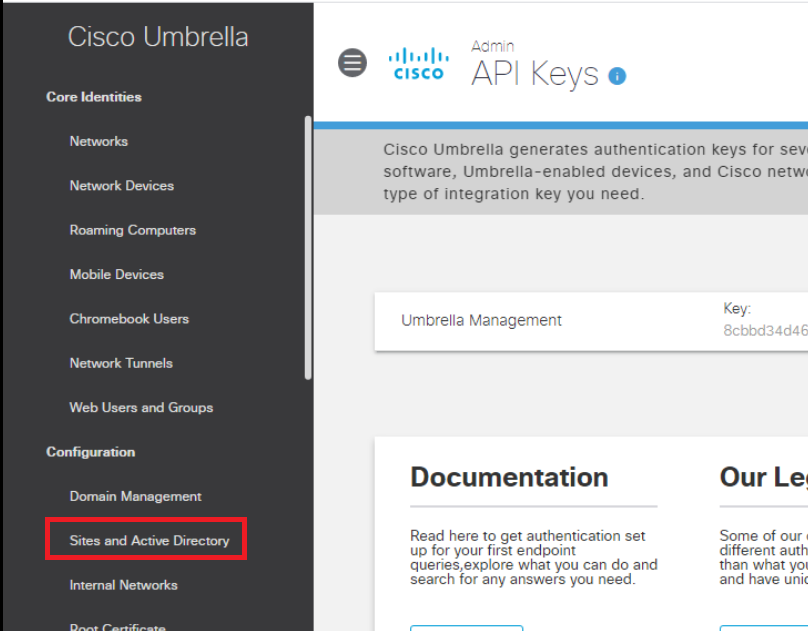
-
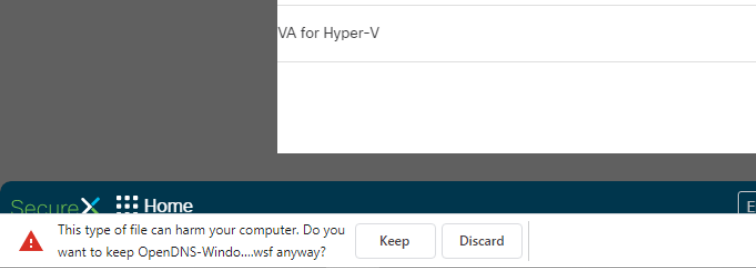
Click on the Download button in the top right-hand corner and download the Windows Configuration script for Domain Controller. Choose to Keep the file, if prompted (browser specific)
-
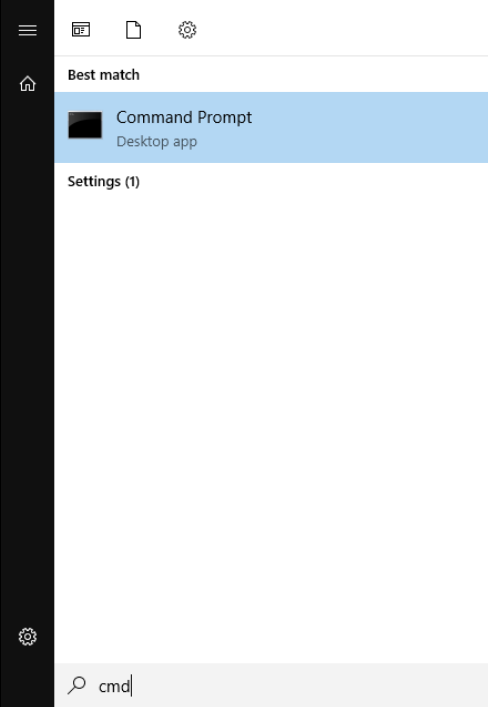
Click on Start and search for cmd. Click on the Command Prompt App
-
Type
cd Downloadsto access the Downloads folder and hit Enter. Enter thecscriptcommand, followed by the Configuration File you just downloaded. The file name will be different from what is shown below - enter the name of the configuration file downloaded by you (typecscript OpenDNSand hit Tab on the keyboard - the name will auto complete) and hit Enter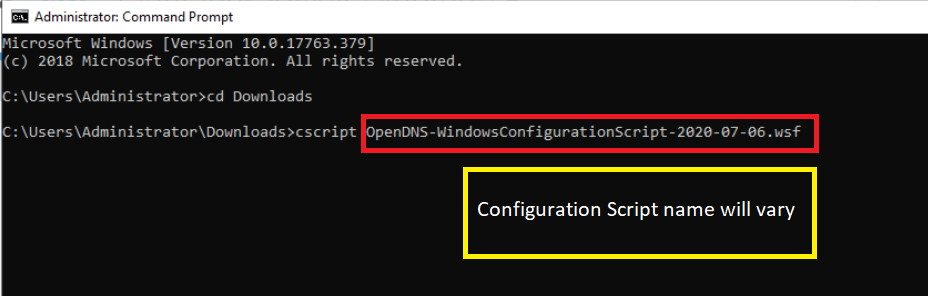
-
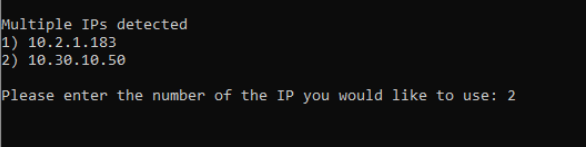
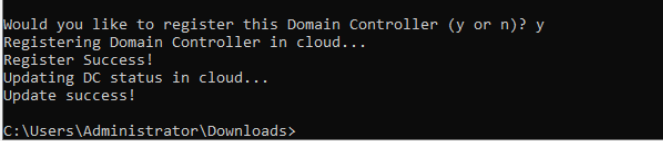
Enter 2 when asked to Enter the IP to be used. We will be using the 10.30.10.50 IP. This is the IP that will show up on Umbrella. Proceed through the script by Entering y for any other prompts that show up
-
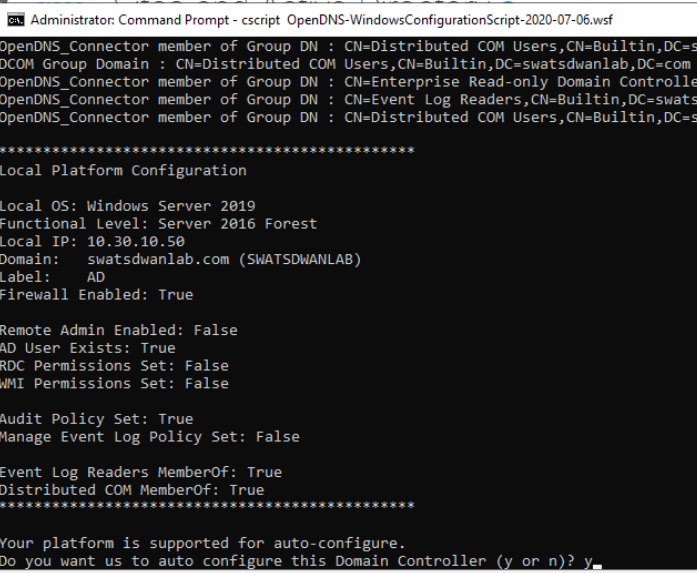
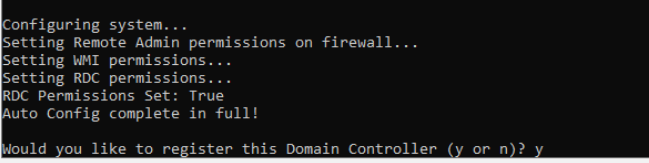
The configuration script should complete successfully
-
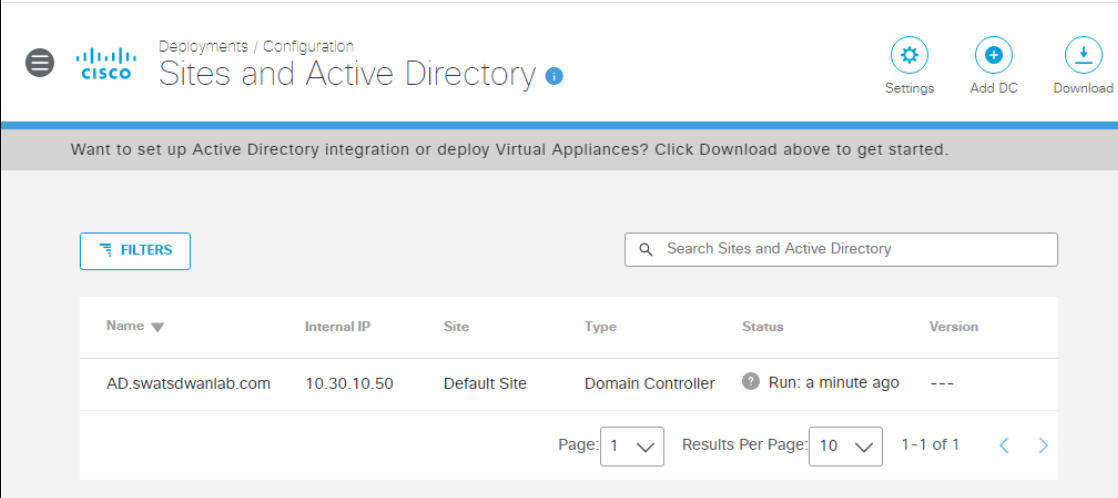
Head over to the Umbrella page and refresh the Sites and Active Directory page. The DC just added should show up. The status sometimes takes an hour to get updated
-
-
-
-
-
-
- Making Umbrella Ours
-
-
- AD Connectors
- Roaming Computer Configuration
- Building a DNS Policy
- Setting up IPSEC Tunnels
- Configuring a Firewall Policy
- Configuring a Web Policy
AD Connectors
AD Connectors allow Umbrella to see your AD structure and reference AD Groups/Users in Policies.
-
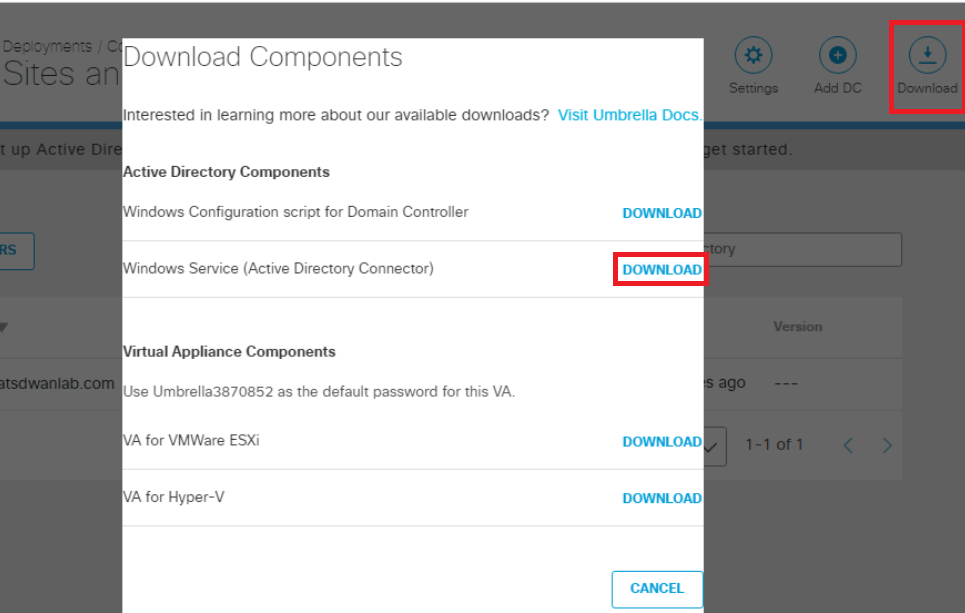
From the AD PC, make sure you are logged in to Umbrella and navigate to Deployment => Configuration => Sites and Active Directory. Click on the Download button in the top right-hand corner and download the Windows Service (Active Directory Connector)
-
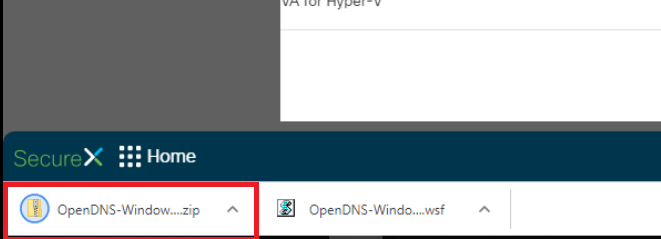
This will download a .zip file named OpenDNS-Windows-Service.zip. Click on the up arrow next to the downloaded file and choose to Open File Location (browser specific - Firefox has a folder icon in the list of downloads which takes you to the location)
-
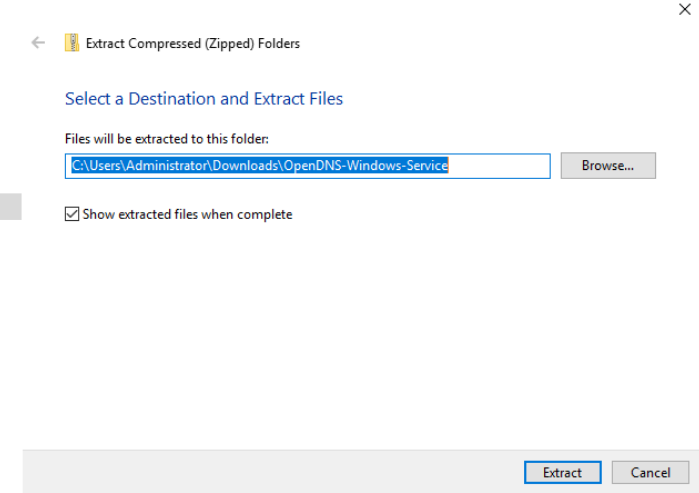
Right click on the file and choose Extract All
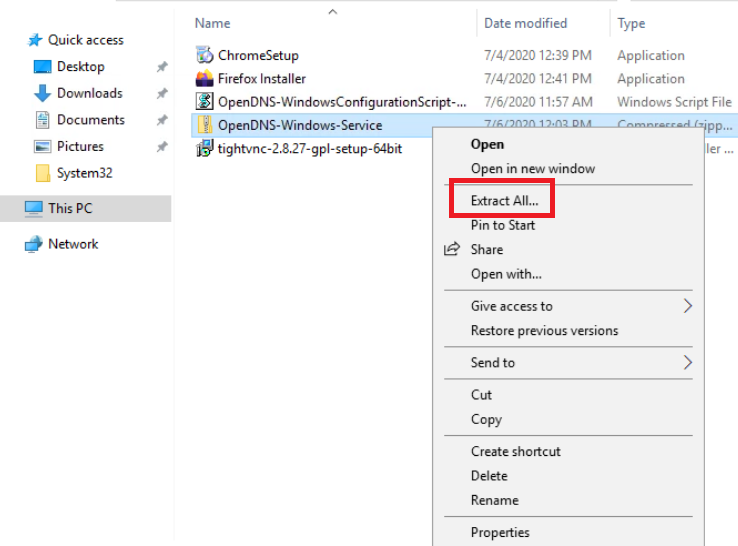
-
The file will be extracted to the path shown in the image by default. Click on Extract
-
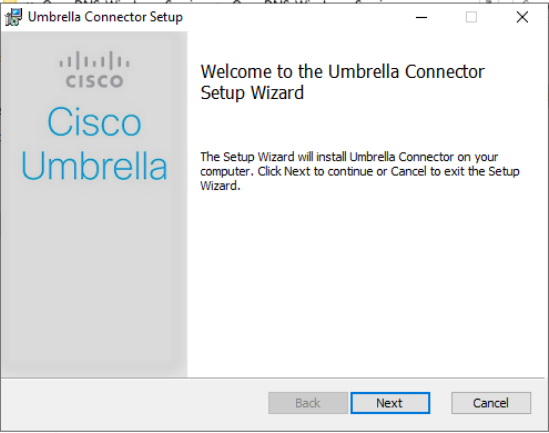
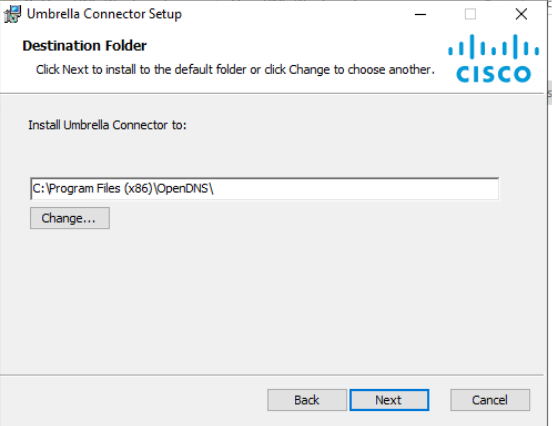
Once extracted, the contents of the .zip will open in a new window. Double click Setup to start the AD Connector Installer

-
Click on Next at the Welcome and Destination folder screens. Enter a password of C1sco12345, leaving the Username at the default of OpenDNS_Connector. These should match with the user we created in Active Directory. Click on Next
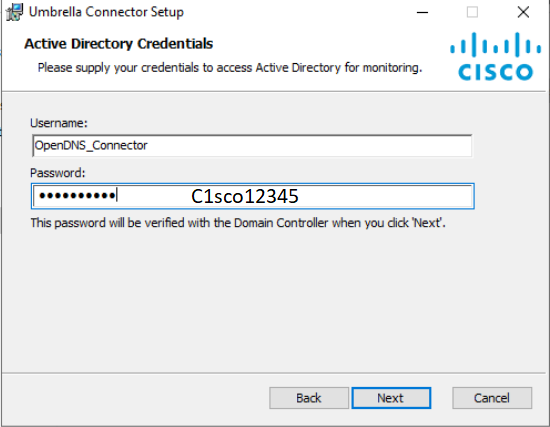
-
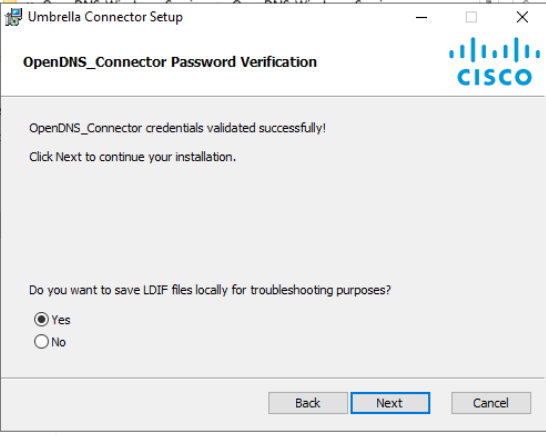
The credentials should be validated successfully. Click on Next
-
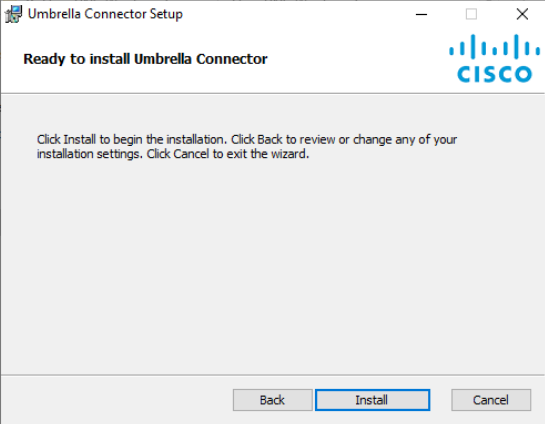
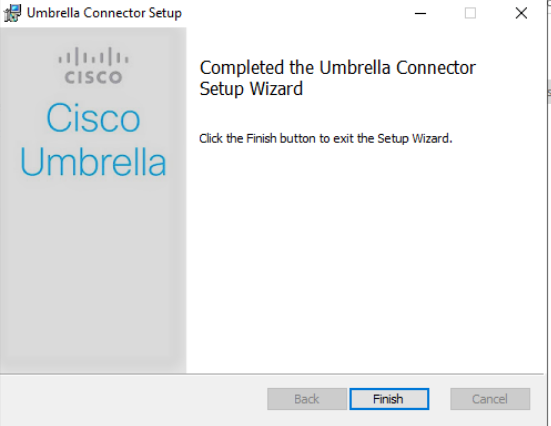
Click on Install to begin the installation and Finish once the installation is complete
-
On the AD PC, click on Start and search for services.msc. Click on the Services Desktop app
-
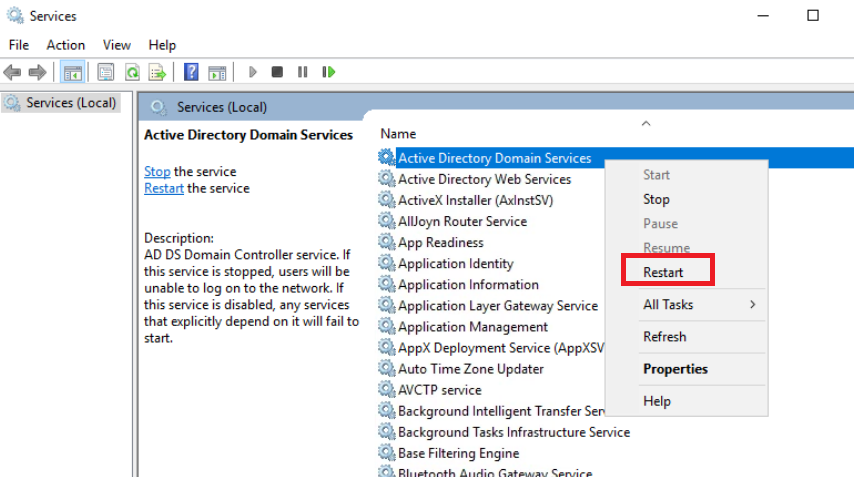
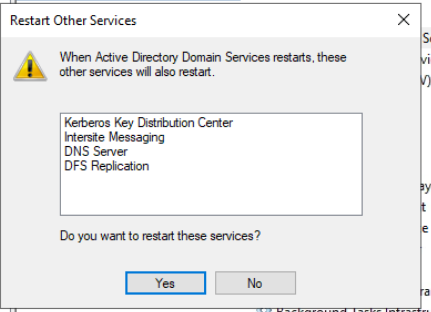
Right click on Active Directory Domain Services and choose to Restart the service. Select Yes to restart other related services as well
-
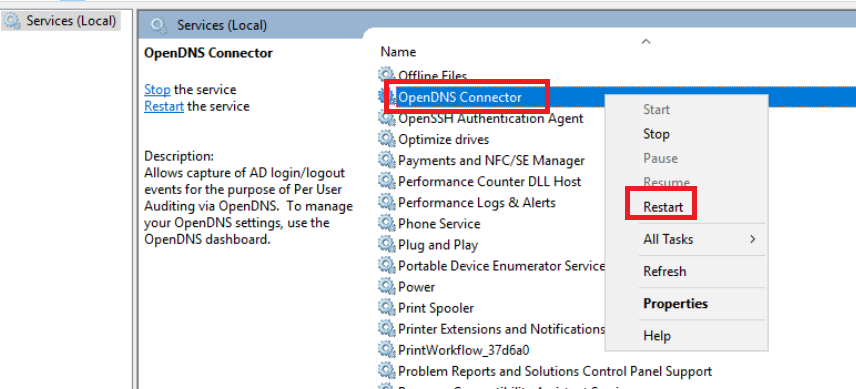
Once the services have restarted, locate the OpenDNS Connector service. Right click it and Restart this service as well
-
Head over to Umbrella and navigate to Deployments => Configuration => Sites and Active Directory. Refresh the page if you’re already on it and the AD Connector will show up over there. Don’t worry if you don’t see a green check mark (it takes time to reflect correctly)
-
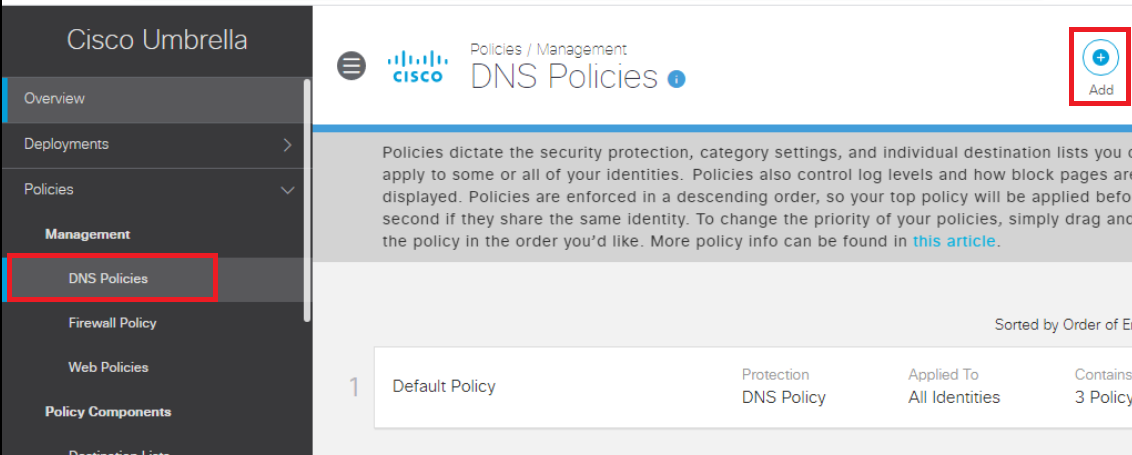
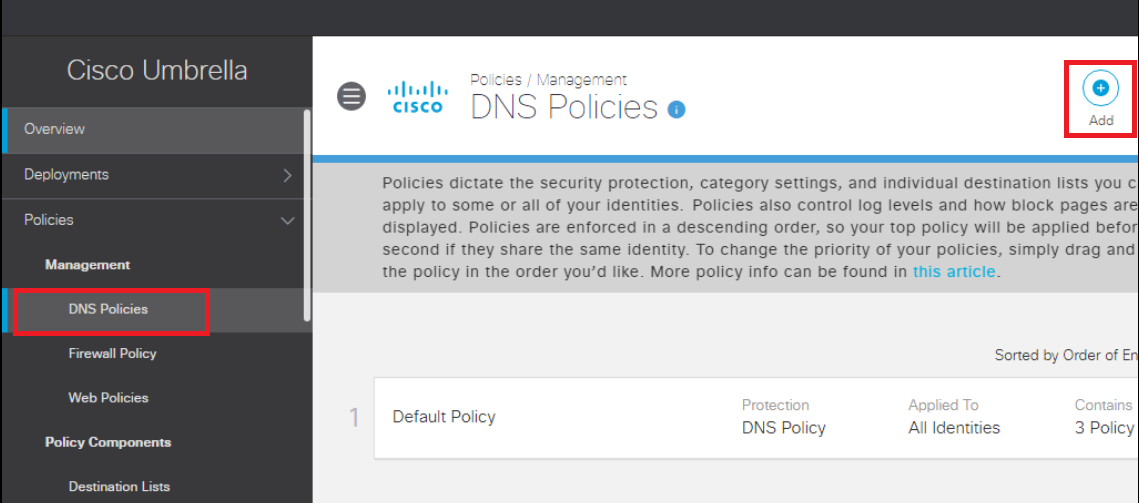
On the Umbrella GUI, go to Policies => Management => DNS Policies and click on Add to create a new DNS Policy. We won’t be adding the policy right now but will just check if our AD schema is visible on Umbrella
-
Click on Next
-
You should see AD Groups and AD Users under All Identities, with a number next to it (13 and 3 respectively in this screenshot). A number is an indication that Umbrella can now see our AD configuration
-
Click on AD Users (click on the word AD Users, don’t click on the checkbox next to it) and you will see 3 Users, imported from AD indicating that AD and Umbrella have been successfully linked. Click on Cancel

This completes the configuration needed for linking AD with Umbrella. While we can reference the AD Groups/Users in our DNS Policies, it is possible to become even more granular and link individual workstations to Umbrella, thereby encompassing the remote workers use case. We will configure this in the next section.
-
-
-
-
-
-
- Making Umbrella Ours
-
-
-
- Roaming Computer Configuration
- Building a DNS Policy
- Setting up IPSEC Tunnels
- Configuring a Firewall Policy
- Configuring a Web Policy
Roaming Computer Configuration
Cisco AnyConnect is used to identify Roaming Computers and include them within our DNS Policies. This is what will be leveraged in our lab environment to build and apply a DNS Policy.
-
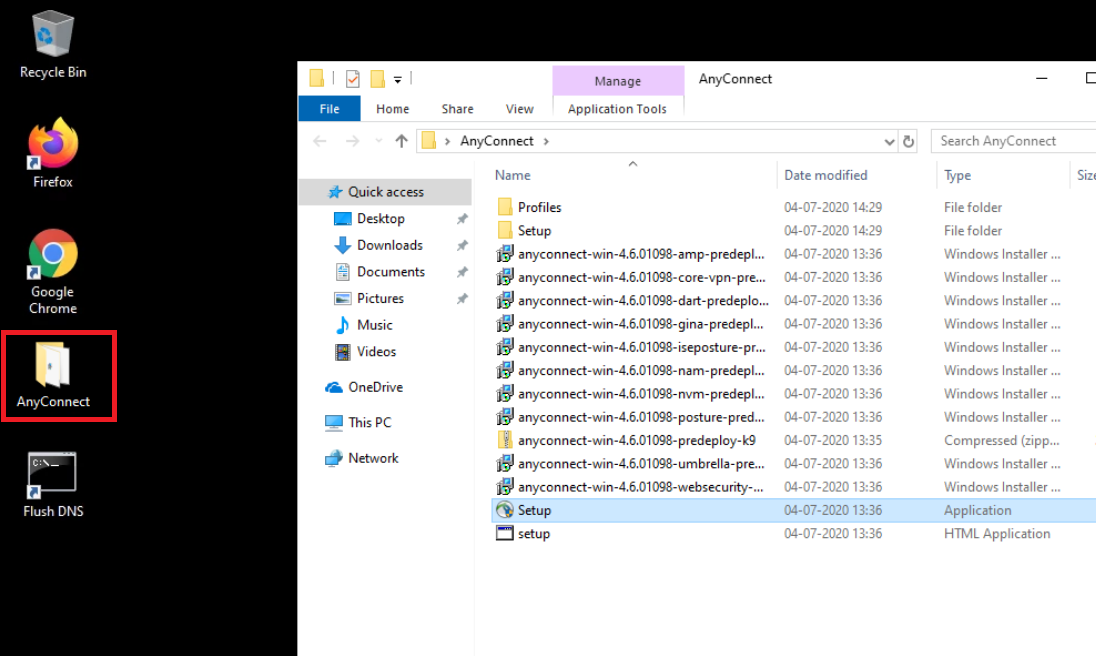
Access the Site 30 PC via your preferred method (Guacamole/RDP/vCenter Console) and log in. Click here and go through Step 1 to review how to connect to the Site 30 PC. Open the AnyConnect folder on the Desktop and double-click Setup to start installing AnyConnect
-
Enter the following credentials when prompted for a username/password and click on Yes
Username Password administrator C1sco12345 
-
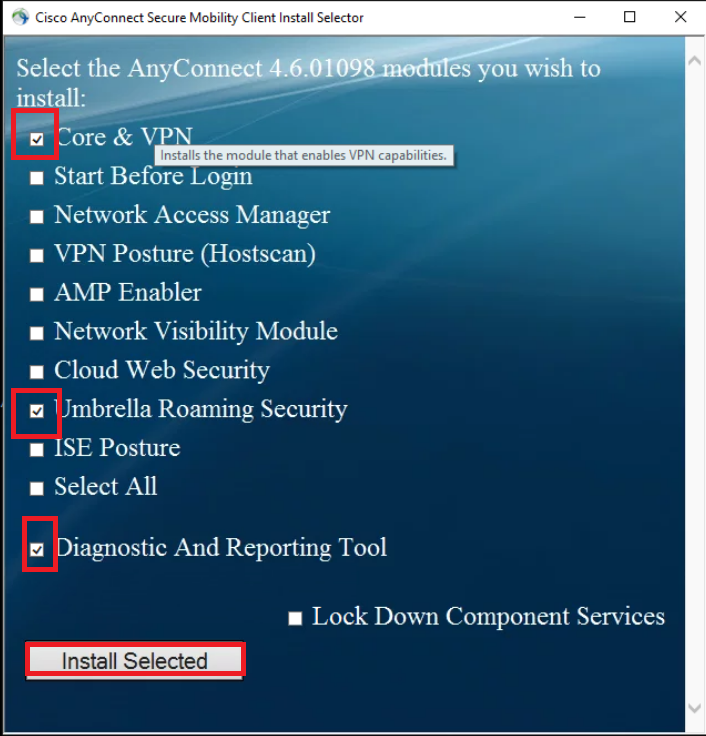
Remove the check mark against all modules except Core & VPN, Umbrella Roaming Security and Diagnostic And Reporting Tool. Click on Install Selected to install the selected modules
-
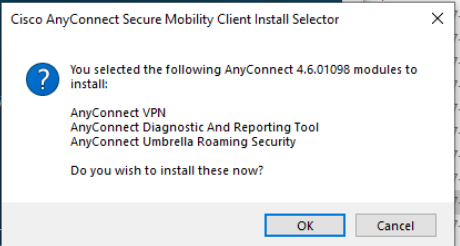
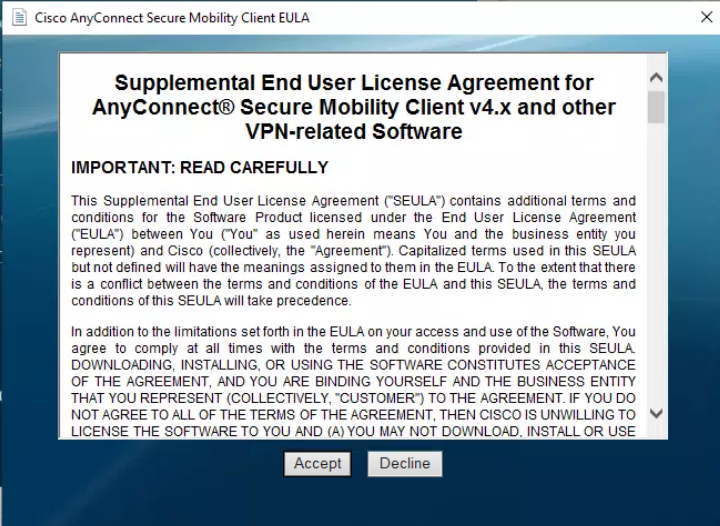
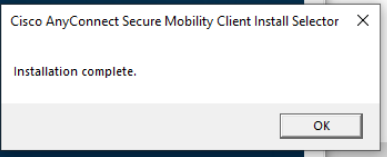
Click on OK and Accept the License Agreement
-
Once installation is complete, click on OK
-
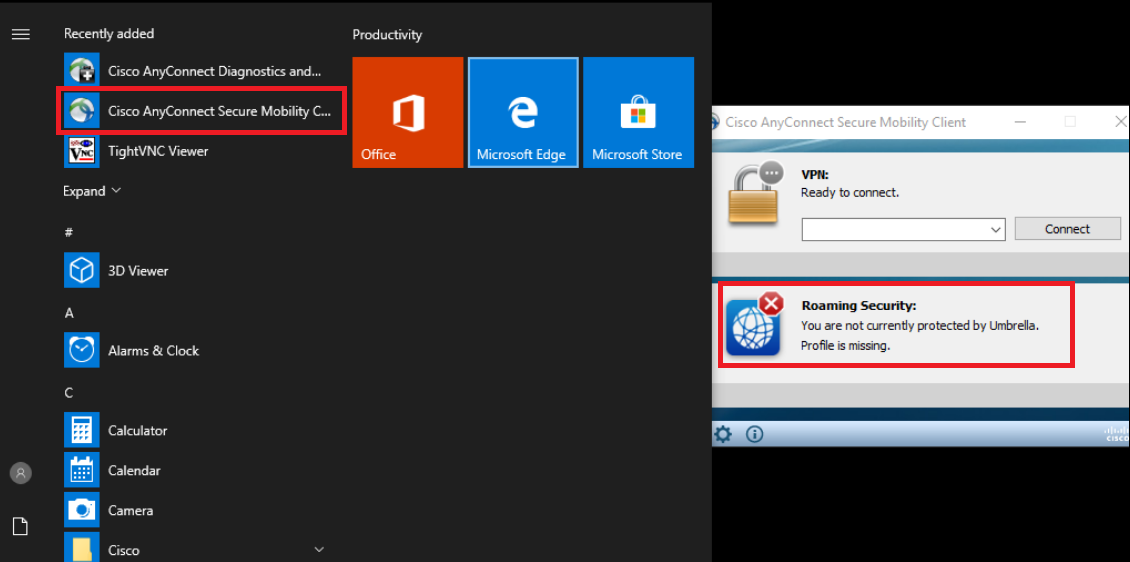
Open Cisco AnyConnect Secure Mobility Client by clicking on Start (it will show up in the Recently Added section). Notice that Roaming Security is flagged as unprotected by Umbrella. We will need to copy a profile unique to our Organization so that this workstation shows up on Umbrella as a Roaming Computer
-
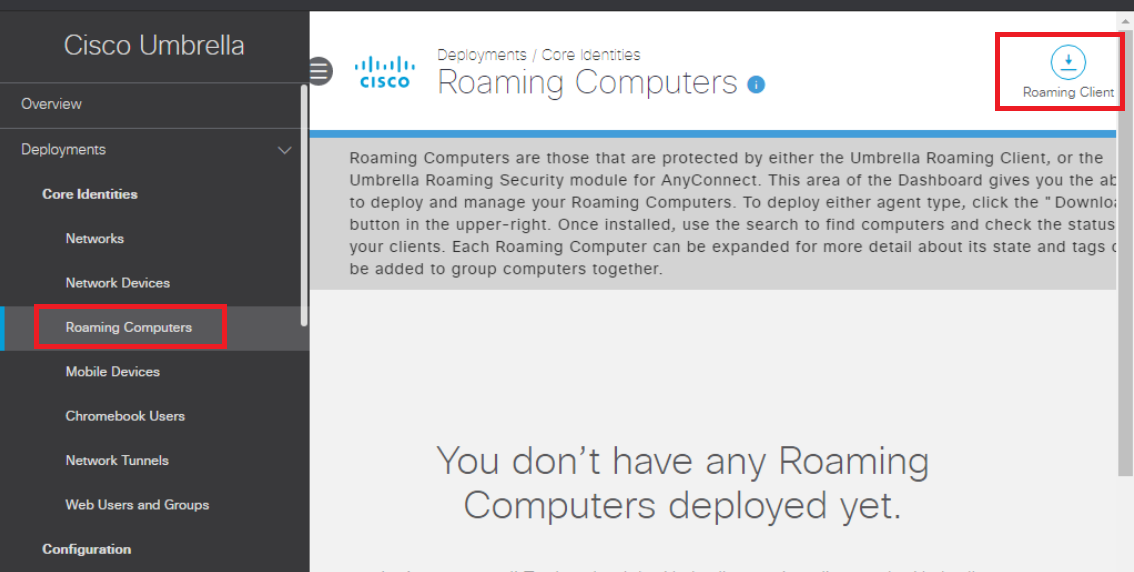
From the Site 30 PC, log in to Umbrella. Click here and reference Step 1 to review the login procedure, but make sure you log in to Umbrella via the Site 30 PC and not the AD PC. Go to Deployments => Core Identities => Roaming Computers and click on Roaming Client in the top right-hand corner
-
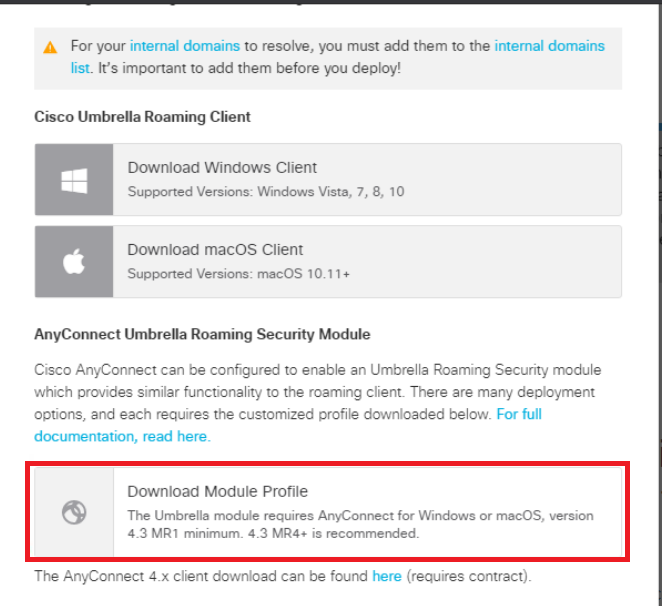
Click on Download Module Profile
-
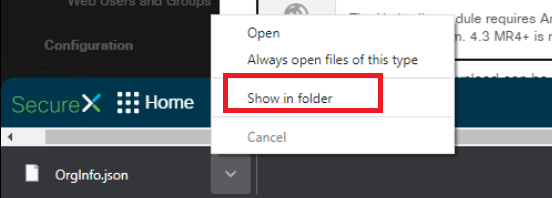
This will download a file called OrgInfo.json. Click on the arrow next to the file download and choose Show in folder (again, browser specific - Firefox has a folder icon to go to the download location)
-
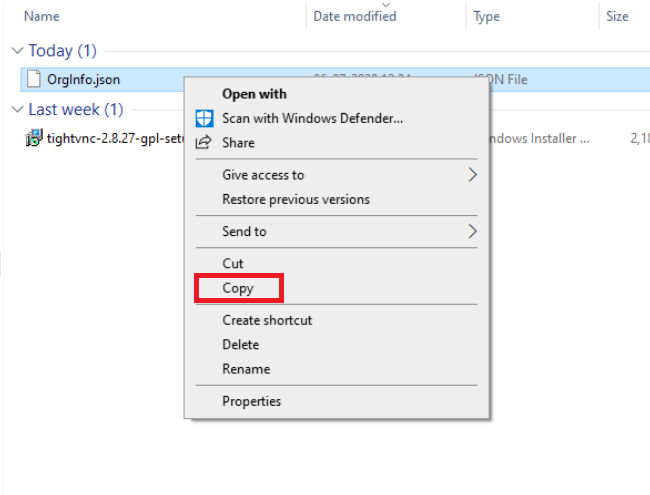
Right click on OrgInfo.json and click on Copy
-
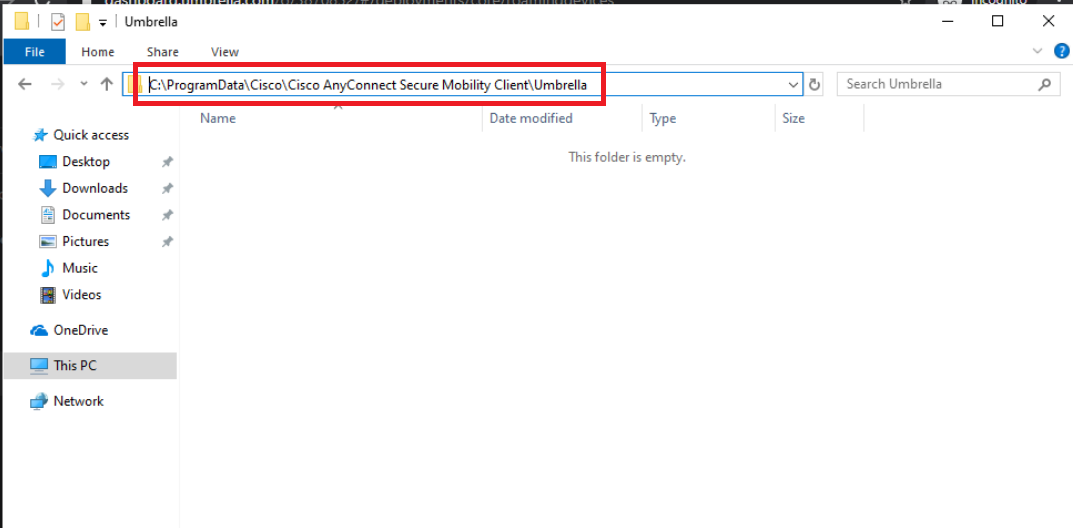
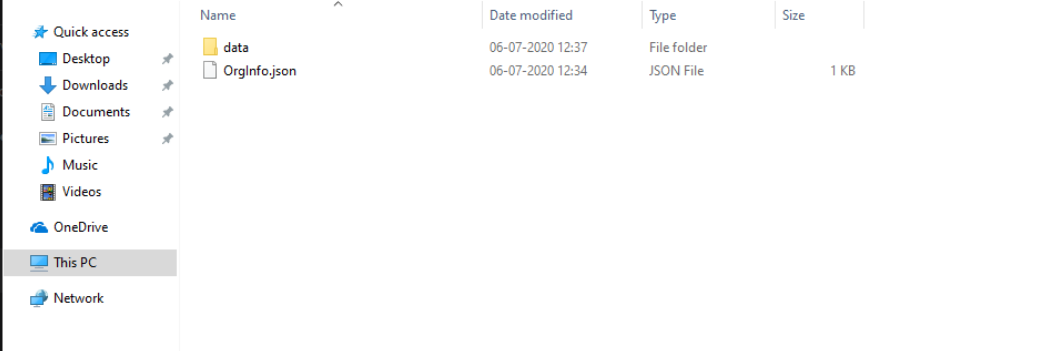
Open Windows Explorer and enter the following path (you will not be able to see this folder since it’s hidden by default. There is an option to view hidden files and folders in Windows, but we can browse directly to the location)- C:\ProgramData\Cisco\Cisco AnyConnect Secure Mobility Client\Umbrella
-
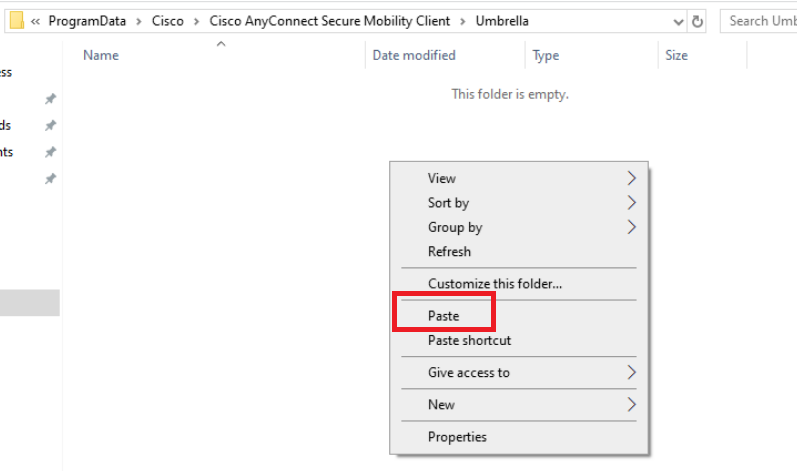
Paste the file we copied before (OrgInfo.json)
-
Click on Continue
-
Enter the username/password as shown below
Username Password administrator C1sco12345 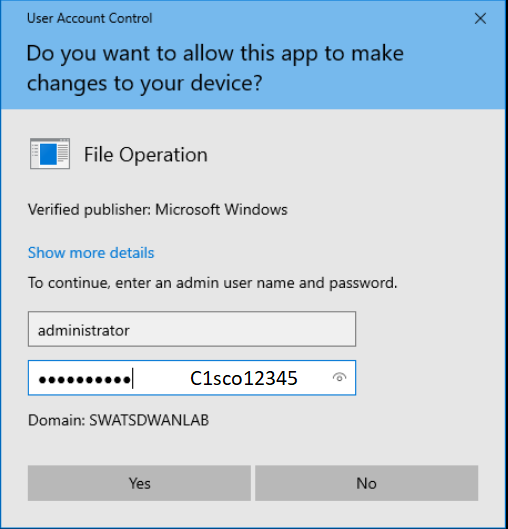
-
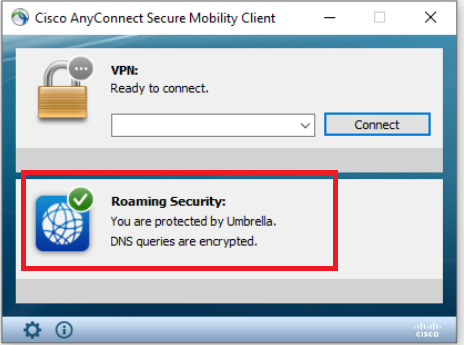
Once the file is placed in the folder, it should auto-generate another folder called data. If this doesn’t show up, close Cisco AnyConnect and re-open
-
AnyConnect should now show that you are protected by Umbrella
-
Back at the Umbrella GUI, refresh the Roaming Computers page. The Site 30 PC will show up as a Roaming Computer
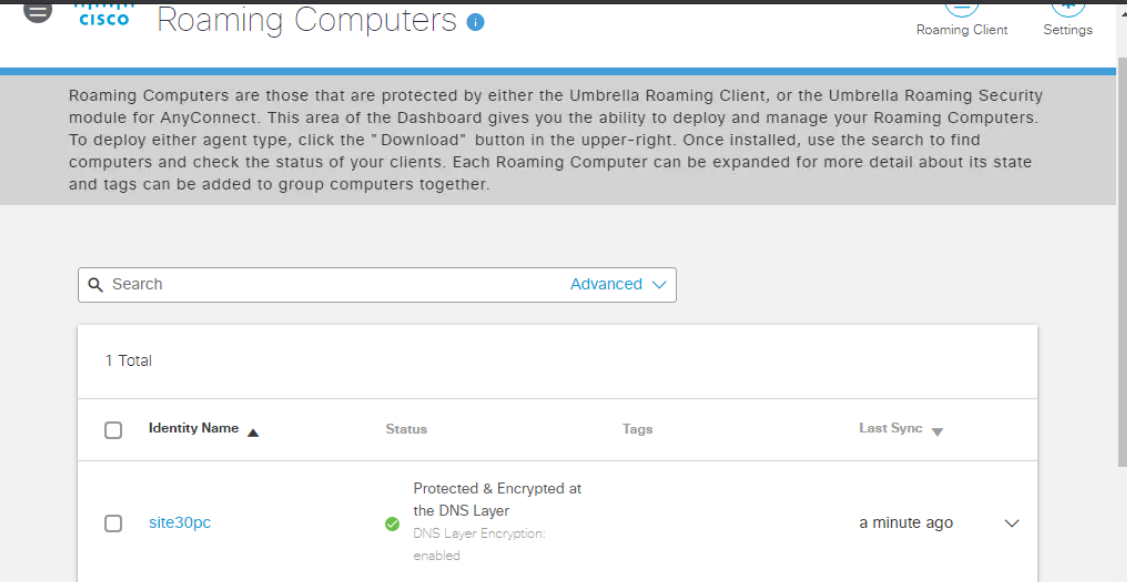
We will use the Roaming Computer as an Identity to enforce DNS Policies (the next section).
-
-
-
-
-
-
-
-
-
-
-
- Building a DNS Policy
- Setting up IPSEC Tunnels
- Configuring a Firewall Policy
- Configuring a Web Policy
Building a DNS Policy
-
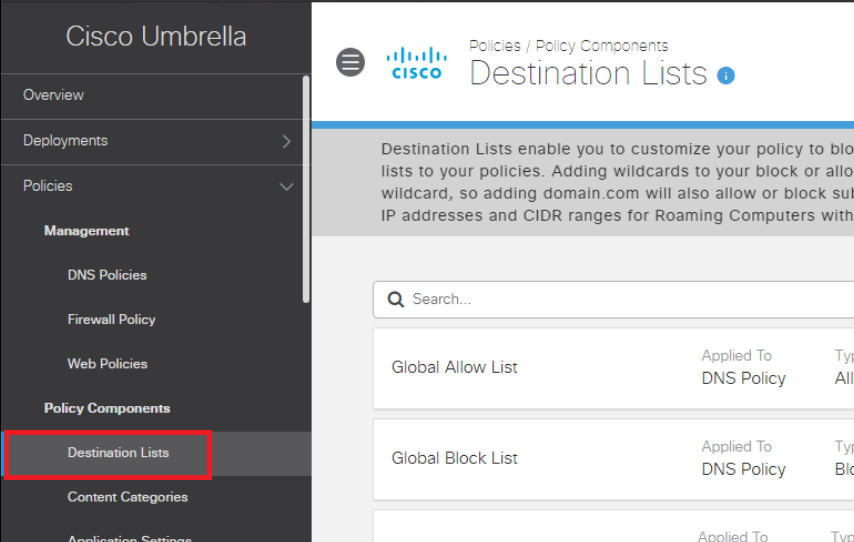
Log in to the Cisco Umbrella GUI (you can now log in from your own workstation since Umbrella is on the Cloud). Click here and reference Step 1 to review the login procedure. Navigate to Policies => Policy Components => Destination Lists. You will notice a few default Lists already created
-
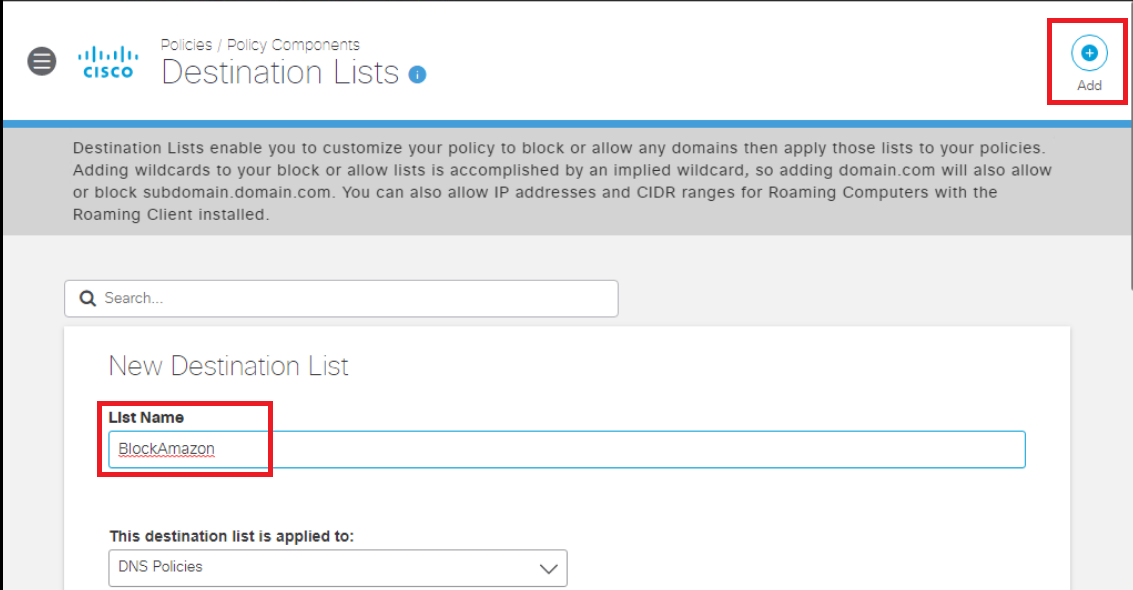
Click on Add in the top right-hand corner and give your List a name of BlockAmazon. Leave the This destination list is applied to field at DNS Policies
-
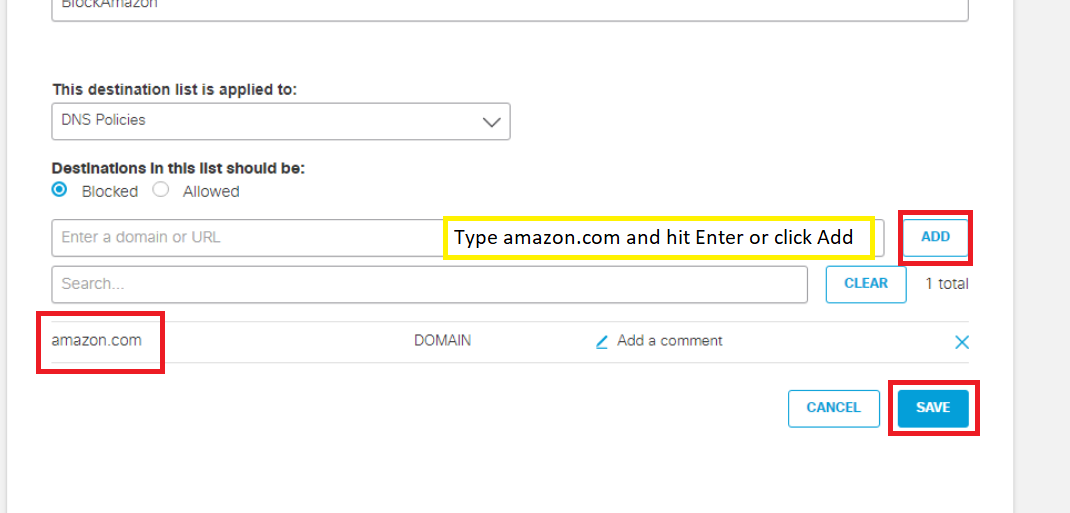
Scroll down to the Destinations in this list should be field and make sure it is set to Blocked. Type amazon.com in the Enter a domain or URL box and hit Enter (or click on Add). This should place amazon.com in the list (blocked). Click on Save
-
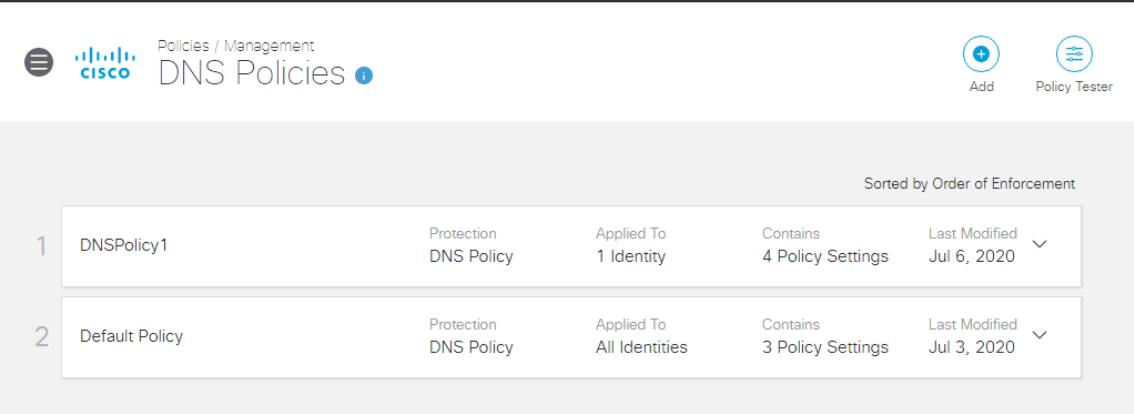
Navigate to Policies => Management => DNS Policies and click on Add to add a new DNS Policy
-
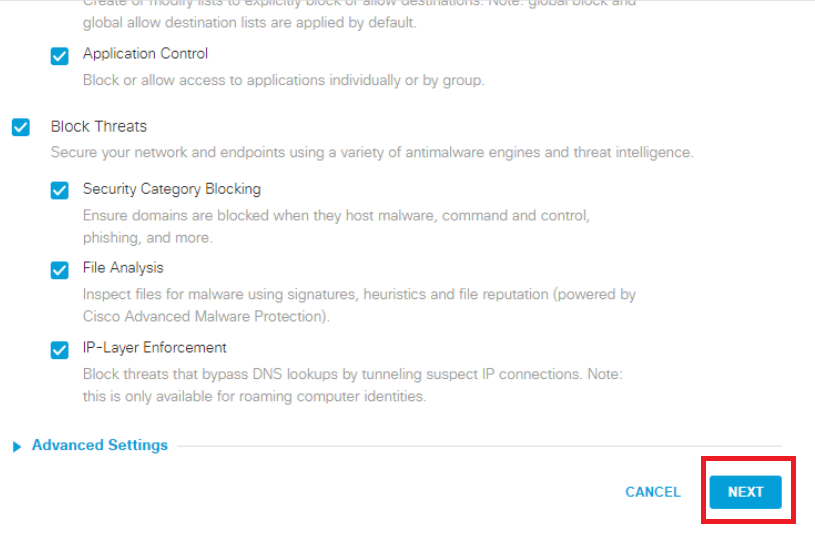
Scroll down on the How would you like to be protected? page and click on Next without making any changes
-
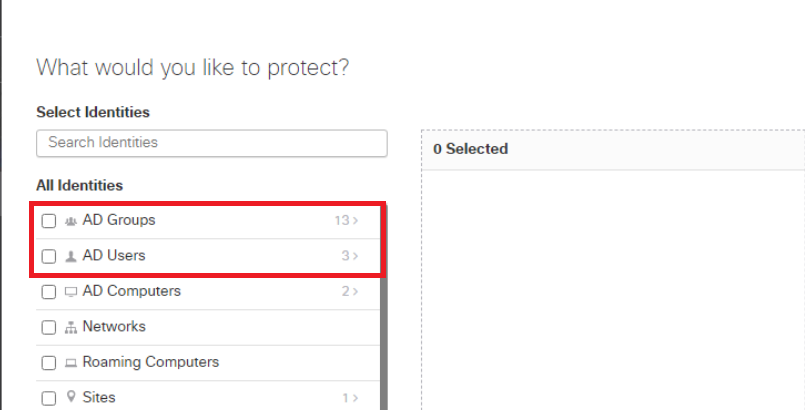
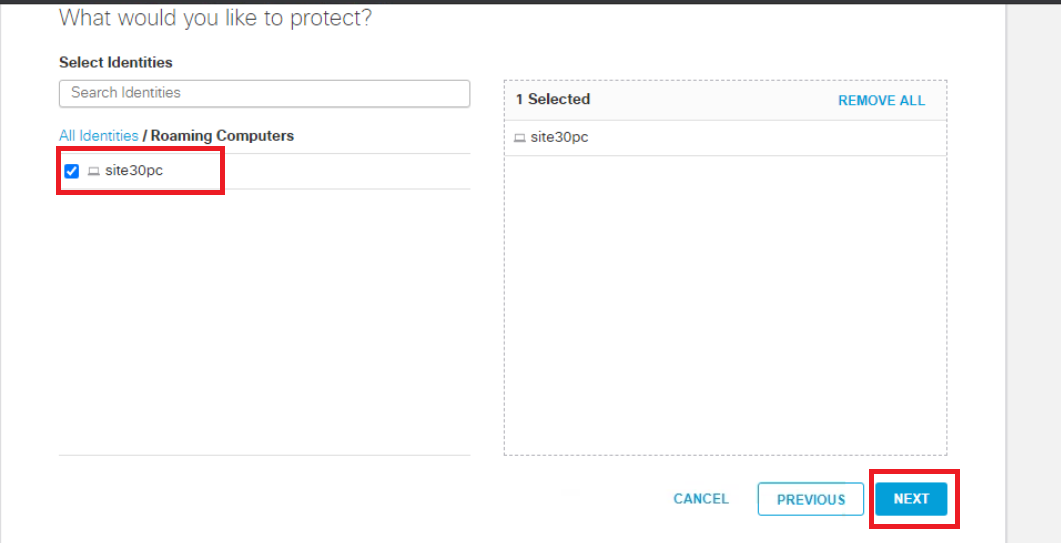
On the What would you like to protect? page, click on Roaming Computers. Don’t click on the checkbox next to it, but on the actual phrase itself
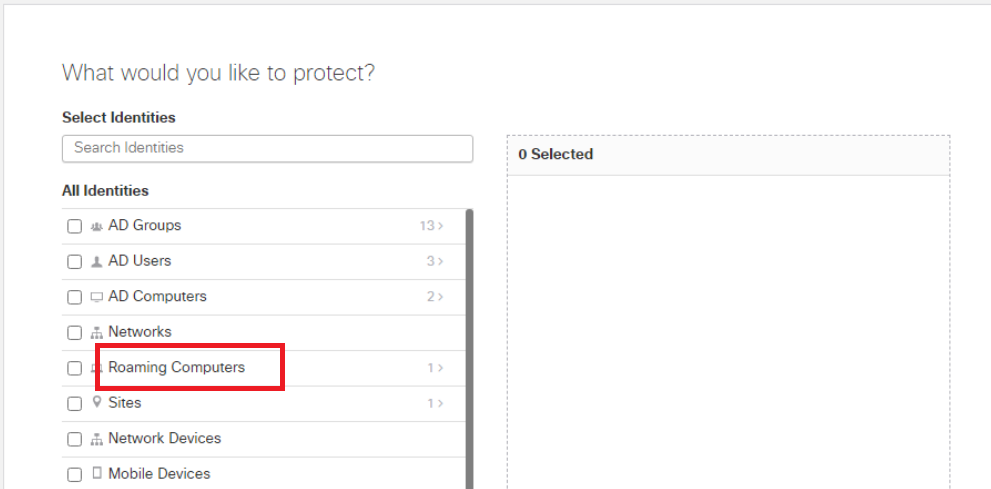
-
Put a check mark next to site30pc and it should show up in the right-hand window. Click on Next
-
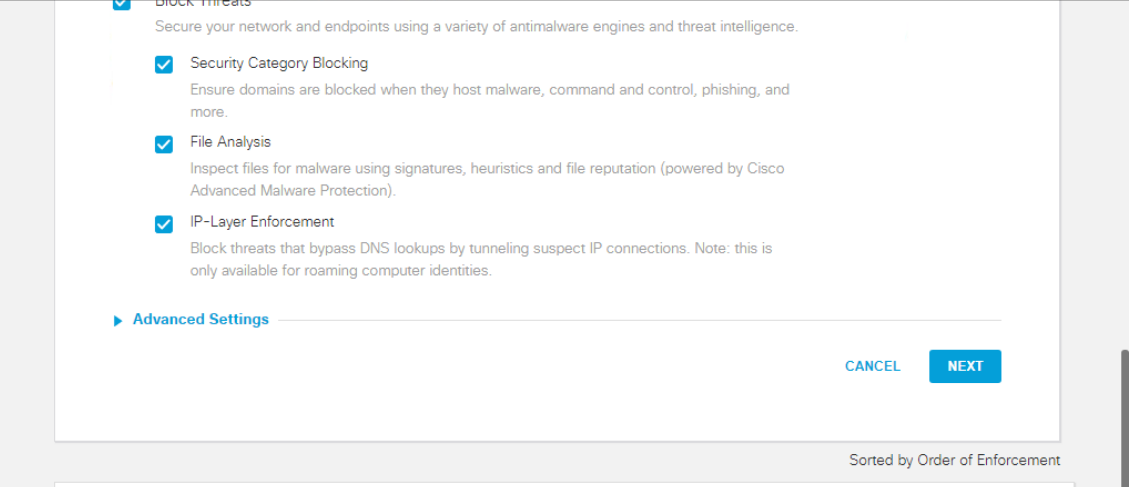
Click Next in the Security Settings
-
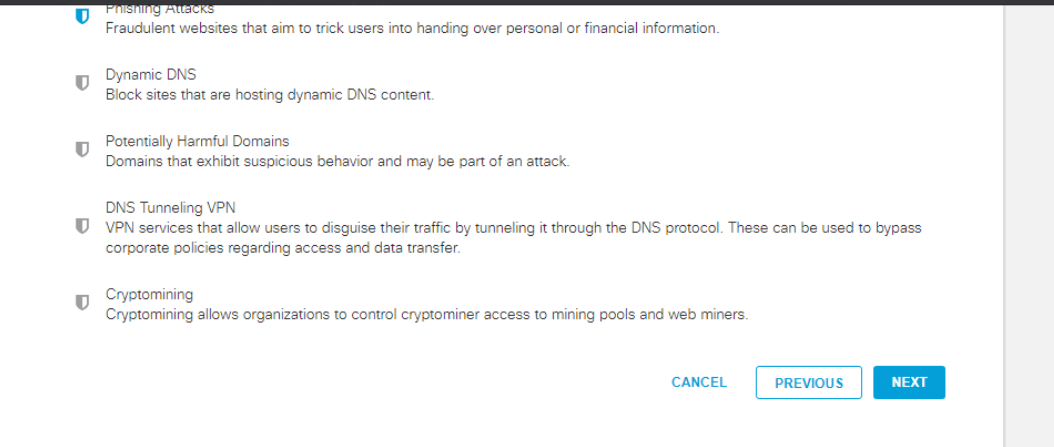
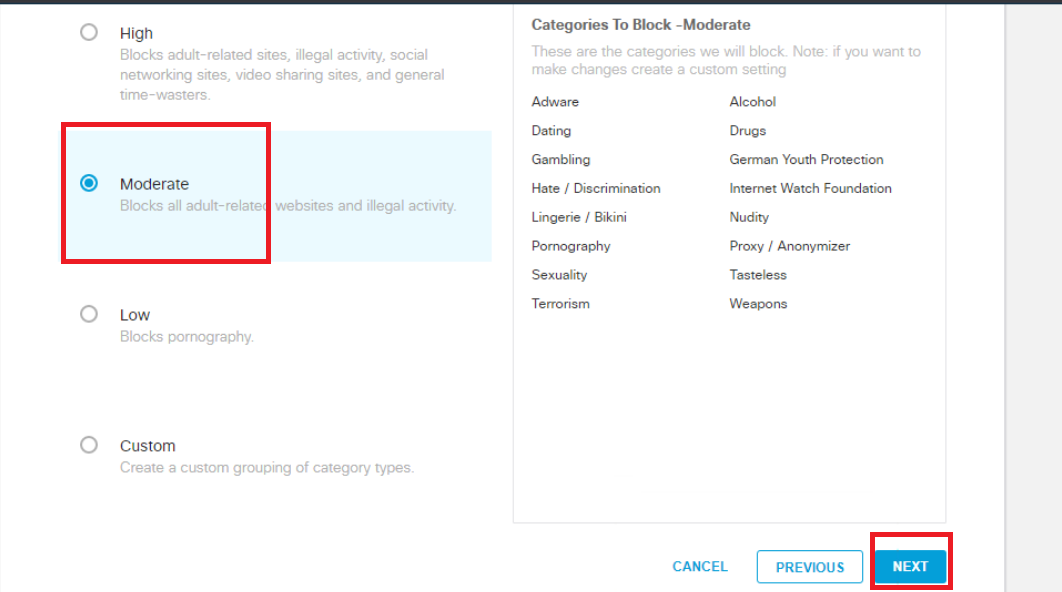
Select Moderate on the Limited Content Access page and make note of the categories that are being blocked. Click on Next
-
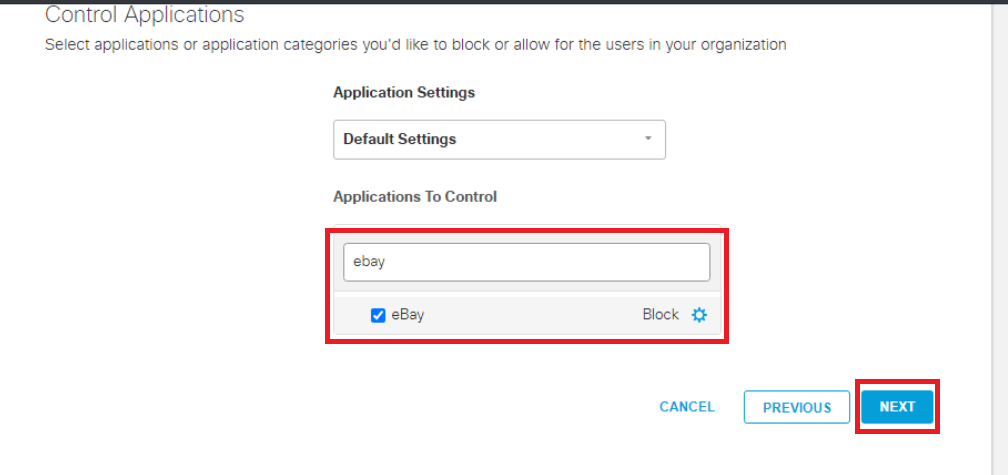
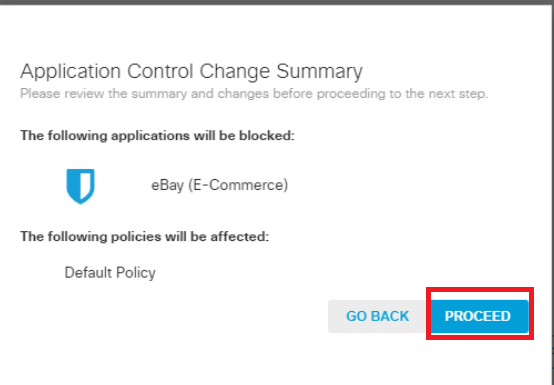
Search for ebay in the Search Box on the Control Applications page under Applications to Control and put a check mark next to eBay. Make sure it is set to Block and click on Next. Click on Proceed on the Application Control Change Summary page
-
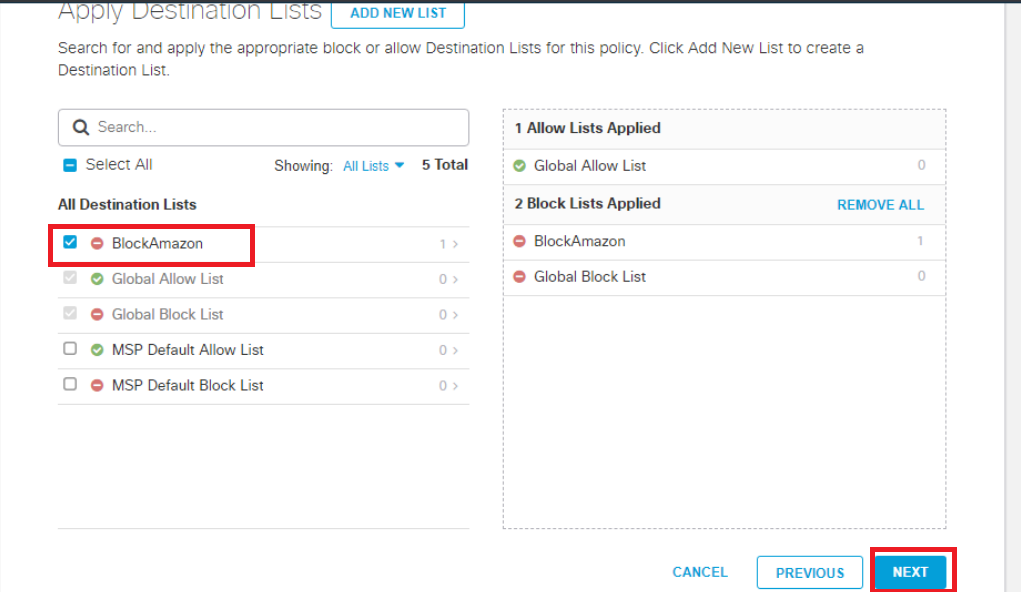
Put a check mark next o BlockAmazon on the Apply Destination Lists page. This will apply the List we created before to the policy being built right now. You should see BlockAmazon on the right hand-side under 2 Block Lists Applied. Click on Next
-
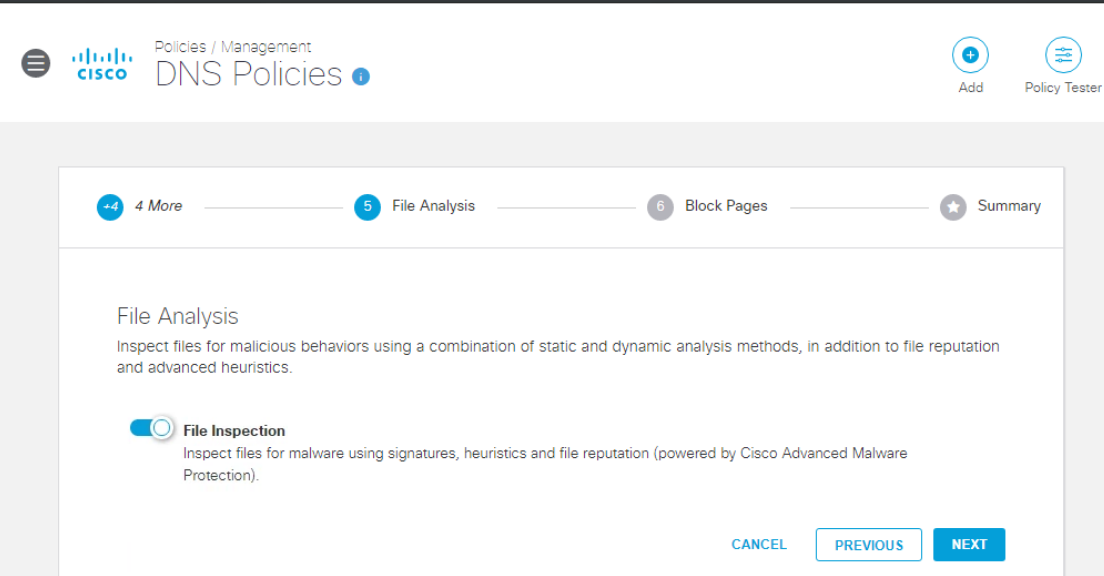
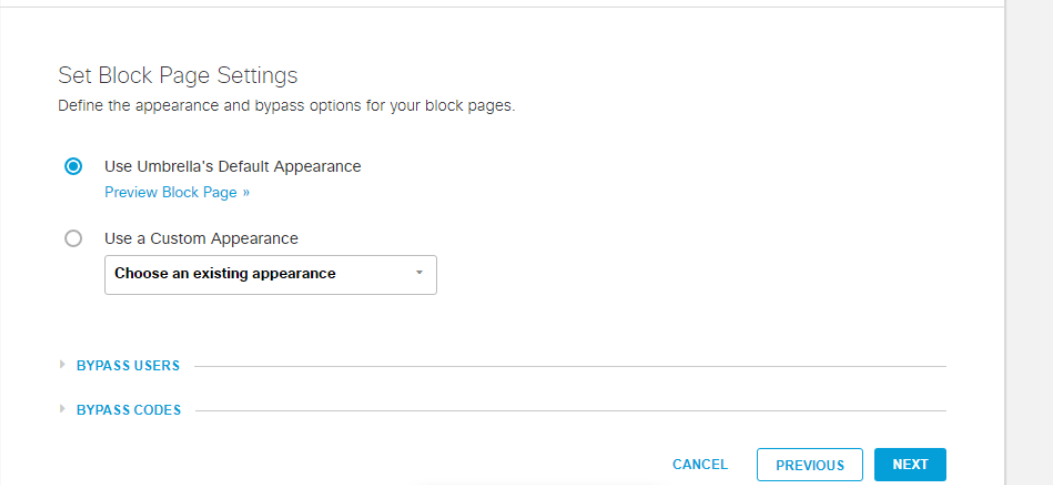
Click on Next on the File Analysis and Set Block Page Settings pages without making any changes
-
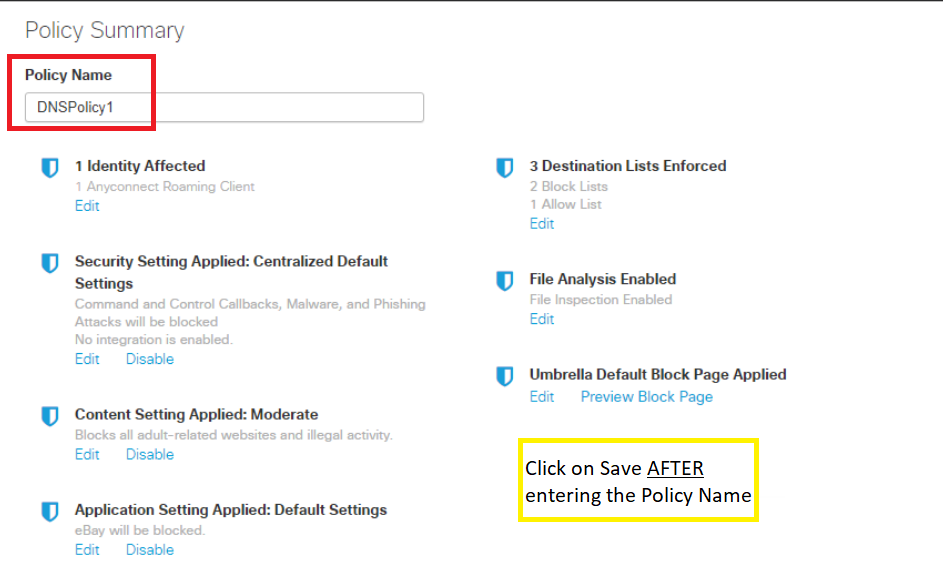
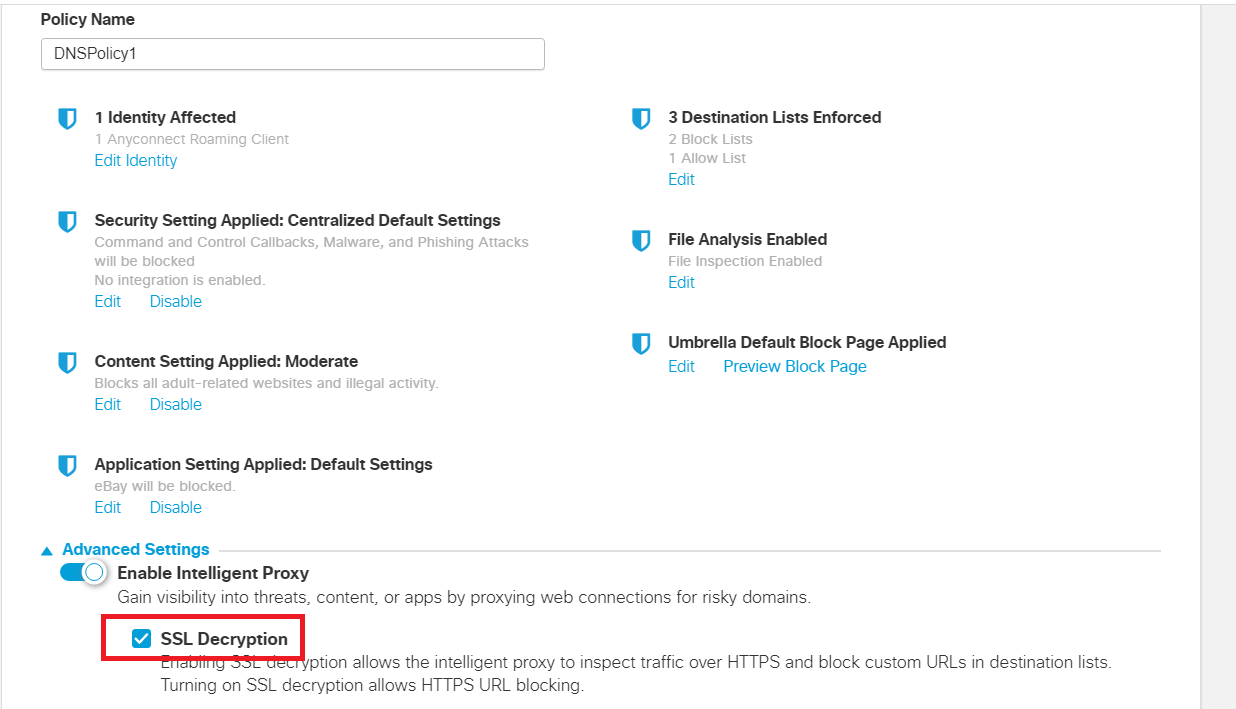
Once on the Policy Summary page, give your Policy a Name of DNSPolicy1. Click on Save
-
Our DNS Policy is now created. It might take 5 minutes for the policy to be applied. Click on the DNSPolicy1 policy and enable SSL Decryption. Scroll down and click on Save
-
We are now going to test our DNS Policy, but before doing so, the Cisco Umbrella root certificate will need to be downloaded and installed on the Site 30 PC. Head over to the Site 30 PC via your preferred connection method (Guacamole/RDP/vCenter Console). Click here and go through Step 1 to review how to connect to the Site 30 PC. Double-click the Flush DNS icon on the Desktop to clear the DNS cache
-
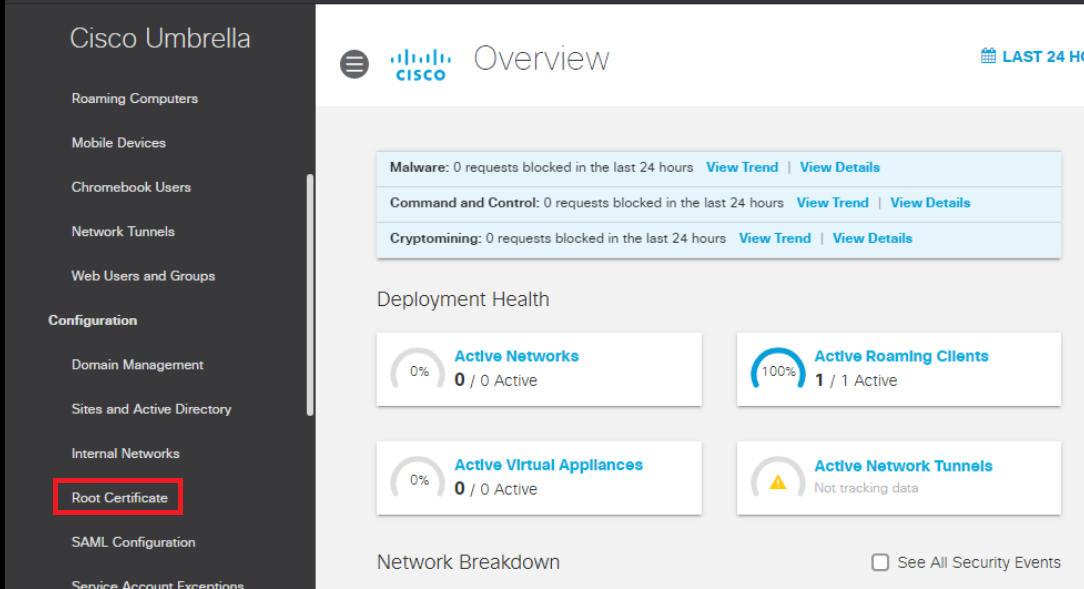
Log in to Umbrella on the Site 30 PC (login.umbrella.com). Click here and reference Step 1 to review the login procedure, but make sure you log in to Umbrella via the Site 30 PC. Navigate to Deployment => Configuration => Root Certificate
-
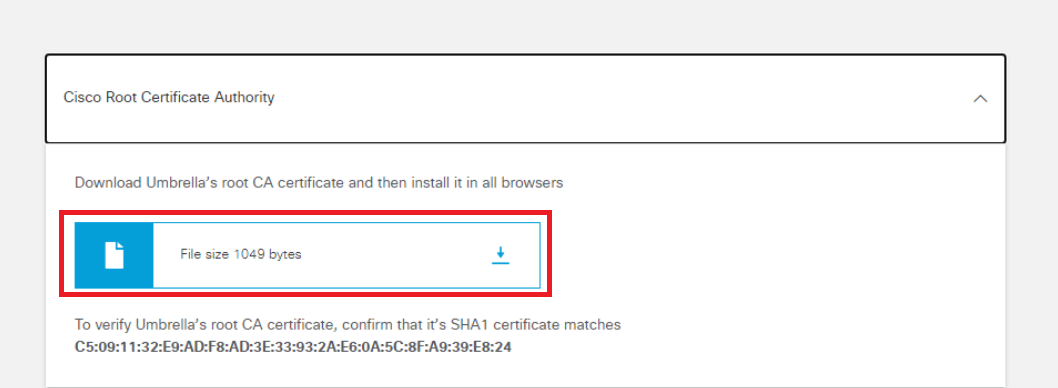
Expand Cisco Root Certificate Authority and download the root CA certificate
-
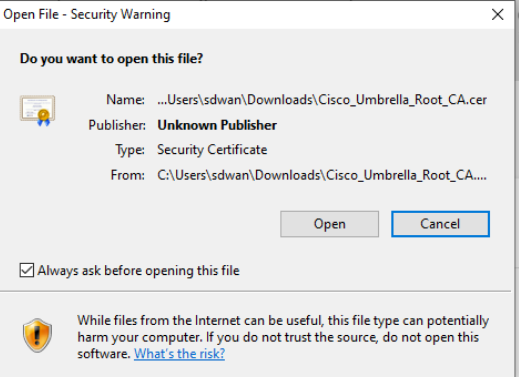
Click on Keep, if prompted and open the downloaded file. Choose Open in the Security Warning
-
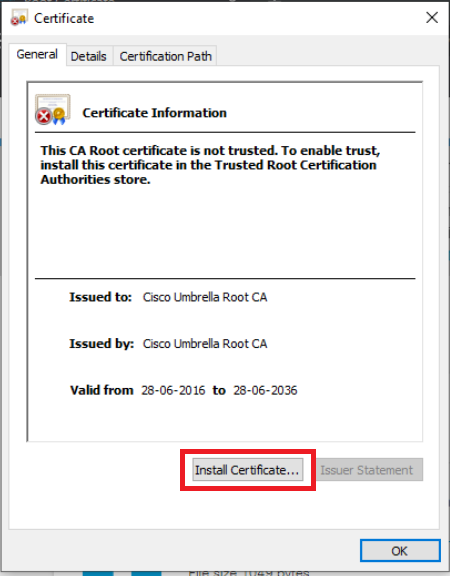
Click on Install Certificate
-
Select Local Machine and click on Next. Enter the credentials shown below and click on Yes
Username Password administrator C1sco12345 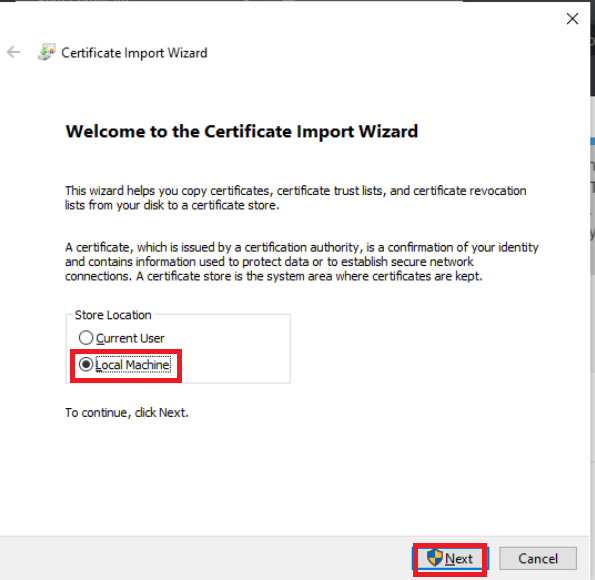
-
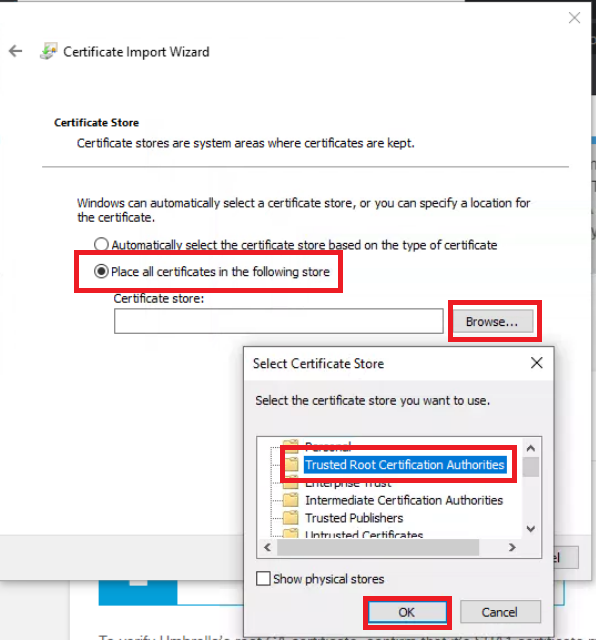
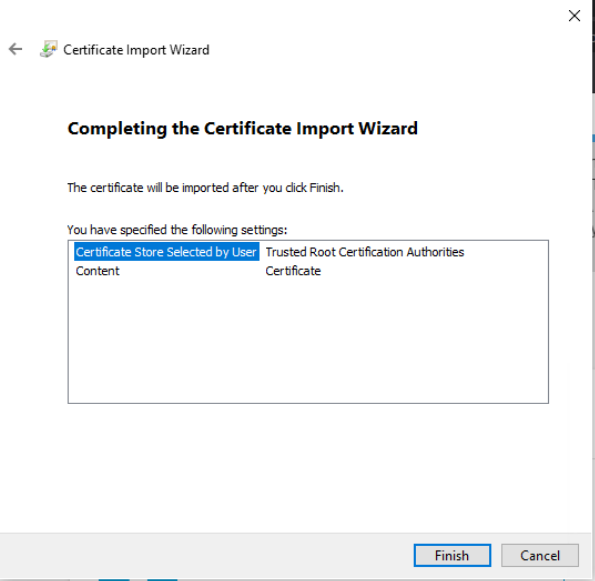
Choose the radio button next to Place all certificates in the following store and click on Browse. Click on Trusted Root Certification Authorities and hit OK
-
Click on Finish and then OK. Close the browser you were using and re-open before proceeding to the next step
-
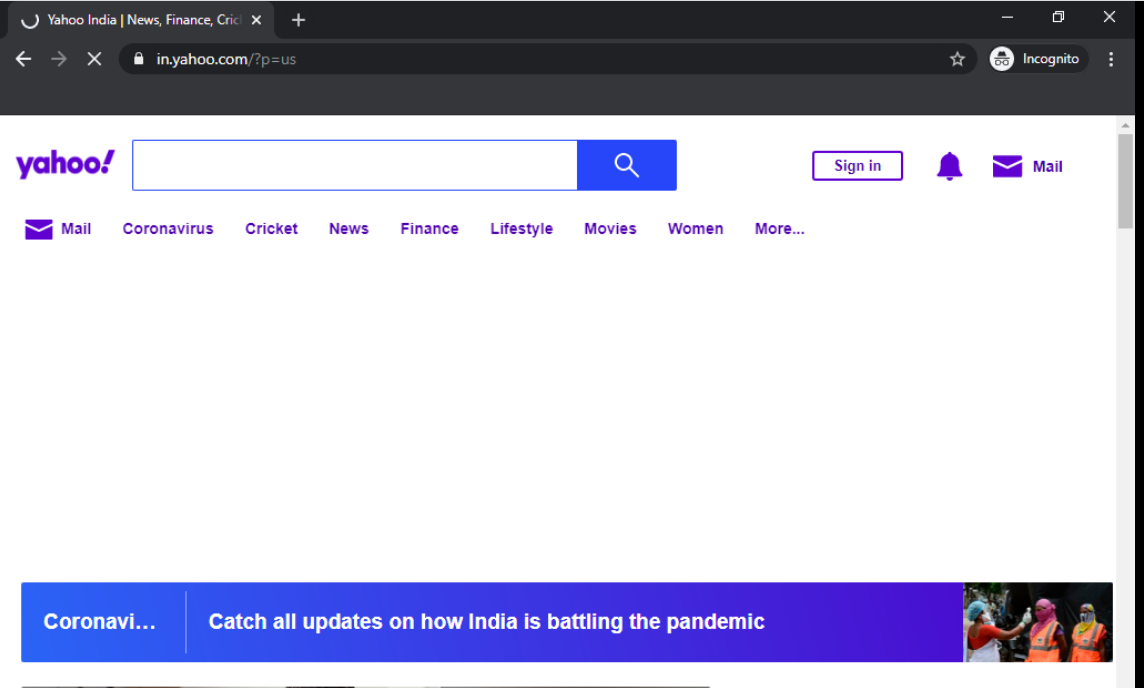
On the browser, go to yahoo.com. The page should open since we haven’t applied any policy for it
-
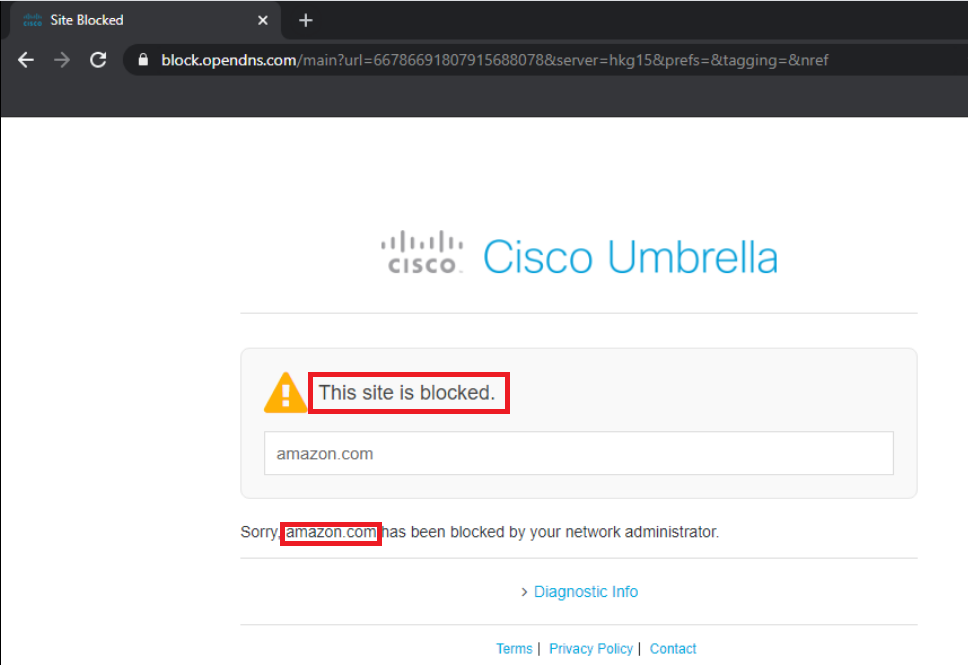
Now try going to amazon.com. We will find that it is blocked with the text The site is blocked indicating this has been done by the administrator via a Block List. Amazon was opening before, but our company policy doesn’t allow it and we have thus leveraged Cisco Umbrella’s DNS Policy functionality to block specific destinations
-
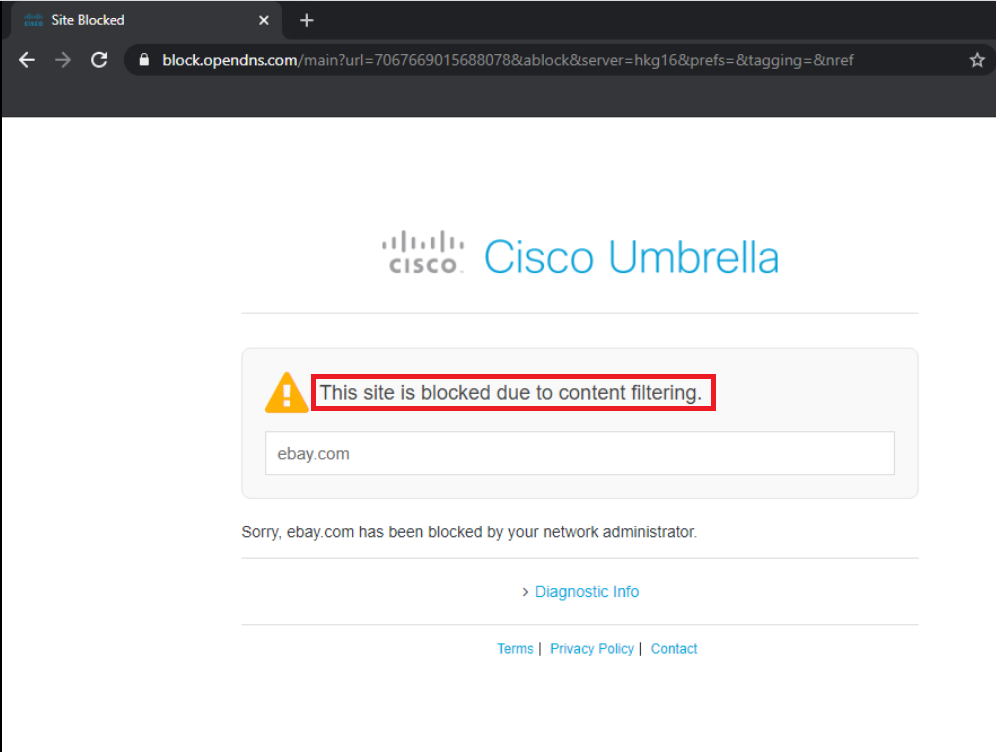
Try to browse to ebay.com. This will also be blocked but the text will read This site is blocked due to content filtering. This is because we blocked eBay in the Control Applications section of our policy
-
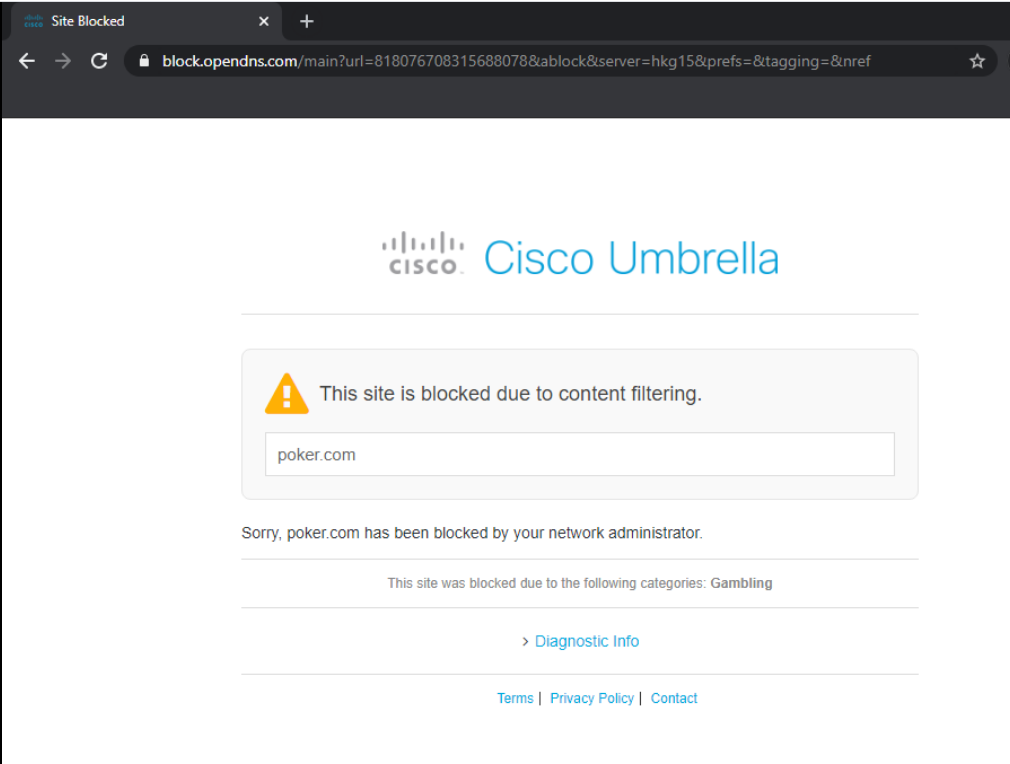
Try to go to poker.com. This will also be blocked (with the same text as the previous step). Over here, our Limited Content Access level of Moderate is coming in to play. Note the subtext mentioning This site was blocked due to the following categories: Gambling
This completes the DNS Security part of our configuration. We have successfully deployed a DNS Policy, blocking sites that are not allowed by our company policy.
-
-
-
-
-
-
-
-
-
-
-
-
- Setting up IPSEC Tunnels
- Configuring a Firewall Policy
- Configuring a Web Policy
Setting up IPSEC Tunnels
The main focus of SD-WAN and Umbrella integration is around Secure Internet Gateway (SIG) functionality. So far, we have run through a DNS policy which is the first layer of security in the network. For deeper packet inspection, we can utilize Umbrella and SD-WAN’s SIG functionality which will create IPSEC tunnels between our vEdges/cEdges and Cisco Umbrella. Traffic will be sent to Umbrella over the IPSEC tunnels and will be subject to Firewall and Web policies.
-
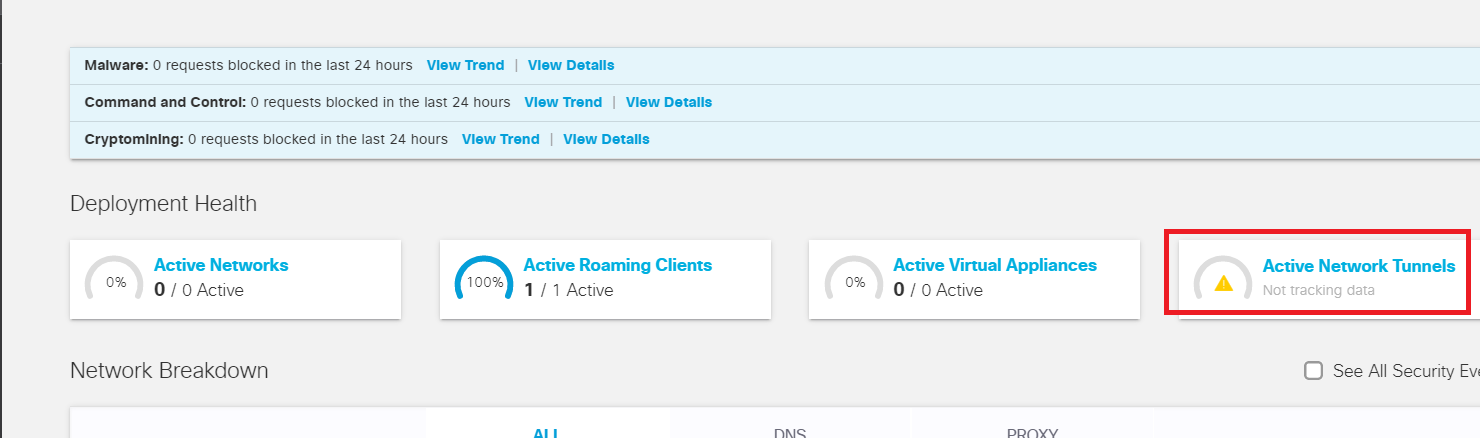
Open a browser and log in to Cisco Umbrella from your Jumphost. Click here and reference Step 1 to review the login procedure, but make sure you log in to Umbrella via the Jumphost and not any other workstation. The main overview page will show that we have 1/1 Active Roaming Client and no Active Network Tunnels
-
Log in to the vManage GUI via the bookmark (or go to 192.168.0.6) with the Username and Password given below. Navigate to Configuration => Templates => Feature Tab and click Add Template. Search for vedge and select the vEdge Cloud device. Click on SIG Credentials under Other Templates
Username Password admin admin 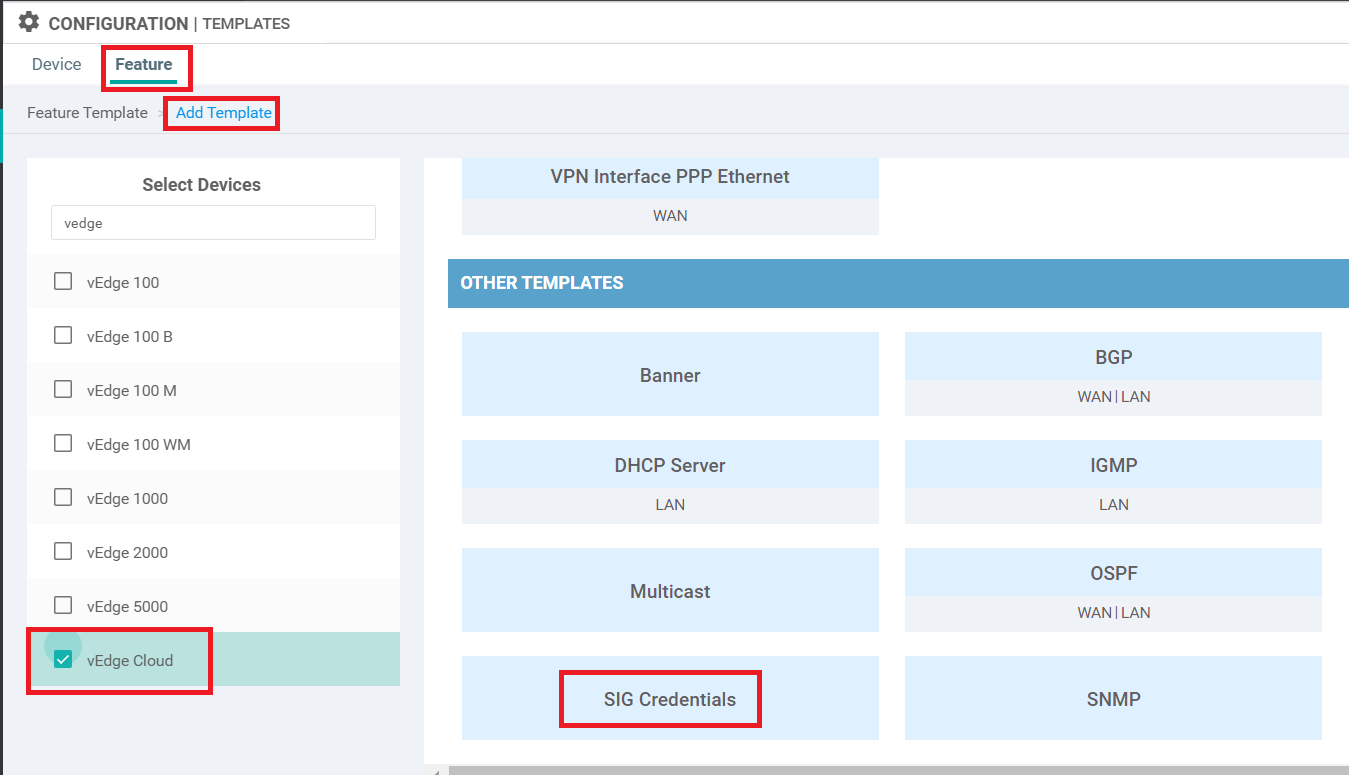
-
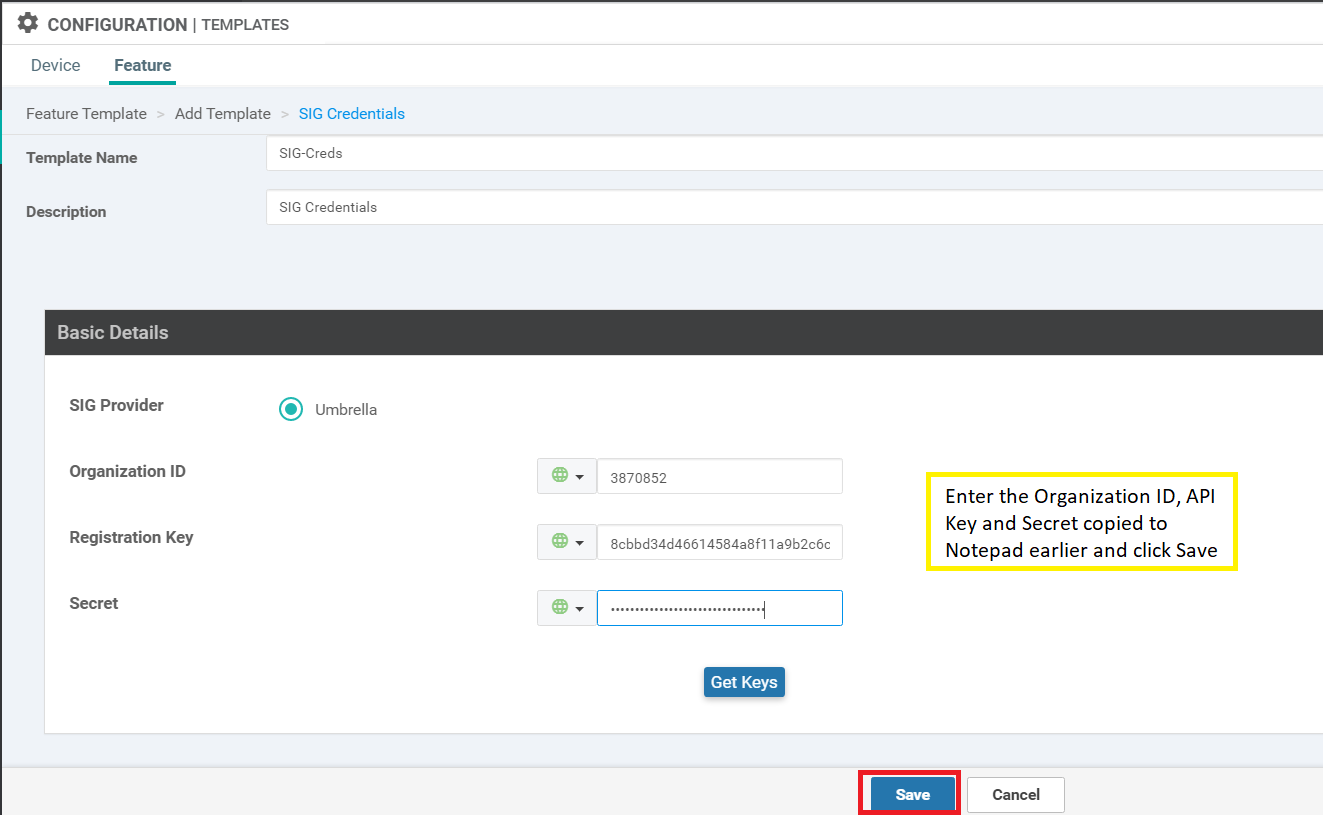
Put the Template Name as SIG-Creds and a Description of SIG Credentials. Enter the Organization ID, Registration Key (i.e. API Key) and Secret copied and saved to notepad before. Click on Save
-
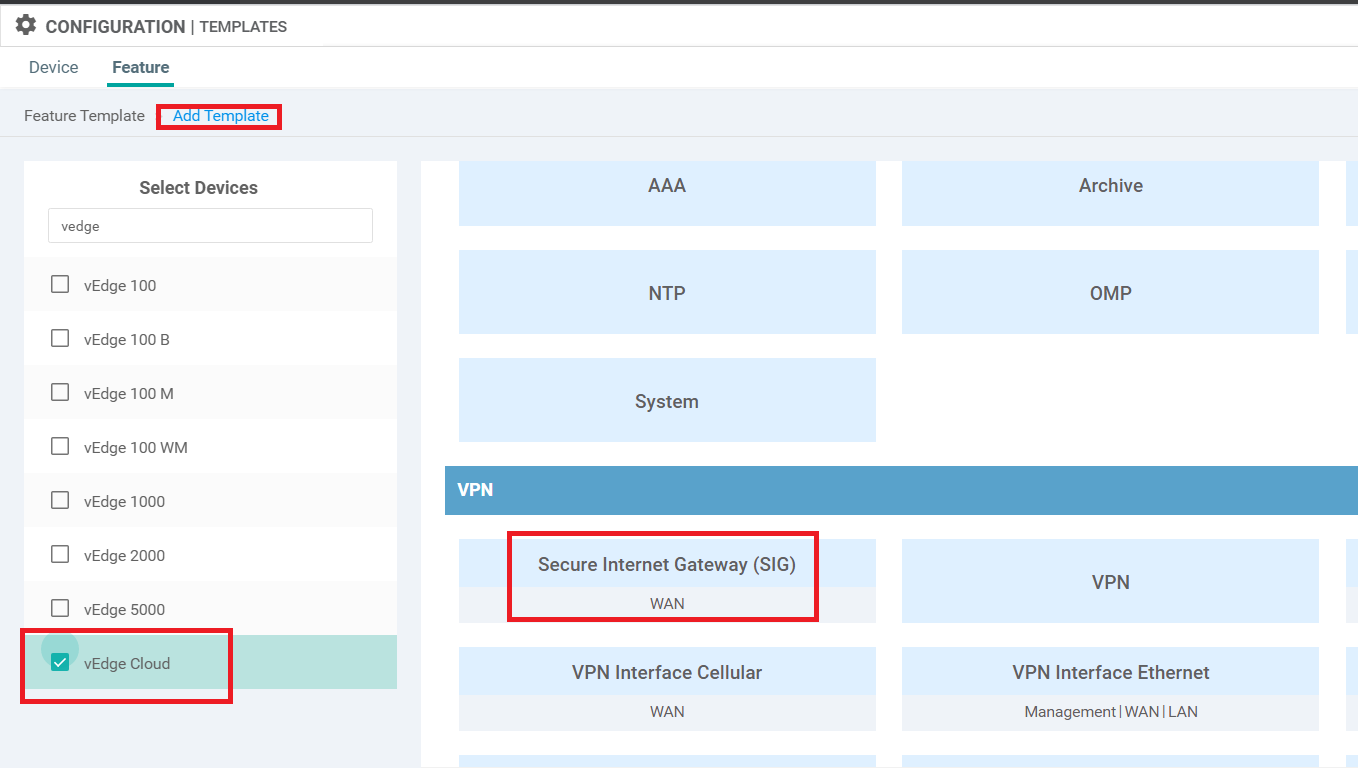
Back at the Templates page, make sure you’re still on the Feature Tab and click on Add Template. Search for vedge and select vEdge Cloud. Click on Secure Internet Gateway (SIG) under VPN
-
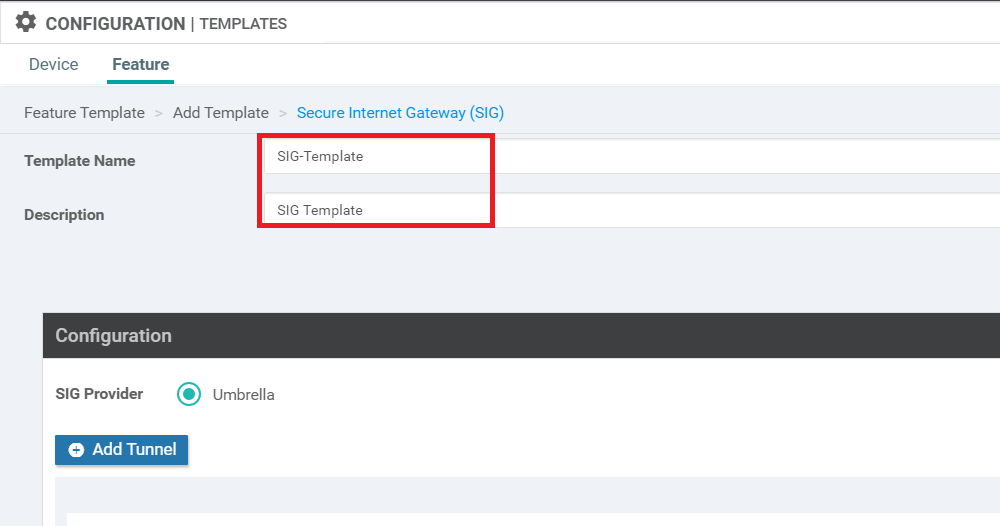
Give it a Template Name of SIG-Template and a Description of SIG Template
-
Click on Add Tunnel and enter the details given in the table below. Click on Add once done
Parameter Global or Device Specific (Drop Down) Value Interface Name (1..255) Global ipsec1 Source Interface Global ge0/0 Data-Center NA Primary 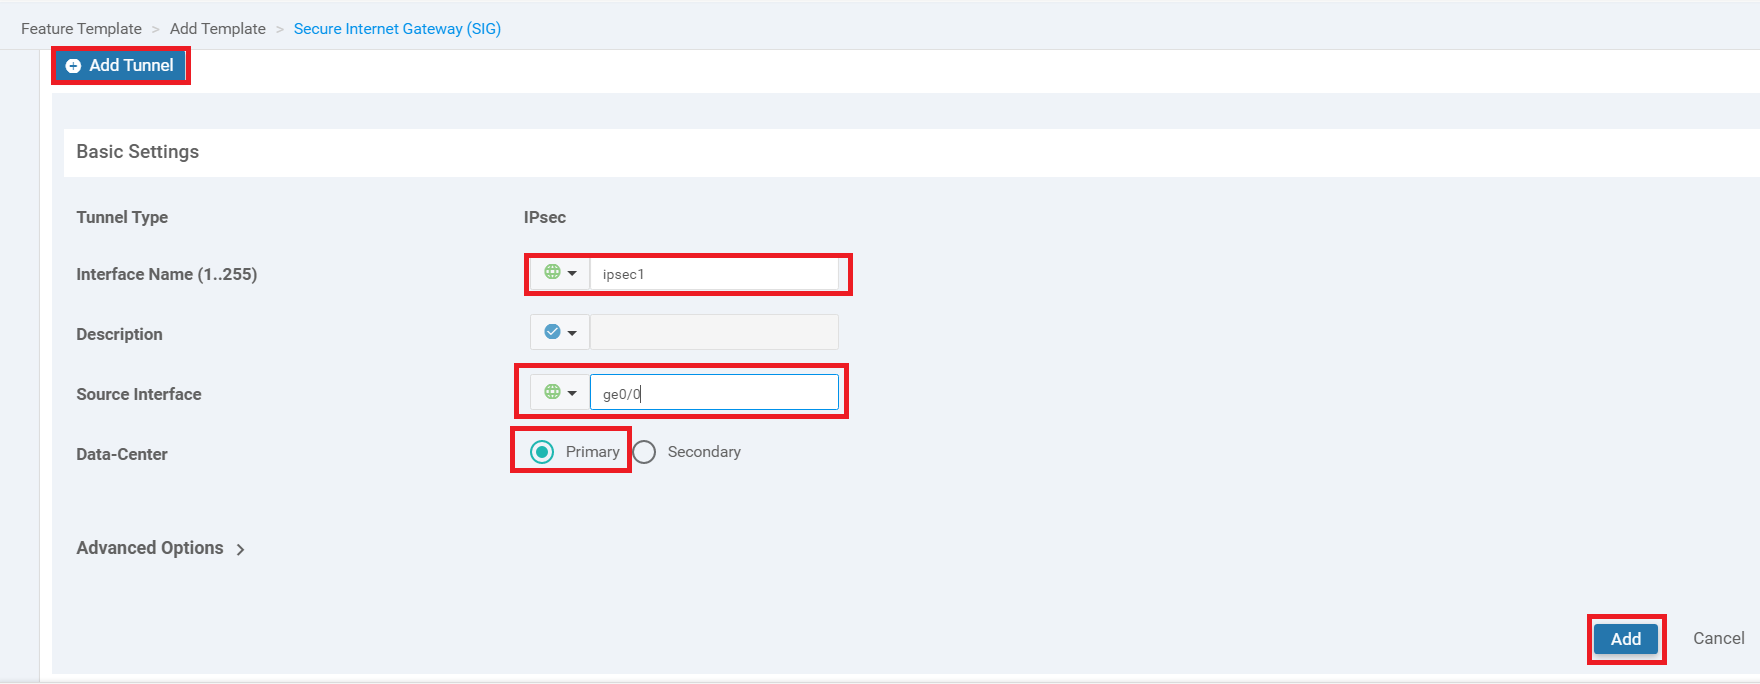
-
Click on Add Tunnel again to add a second IPSEC Tunnel. Enter the details given below and click on Add
Parameter Global or Device Specific (Drop Down) Value Interface Name (1..255) Global ipsec2 Source Interface Global ge0/0 Data-Center NA Secondary 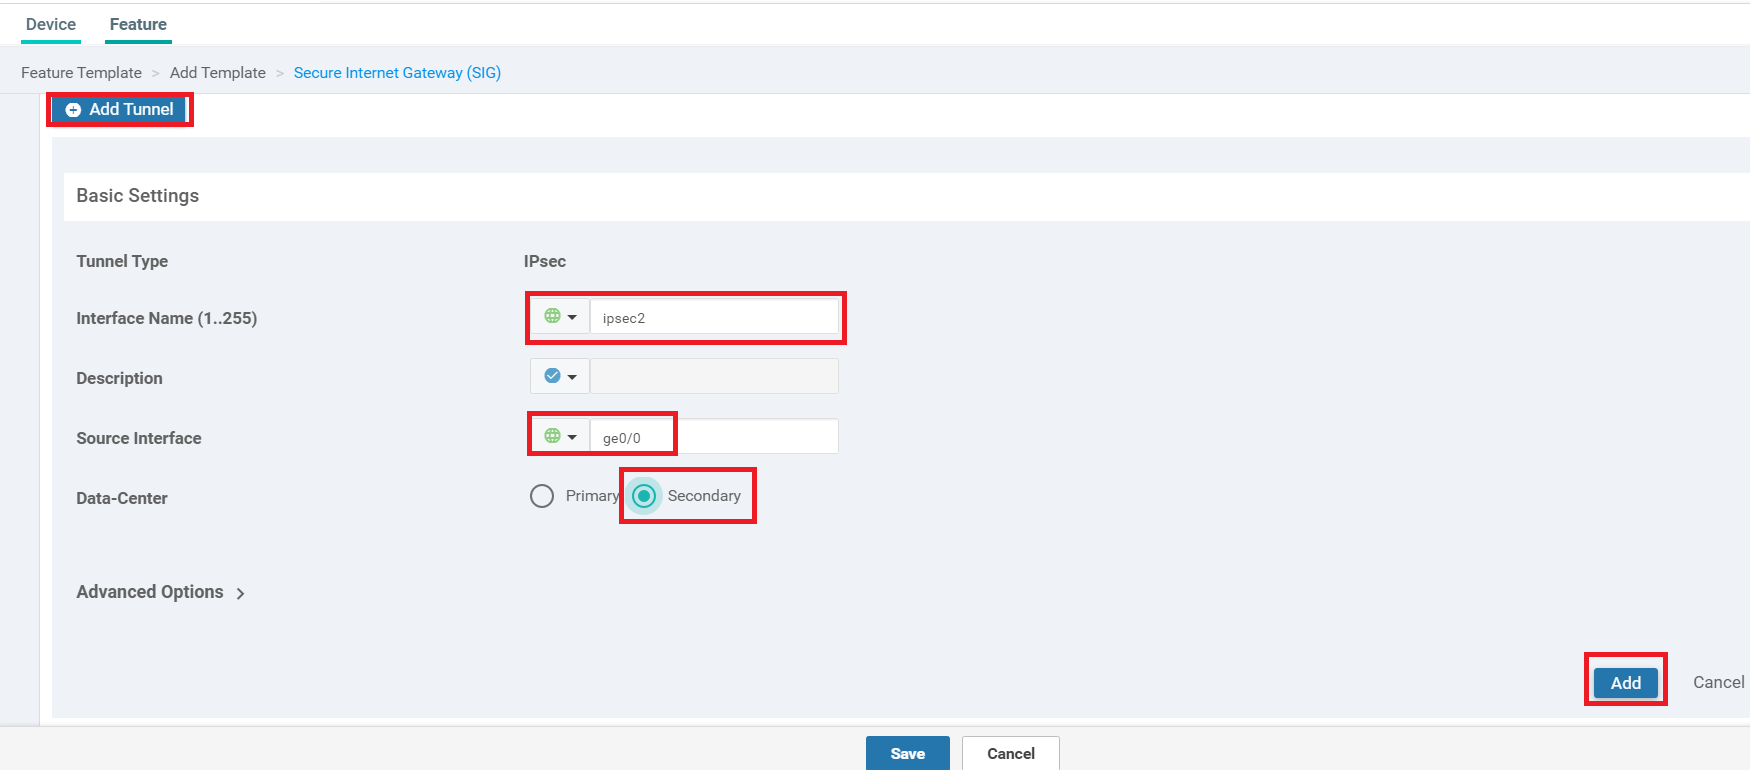
-
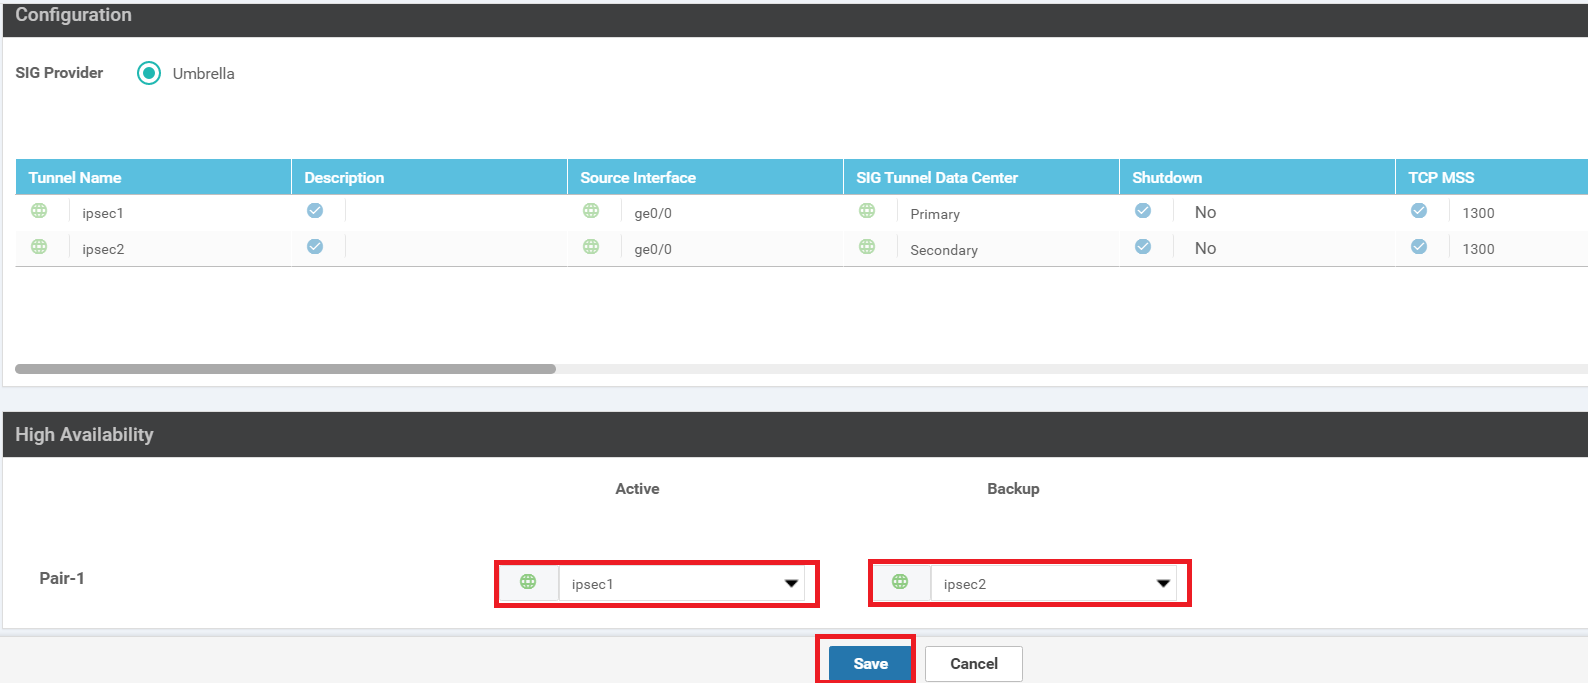
Populate ipsec1 under Active and ipsec2 under Backup. Click on Save
-
Log in to vEdge30 via the saved Putty session. Enter
ping global-a.vpn.sig.umbrella.com. Pings should be successful. Press Ctrl + c to stop the pingsUsername Password admin admin 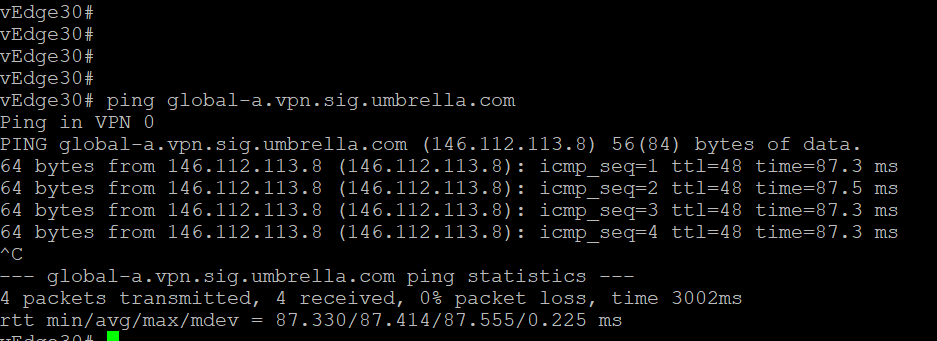
ping global-a.vpn.sig.umbrella.com -
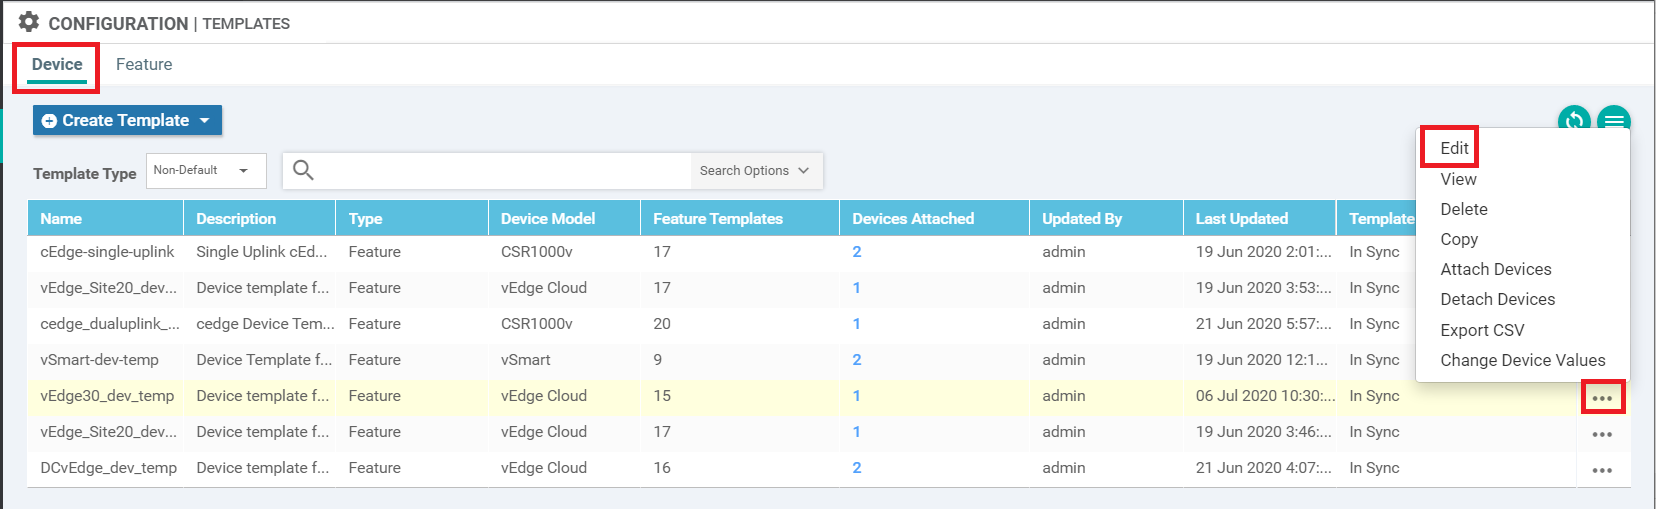
Back on the vManage GUI, navigate to Configuration => Templates. Under the Device tab, locate the vedge30_dev_temp template and click on the three dots next to it. Choose to Edit the template
-
Go to the Transport & Management VPN section click on Secure Internet Gateway under Additional VPN 0 Templates. Select the SIG-Template from the drop down
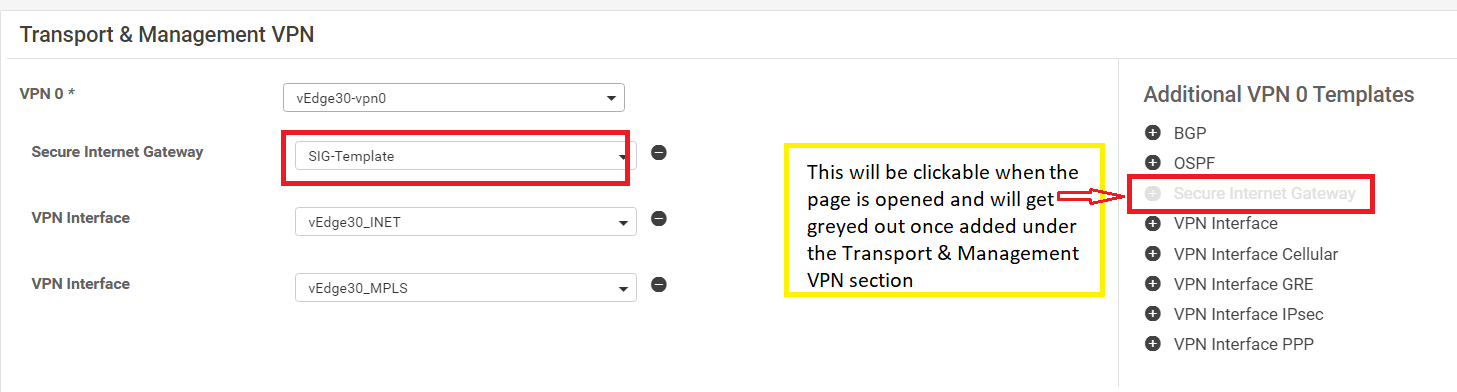
-
Scroll down to the Additional Templates section and populate SIG-Creds for the SIG Credentials. Click on Update

-
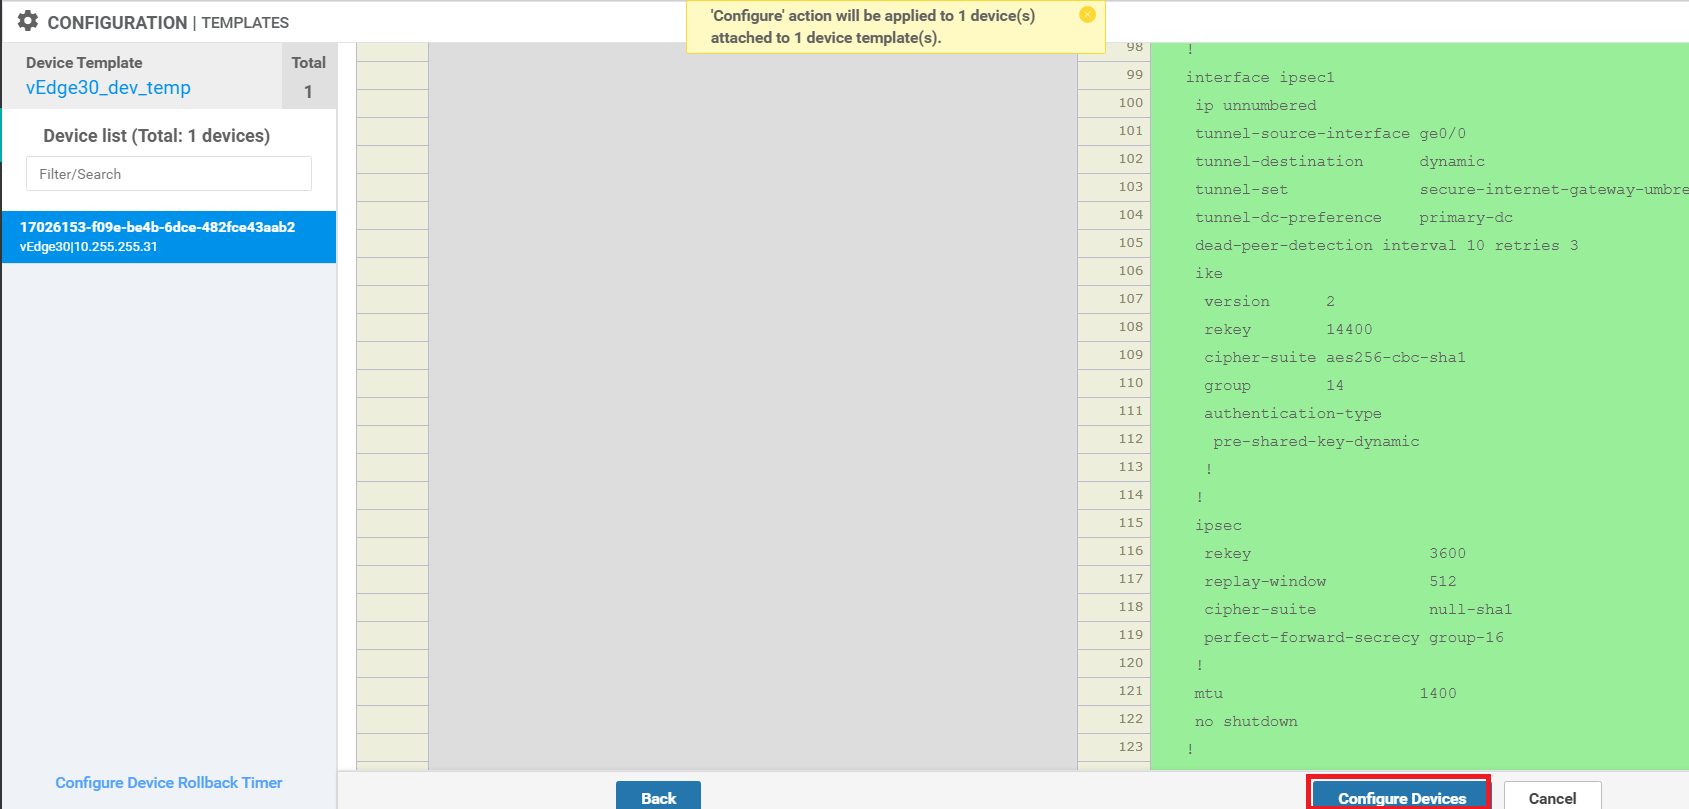
Click on Next. You can view the side-by-side configuration if required. Make note of the secure-internet-gateway and ha-pairs configuration

-
If you scroll down, interface ipsec1 and interface ipsec2 configuration can be viewed. Click on Configure Devices
-
Wait for a couple of minutes and log in to the Putty session for vedge30. Issue the command
show ipsec ike sessions. You will see 2 sessions which should be in a state of IKE_UP_IPSEC_UP. If the sessions are in any other state, wait for a couple more minutes and issue the same command again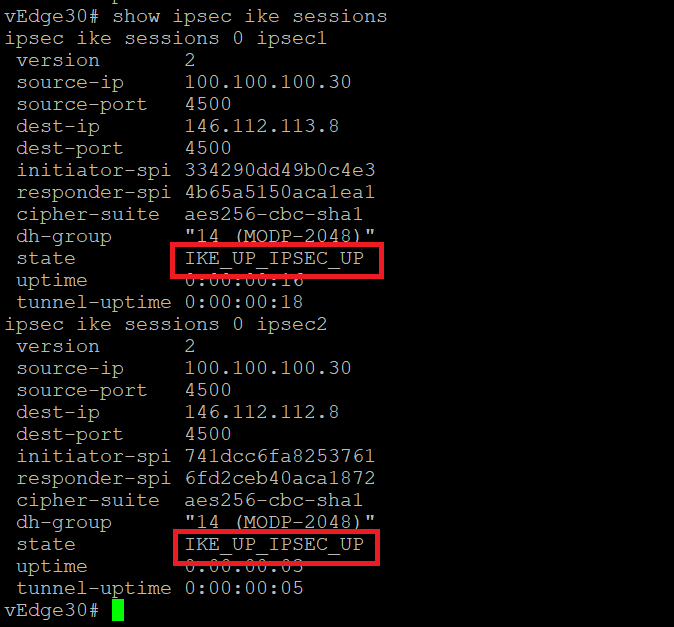
-
Log in to the Umbrella GUI. On the main overview page, you should see Active Network Tunnels 2/2 Active
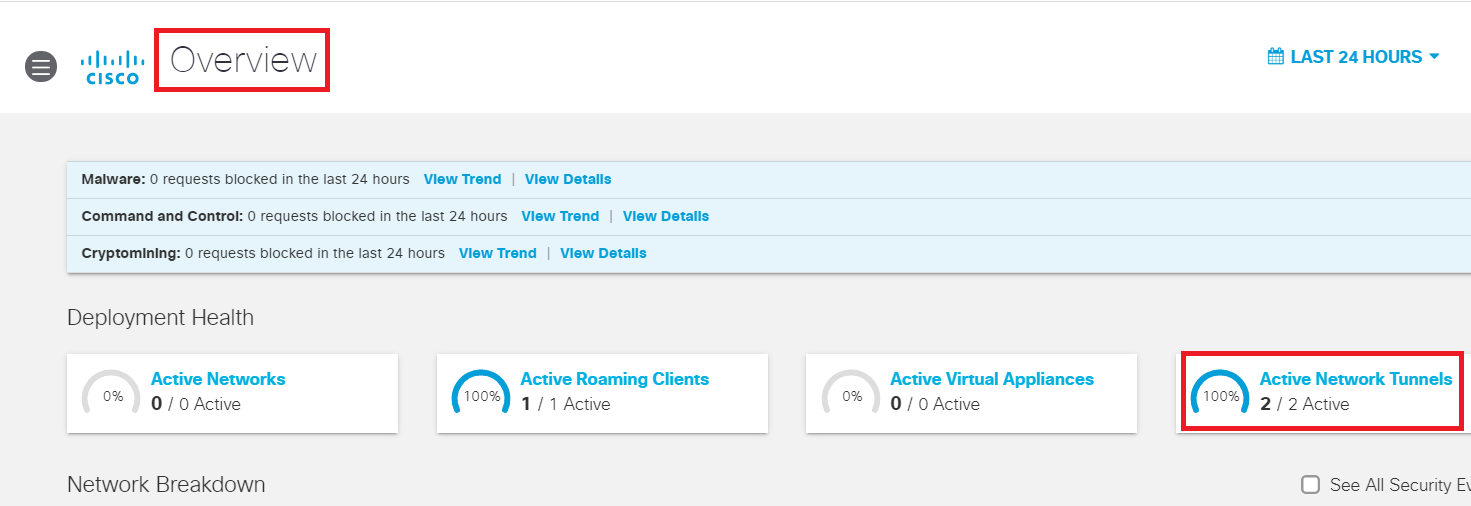
This is an indication that our IPSEC Tunnels to Umbrella are up.
-
Head over to the Site 30 PC and open a web browser. Click on the Outgoing Port Tester (444) bookmark or go to http://portquiz.net:444. The page should load correctly

-
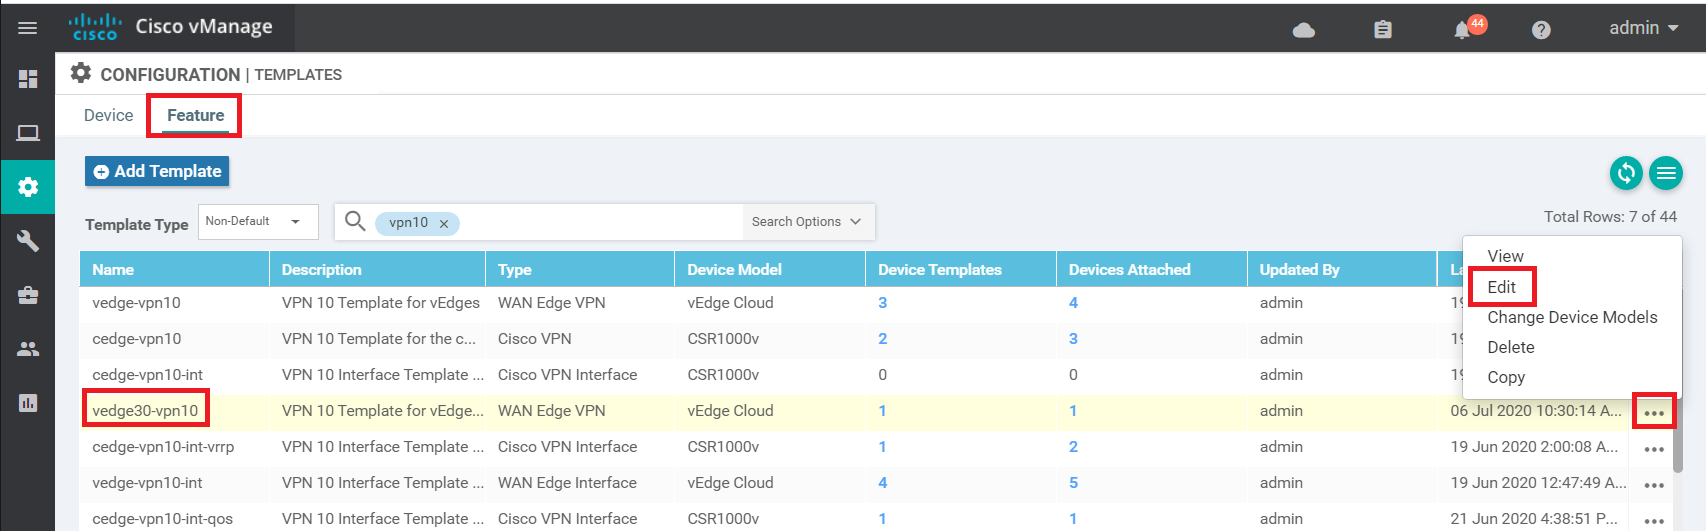
Head back over to the vManage GUI and go to Configuration => Templates => Feature Tab. Locate the vedge30-vpn10 template and click on the three dots next to it. Choose to Edit the template
-
Scroll down to the Service Route section and click on New Service Route. Enter a global Prefix for 0.0.0.0/0 and click on Add. Click on Update followed by Next and Configure Devices
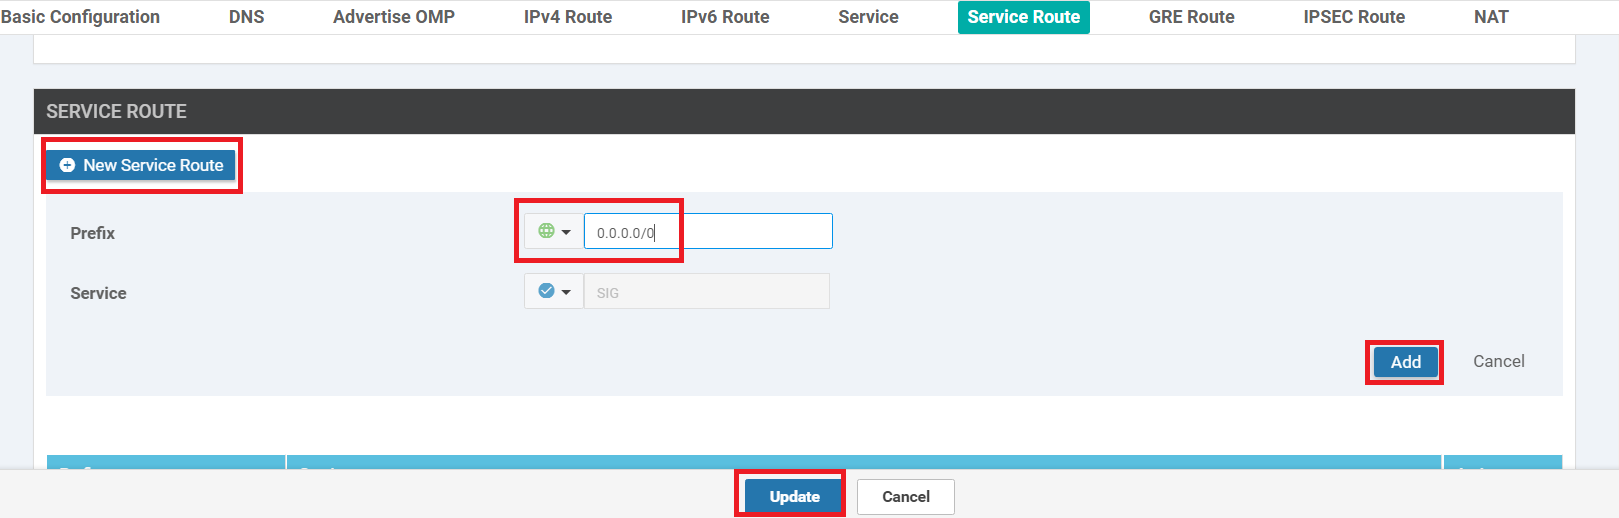
This will ensure that all the traffic hitting VPN 10 on vEdge30 is punted over the newly established IPSEC Tunnels to Umbrella.
-
On the Umbrella GUI, click on Active Network Tunnels and you will see the naming convention automatically populated for our 2 Tunnels. Both tunnels should be in an Active state (if the status is unknown, wait for some time and revisit this page)
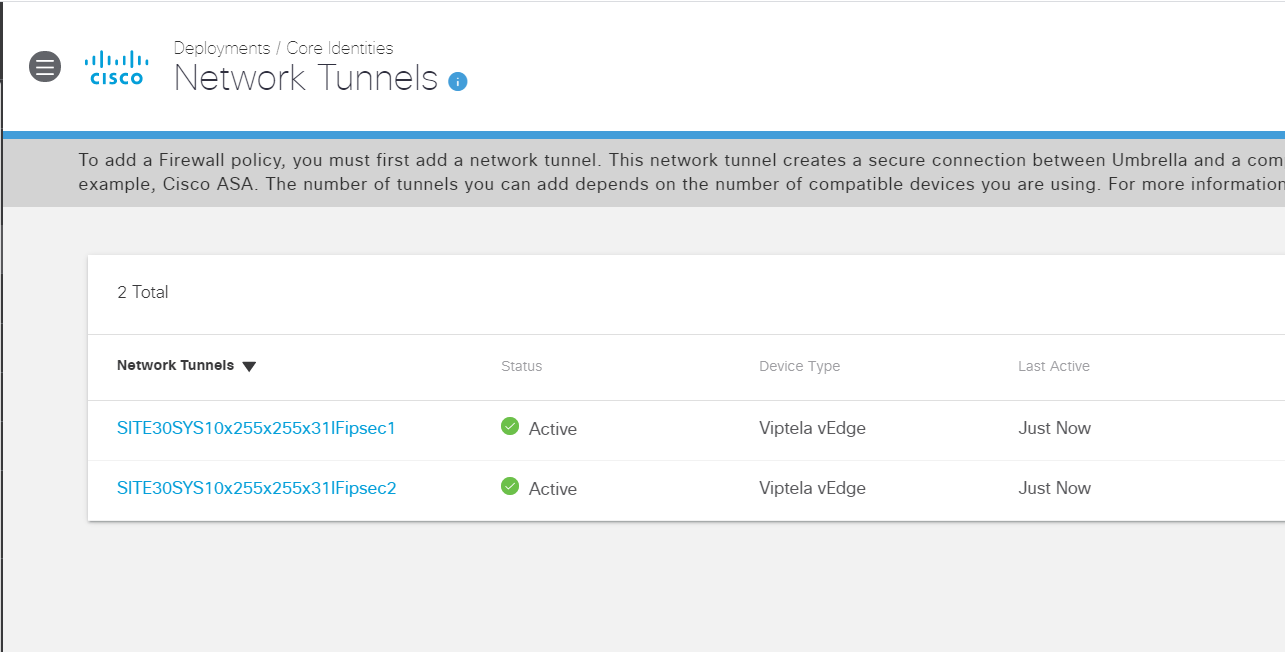 Tip: The naming convention can be broken down as the Site ID, followed by the word SYS (for System IP) and then the System IP of the device in question with the dots replaced by x. The last few characters reference the Interface (IF) followed by the Interface Name (ipsec1 and ipsec2 in our case).
We have completed IPSEC Tunnel configuration for our vEdge30 device. Through the Service Route, we have ensured that all traffic is punted over the Tunnels to Umbrella (this is not in effect yet, more changes will be made to force traffic over the Tunnels).
-
-
-
-
-
-
-
-
-
-
-
-
-
- Configuring a Firewall Policy
- Configuring a Web Policy
Configuring a Firewall Policy
-
Log in to Cisco Umbrella from your Jumphost, if not already logged in. Navigate to Policies => Management => Firewall Policy and click on Add in the top right-hand corner

-
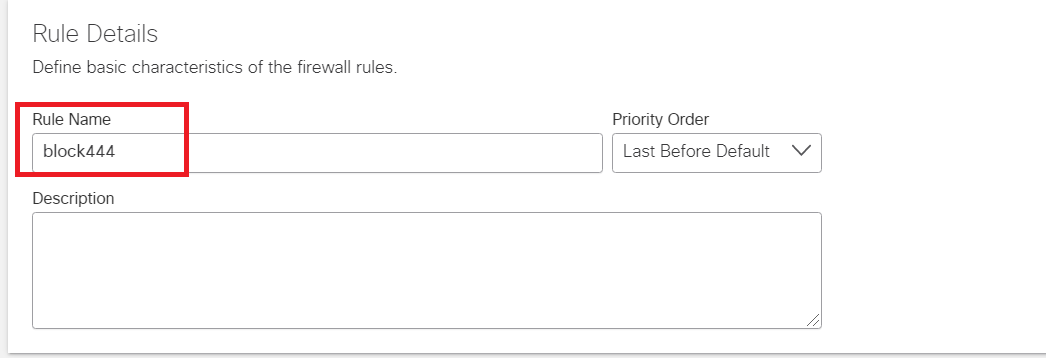
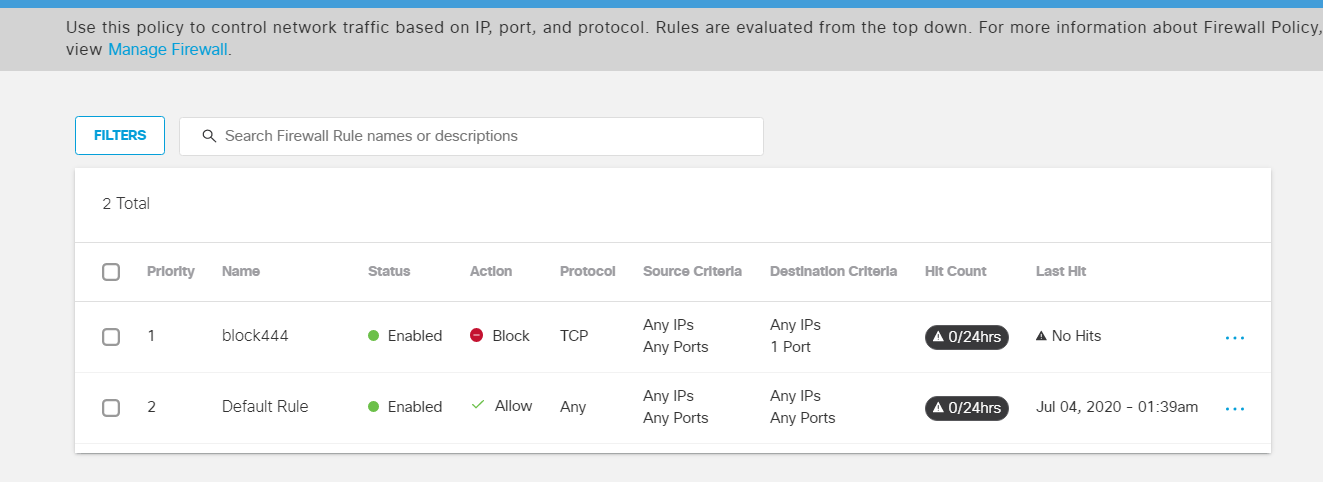
Enter the rule name as block444. We will be blocking TCP traffic to port 444 via this Firewall Policy
-
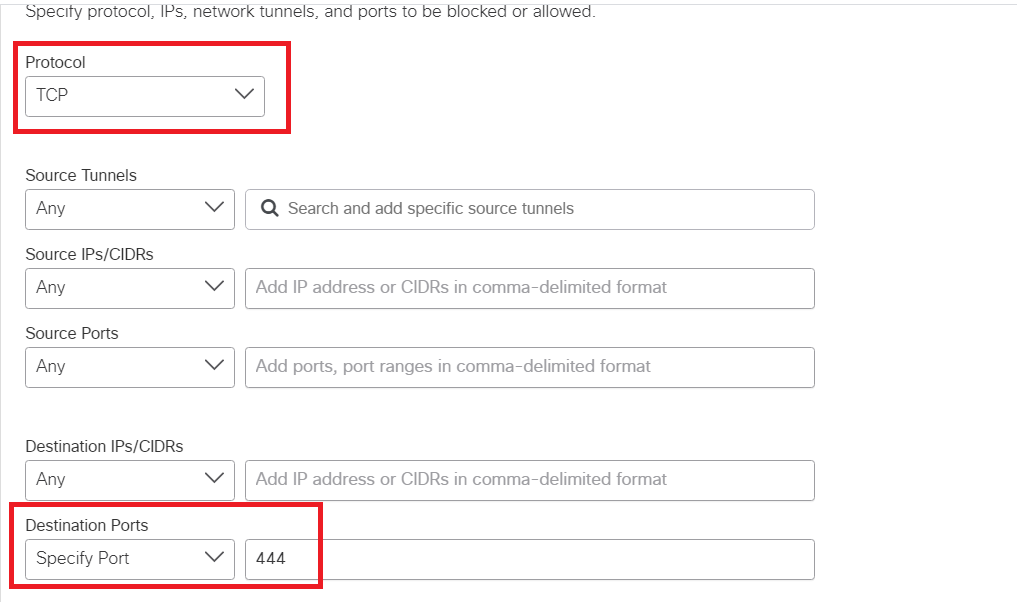
Scroll down and set the Protocol to TCP. Set the Destination Ports to Specify Port and enter the port number 444
-
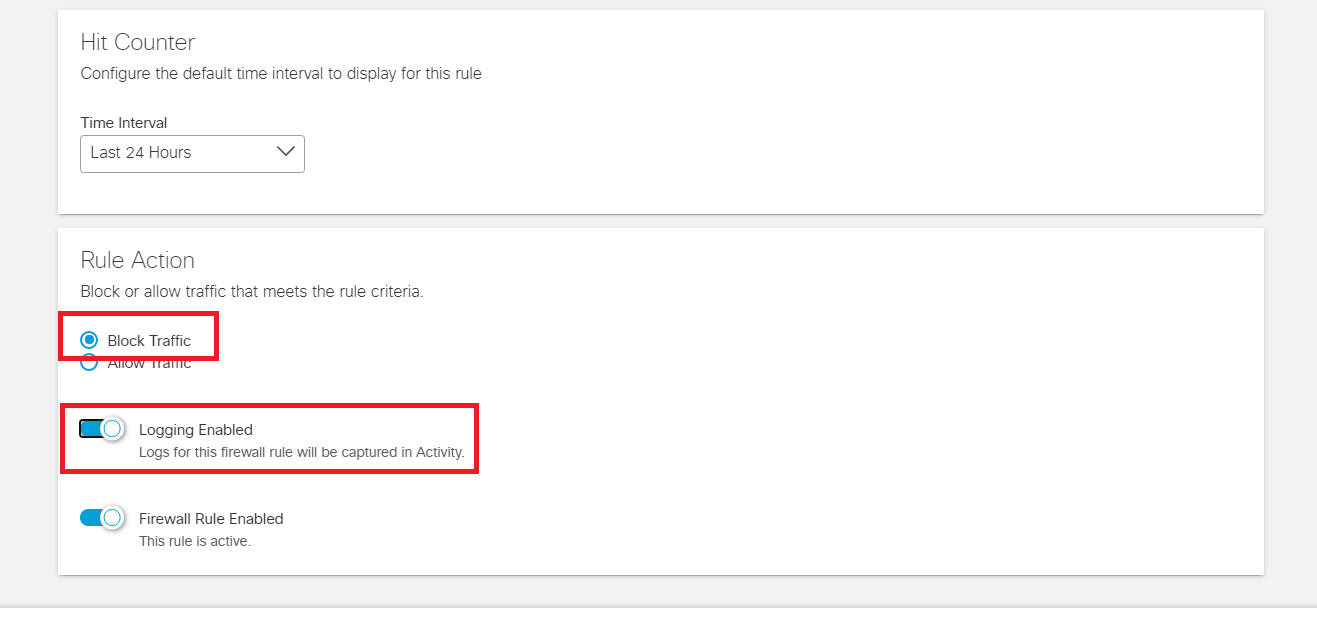
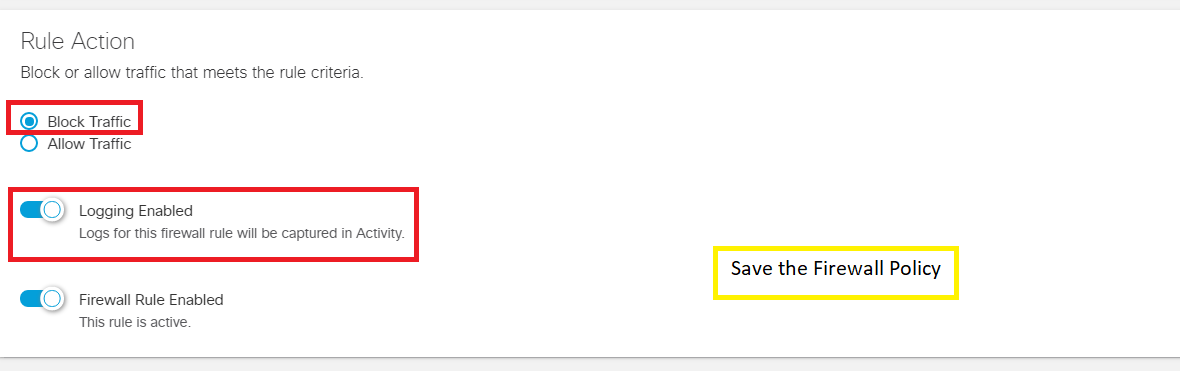
Set the Rule Action to Block Traffic and Enable Logging
-
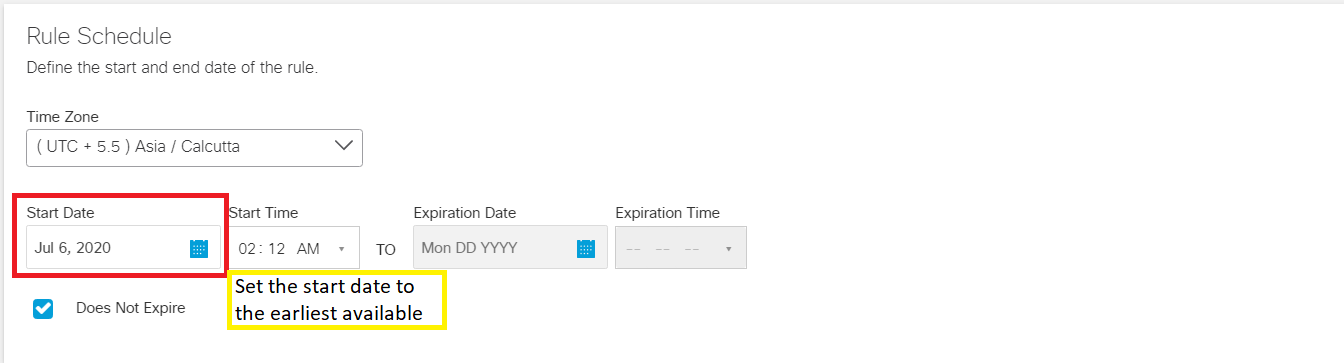
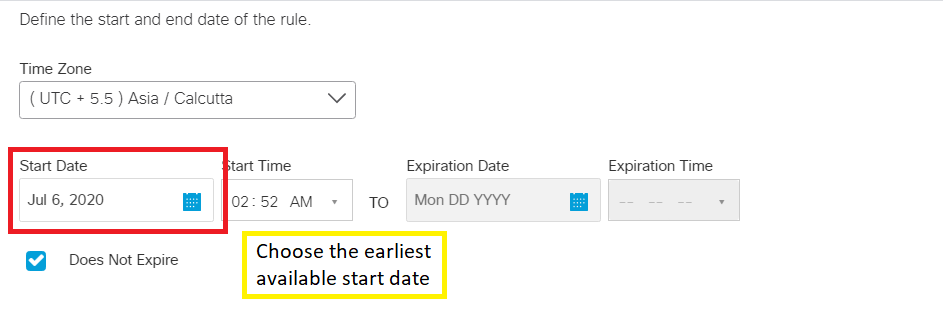
Under Rule Schedule set the Start Date to the earliest available and make sure Does Not Expire is checked. Click on Save
-
The Firewall Policy of block444 should show up above the Default Rule
-
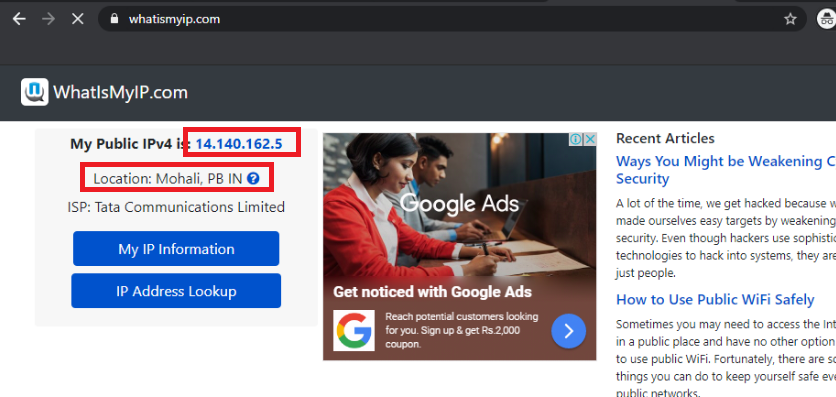
On the Site 30 PC, open a browser and go to whatismyip.com. The Public IPv4 address should show up as 14.140.162.5. We will remove DIA configuration at Site 30 and check the Public IP again
-
On the vManage GUI, navigate to Configuration => Policies and click on the three dots next to the Site40-Guest-DIA policy. Click on Edit. Under the Policy Application page, click on the Traffic Data tab. Delete the Site30 Site List/VPN List and click on Save Policy Changes. Choose to Activate the configuration, if prompted
-
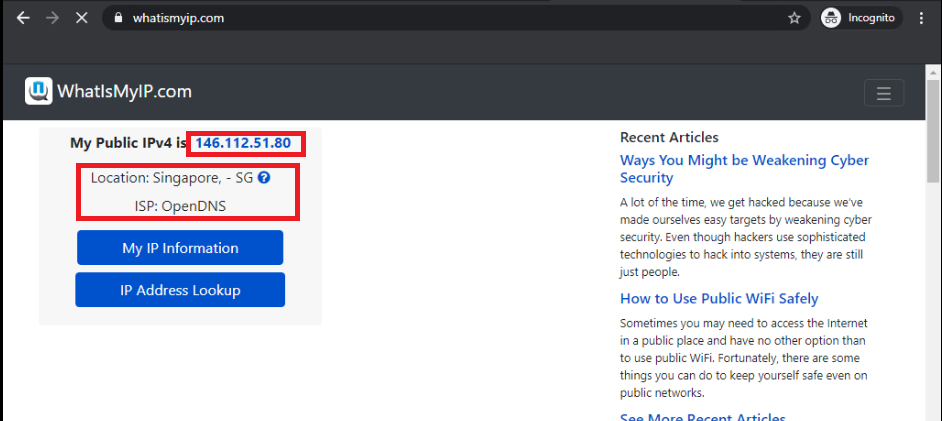
Once the policy changes have been pushed successfully, go back to the Site 30 PC and use a browser to go to whatismyip.com again. The Public IPv4 address should now be in the 146.112.A.B address space - this is the Singapore Umbrella Server
-
Use the bookmark to navigate to Outgoing Port Tester (444) or go to http://portquiz.net:444. The site will not load
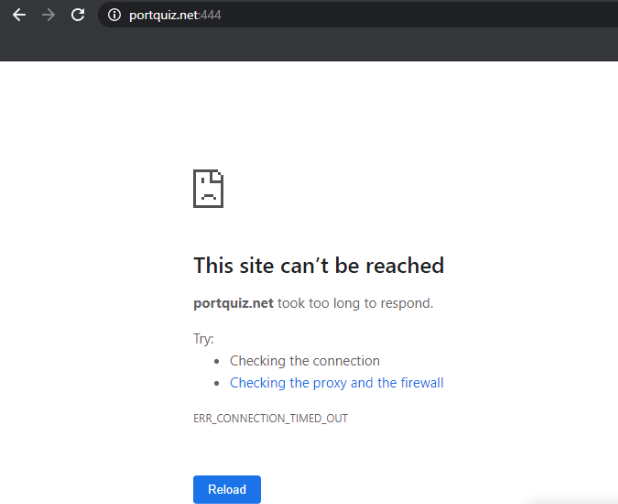
-
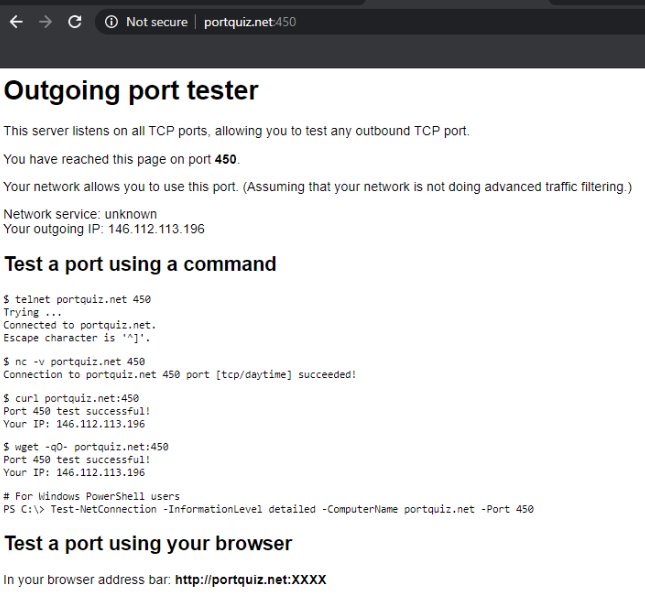
Try to access http://portquiz.net:450 and the site should load right up, indicating that TCP connections to port 444 are being blocked (in line with our Firewall Policy)
-
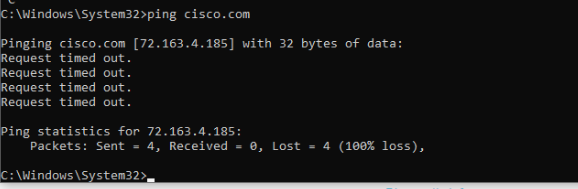
Other than using the Cloud Delivered Firewall to block specific ports, we can also block ICMP packets. Open a command prompt on the Site 30 PC and type
ping cisco.com. Hit Enter. The pings should be successful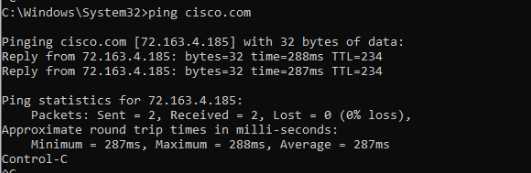
-
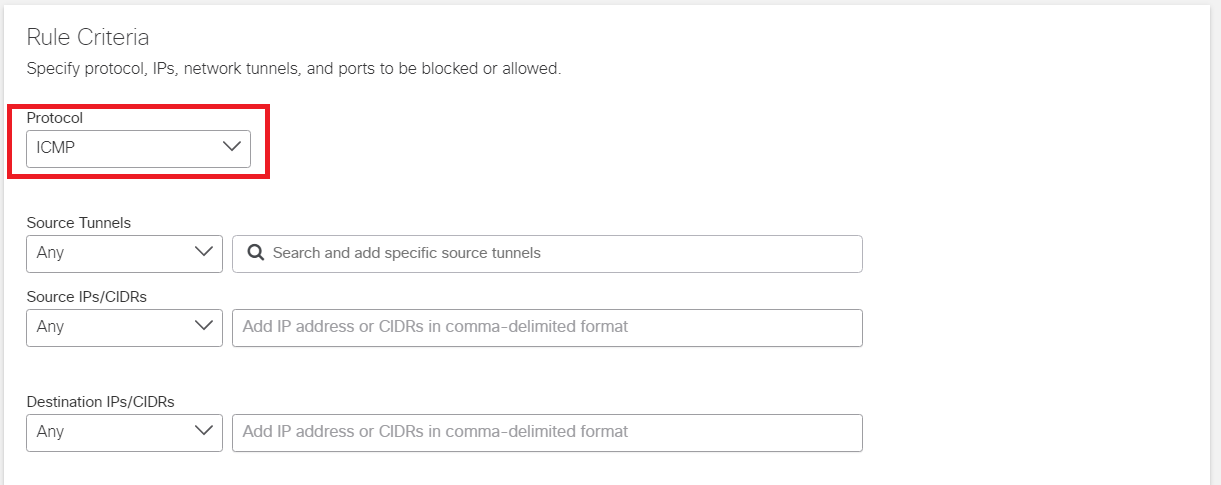
Go to the Umbrella GUI and navigate to Policies => Management => Firewall Policy. Click on Add to add a new policy and name it blockicmp
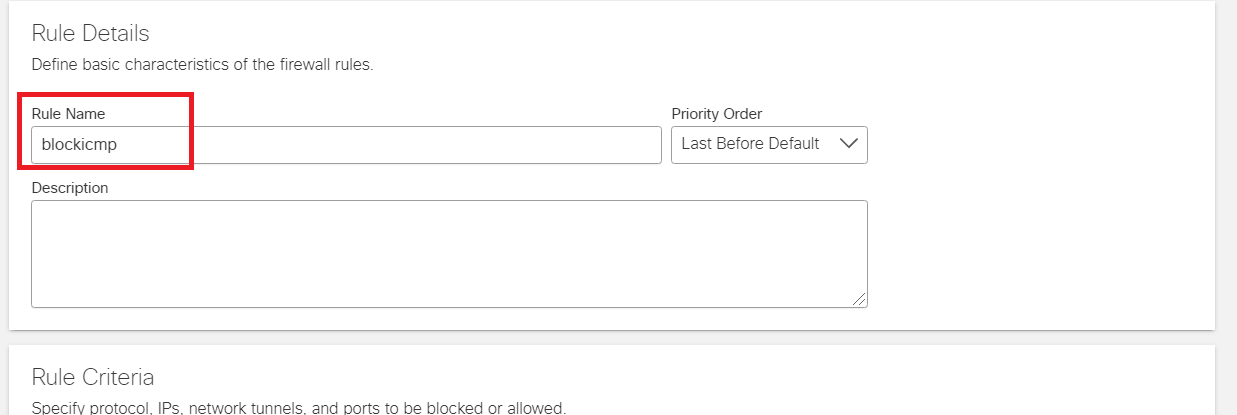
-
Set the Protocol as ICMP
-
Make sure the Start Date is the earliest available and the Rule Action is set to block traffic, with logging enabled. Click on Save to save the firewall policy
-
Wait for approximately 5 minutes and try to ping cisco.com from the Site 30 PC again. Pings should now be blocked
We have thus used a Firewall Policy to block traffic to a particular destination port and block a certain protocol. This completes our configuration of a Cloud Delivered Firewall.
-
-
-
-
-
-
-
-
-
-
-
-
-
-
- Configuring a Web Policy
Configuring a Web Policy
We will now apply a Web Policy to all traffic traversing the IPSEC Tunnels.
-
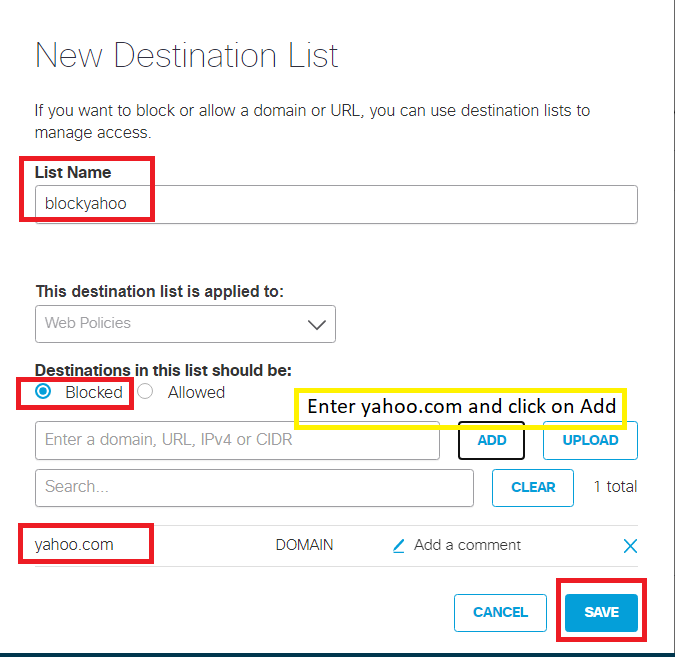
On the Umbrella GUI, navigate to Policies => Policy Components => Destination Lists and click on Add. Name the list blockyahoo and make sure that the Blocked radio button is selected. The This Destination List is applied to field should be Web Policies. Enter yahoo.com in the Enter a domain, URL, IPv4 or CIDR box and click on Add. Once yahoo.com shows up in the lower half of the screen, click on Save
-
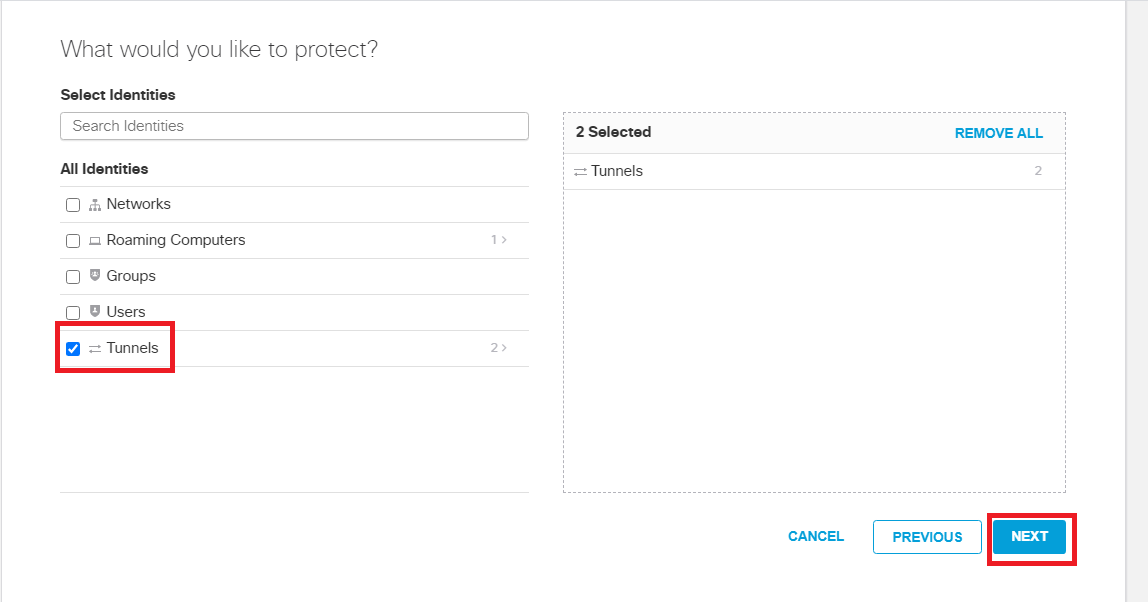
Go to Policies => Management => Web Policies and click on Add. Click Next on the How would you like to be protected? window and put a check mark next to Tunnels in the What would you like to protect? window. Click on Next
-
Click the Radio Button next to Decrypt Blocked Traffic Only on the HTTP Inspection window and click on Next

-
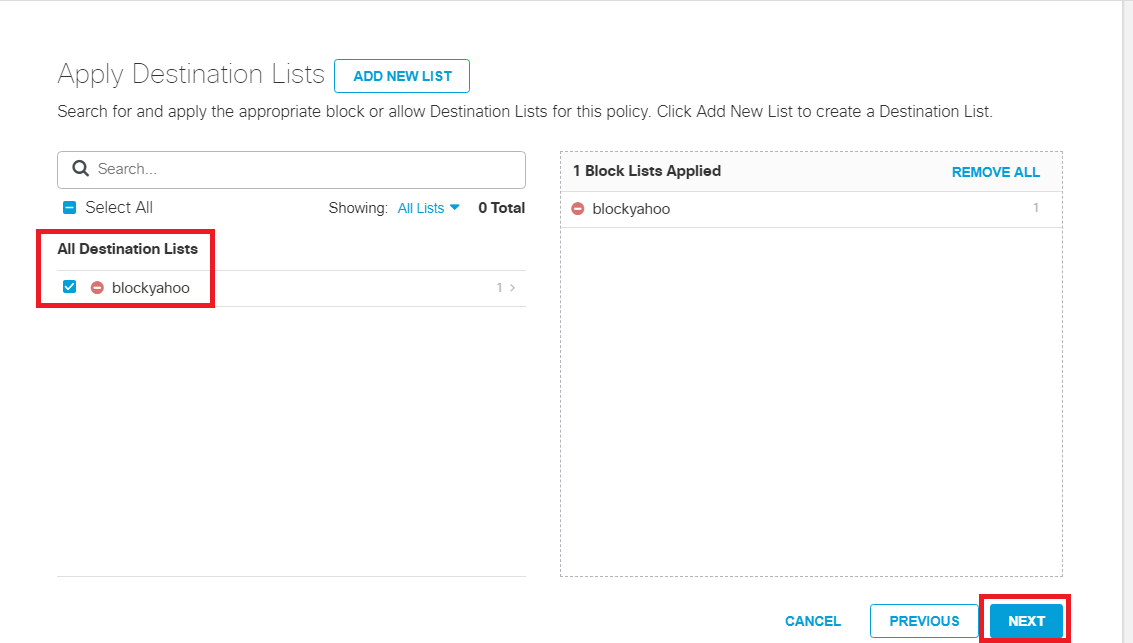
Click Next for Security Settings, Limit Content Access, Tenant Controls and Control Applications. Put a check mark next to the blockyahoo Destination List and click on Next
-
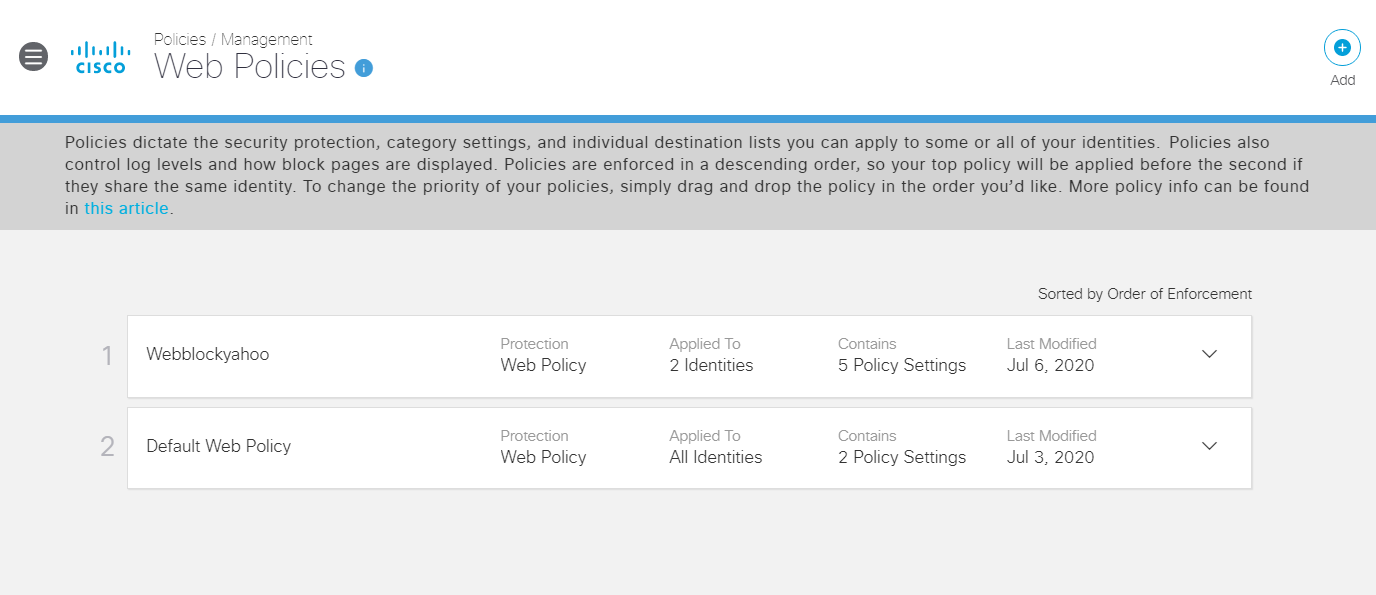
Click Next on File Analysis, File Type Control and Set Block Page Settings. Give the Policy a name of Webblockyahoo and click on Save. The policy should show up above the Default Web Policy
-
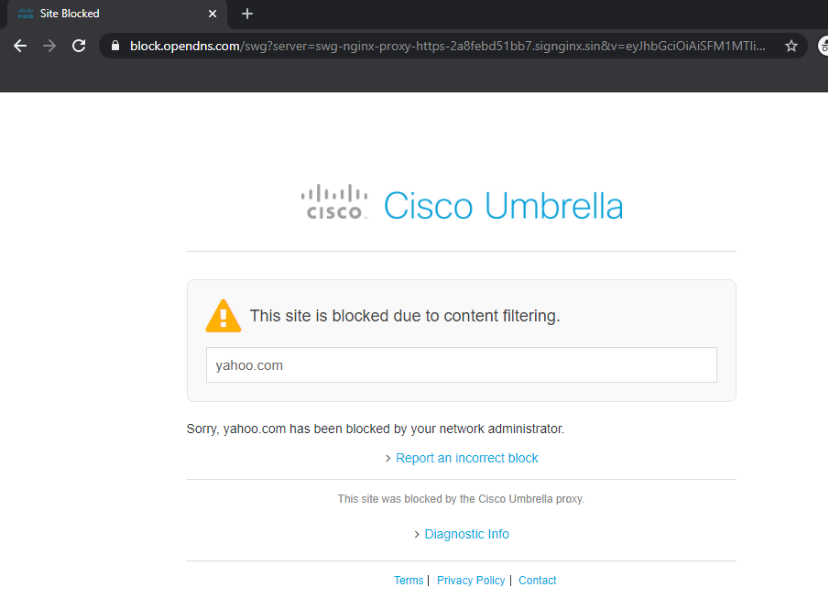
Wait for a few minutes and head over to the Site 30 PC. Click on the Flush DNS icon on the Desktop and open a new browser window. Try to access yahoo.com (you can use the bookmark). Traffic to Yahoo, which was working before, should now be blocked. Make note of the subtext This site was blocked by the Cisco Umbrella proxy
We have completed integration and configuration of Umbrella with our SD-WAN environment.
-
-
-
-
-
-
-
-
-
-
-
-
-
-
-