- Configuring VPN 0 Templates for vSmarts
- Configuring the main VPN 0 template
- Configuring the VPN 0 Interface Template
- Configuring VPN 512 Templates for vSmarts
- Configuring the main VPN 512 template
- Configuring the VPN 512 Interface Template
- Attaching vSmarts to the Device Template and Verification
Configuring VPN 0 Templates for vSmarts
We will now create and apply Templates to the vSmarts. This will allow us to enforce Centralized Policies, which will be used in the following sections.
Unlike before, we will create a Device Template and set up our Feature Templates on the fly. You will notice that vSmart Templates are simpler than the other Templates we’ve used so far.
Configuring the main VPN 0 template
-
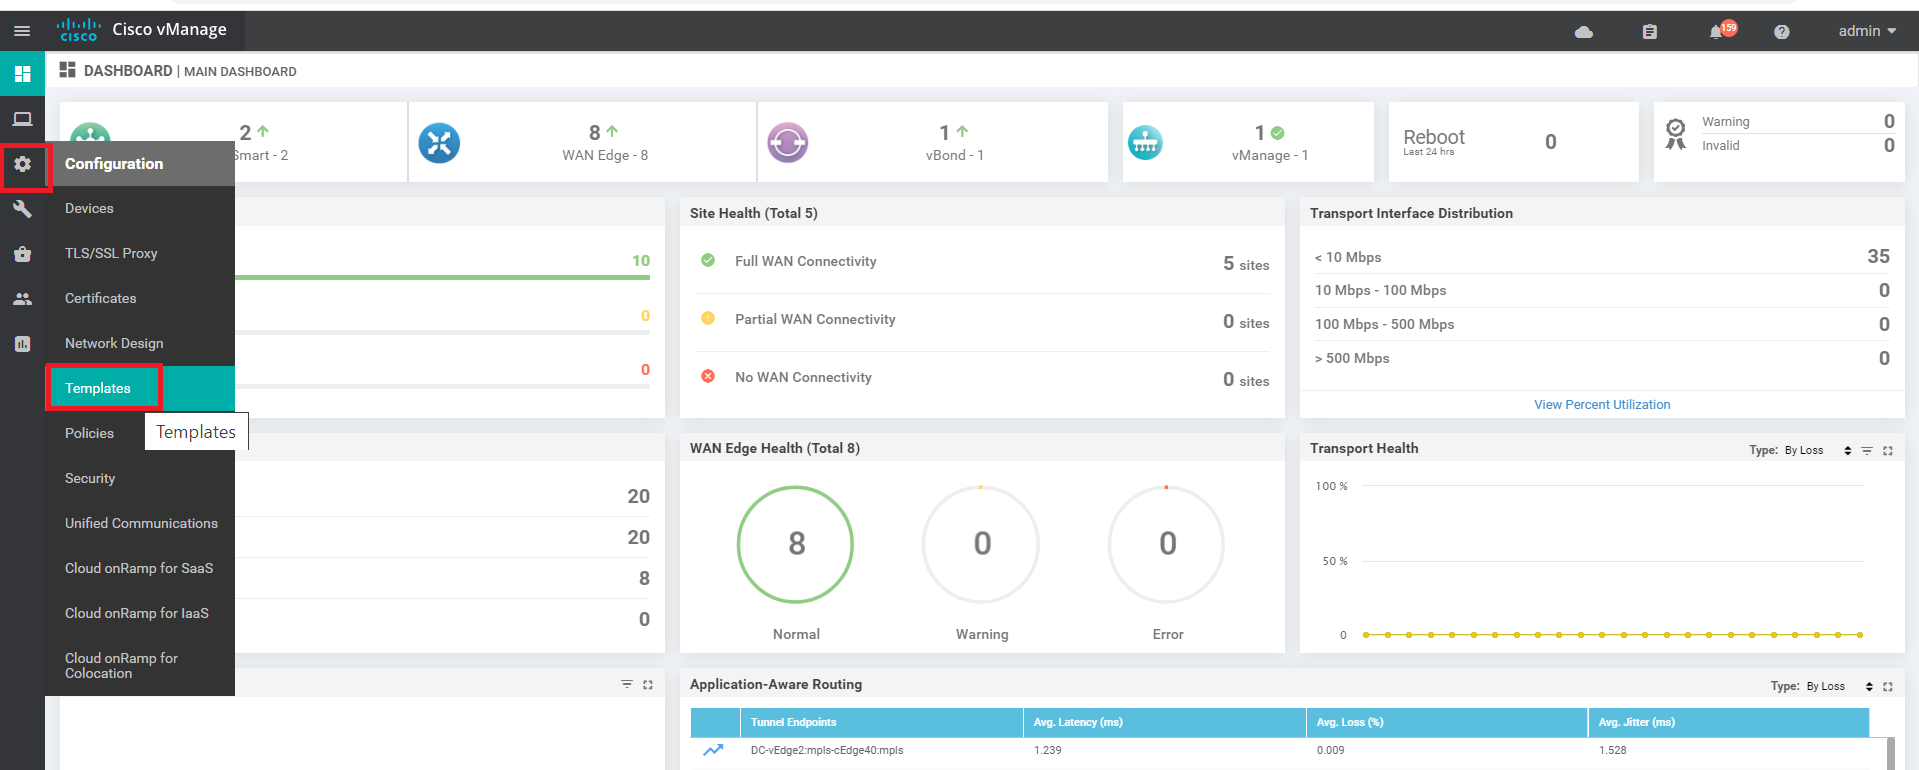
Go to Configuration => Templates
-
While on the Device Tab (we’re creating Device Templates), click on Create Template and choose From Feature Template

-
Select the Device Model as vSmart, populate the Template Name as vSmart-dev-temp and the Description as Device Template for vSmarts
-
Under Transport and Management VPN, click on the drop down next to VPN 0. Click on Create Template. This is where we’re creating our Feature Templates on the fly

-
Populate the details in the template as given below
Section Field Global or Device Specific (drop down) Value Template Name NA vSmart-VPN0 Description NA VPN0 Template for the vSmarts Basic Configuration VPN Global VPN 0 Basic Configuration - DNS Primary DNS Address Global 10.y.1.5 Basic Configuration - DNS Secondary DNS Address Global 10.y.1.6 Over here, y is 1 if you’re on the SJC DC and 2 if you’re on the GHI DC (the email with lab details should enumerate which DC you’re on).

-
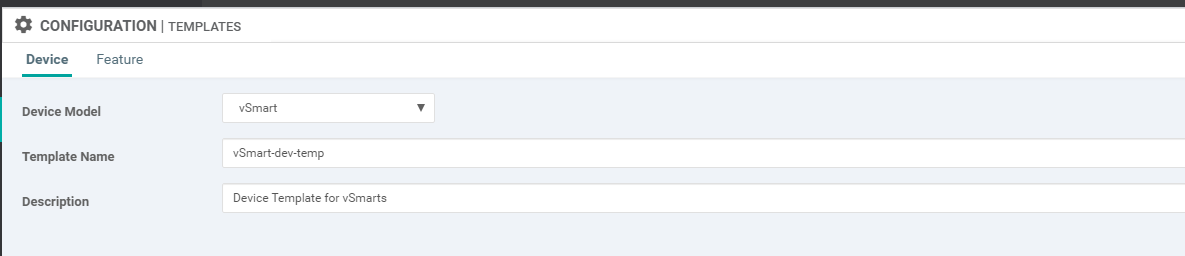
Under IPv4 Route click on New IPv4 Route and specify the Prefix as 0.0.0.0/0. Click on Add Next Hop

-
Click on Add Next Hop again

-
Enter the Address as 100.100.100.1, making it a Global value. Click on Add

-
Click on Add again in the IPv4 Route section to add the route

-
Click on Save to save this Feature Template
This completes the configuration of the Main VPN 0 Template. Continue with configuring the VPN 0 Interface Template.
- Configuring VPN 0 Templates for vSmarts
-
- Configuring the VPN 0 Interface Template
- Configuring VPN 512 Templates for vSmarts
- Configuring the main VPN 512 template
- Configuring the VPN 512 Interface Template
- Attaching vSmarts to the Device Template and Verification
Configuring the VPN 0 Interface Template
-
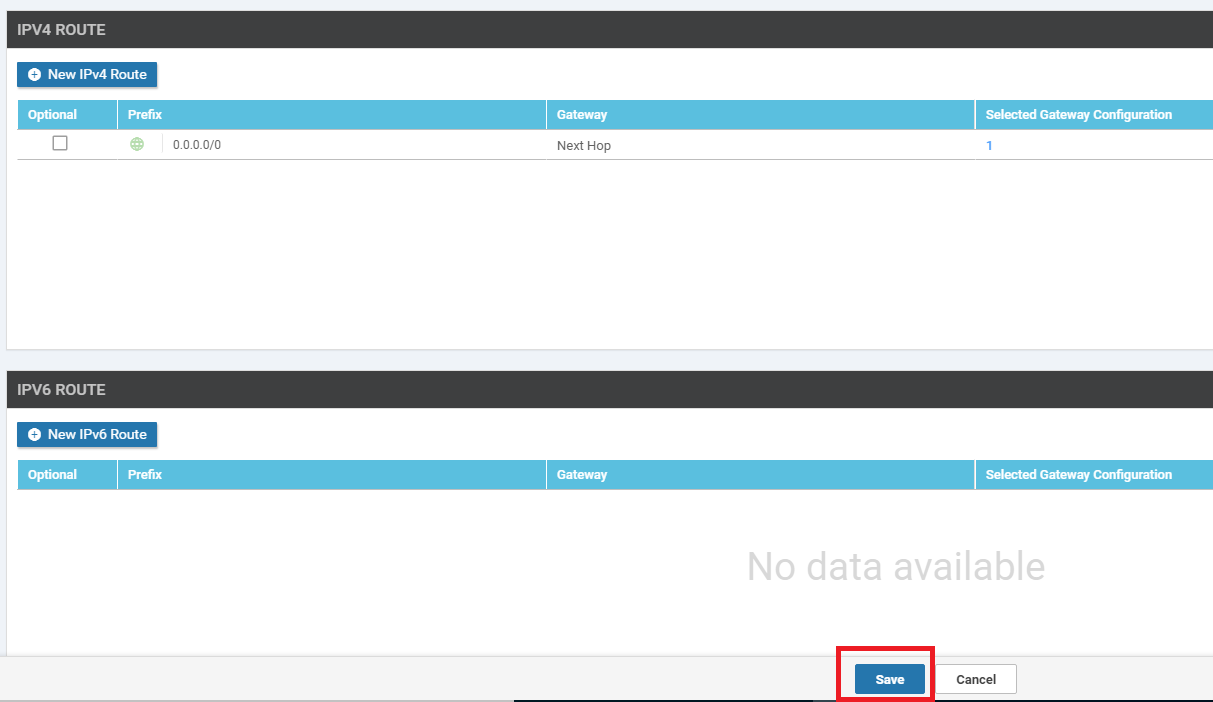
Click on VPN Interface from the Additional VPN 0 Templates section and click on the drop down for VPN Interface. Click on Create Template to create the VPN Interface Feature Template

-
Populate the details as given below and click on Save
Section Field Global or Device Specific (drop down) Value Template Name NA vSmart-VPN0-Int Description NA VPN0 Interface for vSmarts Basic Configuration Shutdown Global No Basic Configuration Interface Name Global eth0 Basic Configuration - IP Configuration IPv4 Address Device Specific vpn0_if_ip_address Tunnel Tunnel Interface Global On Tunnel Color Global public-internet Tunnel - Allow Service All Global On 
This completes the configuration of the VPN 0 Interface Template.
Make sure the VPN 0 and VPN 0 Interface Templates just created are selected from the drop down in the Device Template we’re building before proceeding to create the VPN 512 Templates.
-
-
-
- Configuring VPN 512 Templates for vSmarts
- Attaching vSmarts to the Device Template and Verification
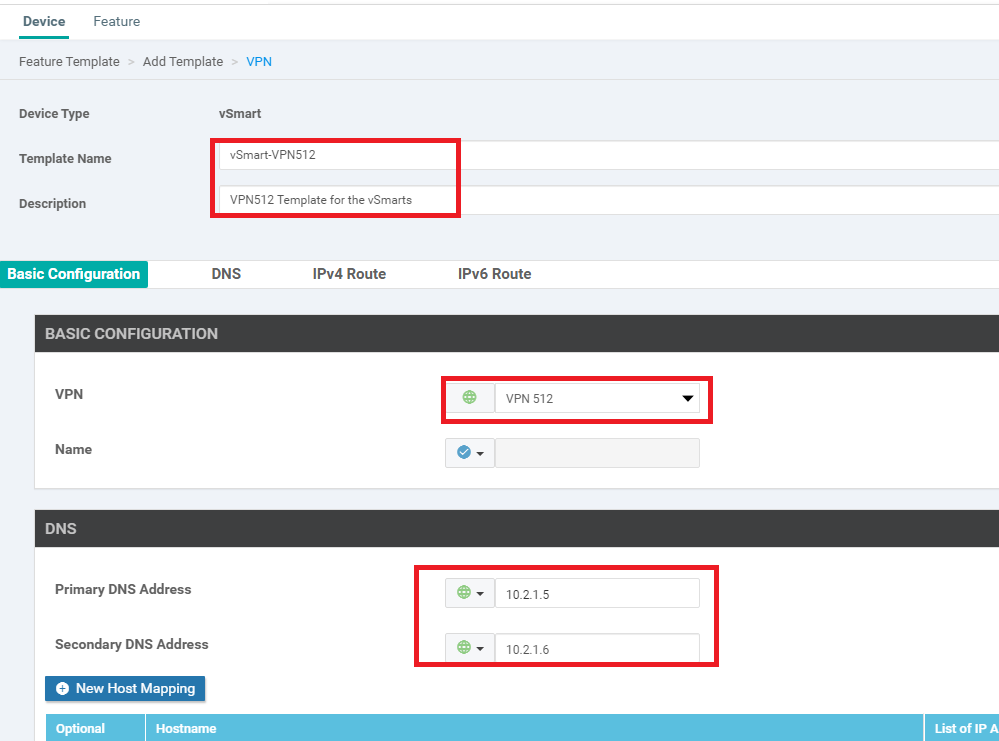
Configuring VPN 512 Templates for vSmarts
-
On the Device Template page itself, click on the drop down next to VPN 512 under the Transport and Management VPN section. Click on Create Template

-
Enter the details as shown below
Section Field Global or Device Specific (drop down) Value Template Name NA vSmart-VPN512 Description NA VPN512 Template for the vSmarts Basic Configuration VPN Global VPN 512 Basic Configuration - DNS Primary DNS Address Global 10.y.1.5 Basic Configuration - DNS Secondary DNS Address Global 10.y.1.6 Over here, y is 1 if you’re on the SJC DC and 2 if you’re on the GHI DC (the email with lab details should enumerate which DC you’re on).
-
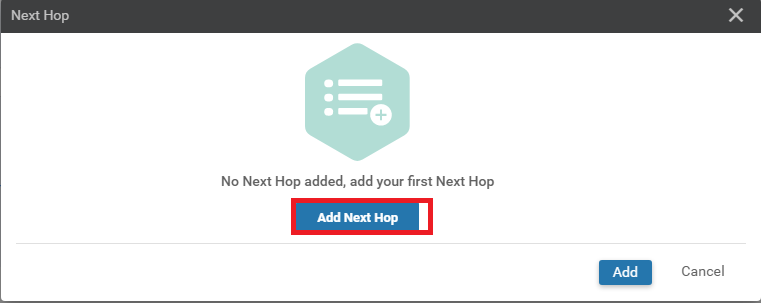
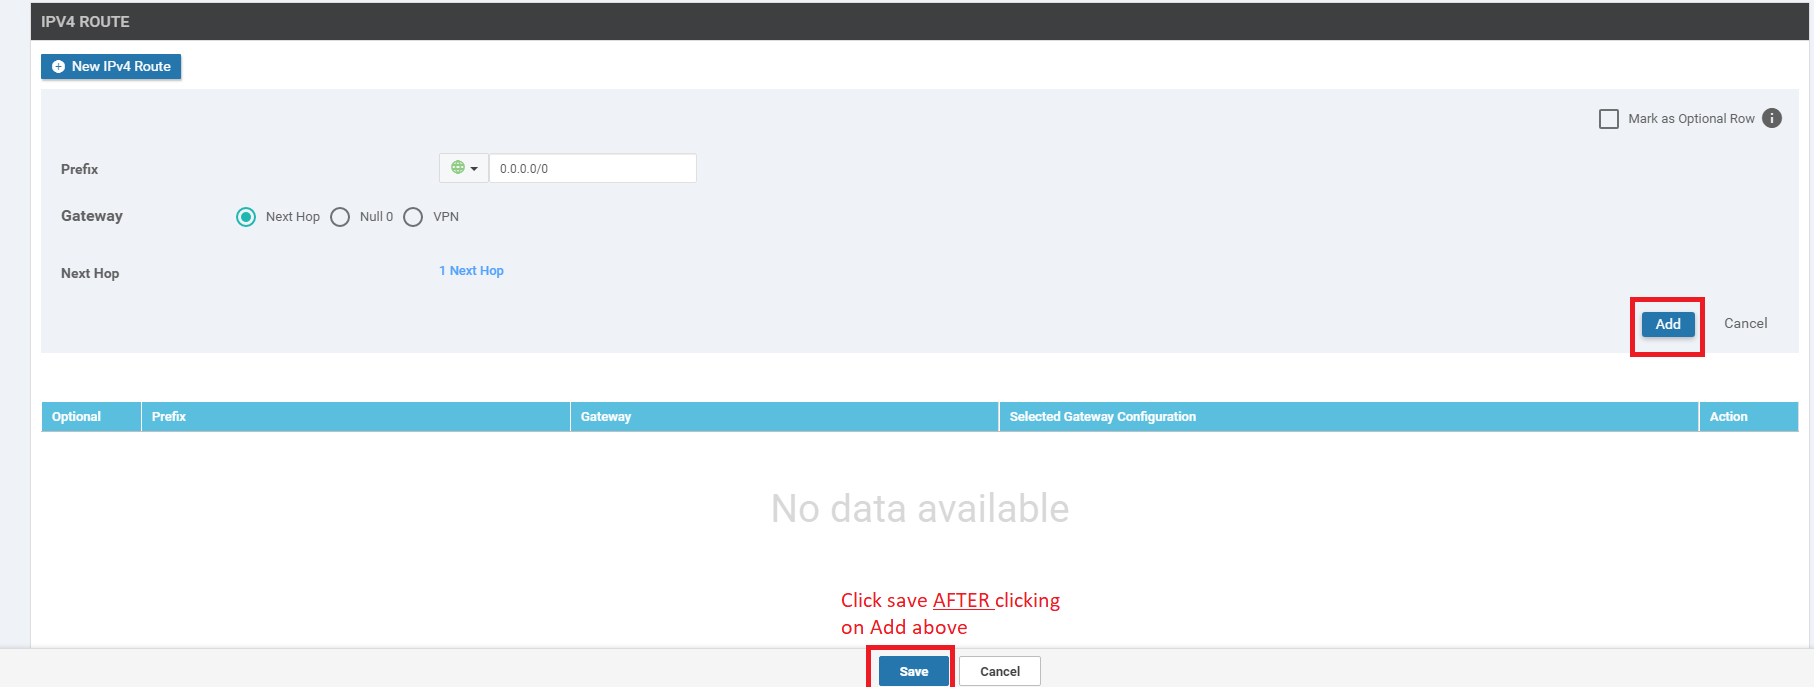
Under IPv4 Route click on New IPv4 Route and specify the Prefix as 0.0.0.0/0. Click on Add Next Hop

-
Click on Add Next Hop again
-
Enter the address as 192.168.0.1, a Global value. Click on Add

-
Click on Add again to add the IPv4 Route and then click on Save
-
Back on the main Device Template page, make sure vSmart-VPN512 is selected as the Template. Click on VPN Interface under Additional VPN 512 Templates and click on the drop down. Choose to Create Template. We’re creating the VPN 512 Interface Feature Template at this point

-
Enter the details as shown below and click on Save
Section Field Global or Device Specific (drop down) Value Template Name NA vSmart-vpn512-int Description NA VPN512 Interface Template for the vSmarts Basic Configuration Shutdown Global No Basic Configuration Interface Name Global eth1 Basic Configuration - IP Configuration IPv4 Address Device Specific vpn512_if_ip_address Tunnel Tunnel Interface Global Off 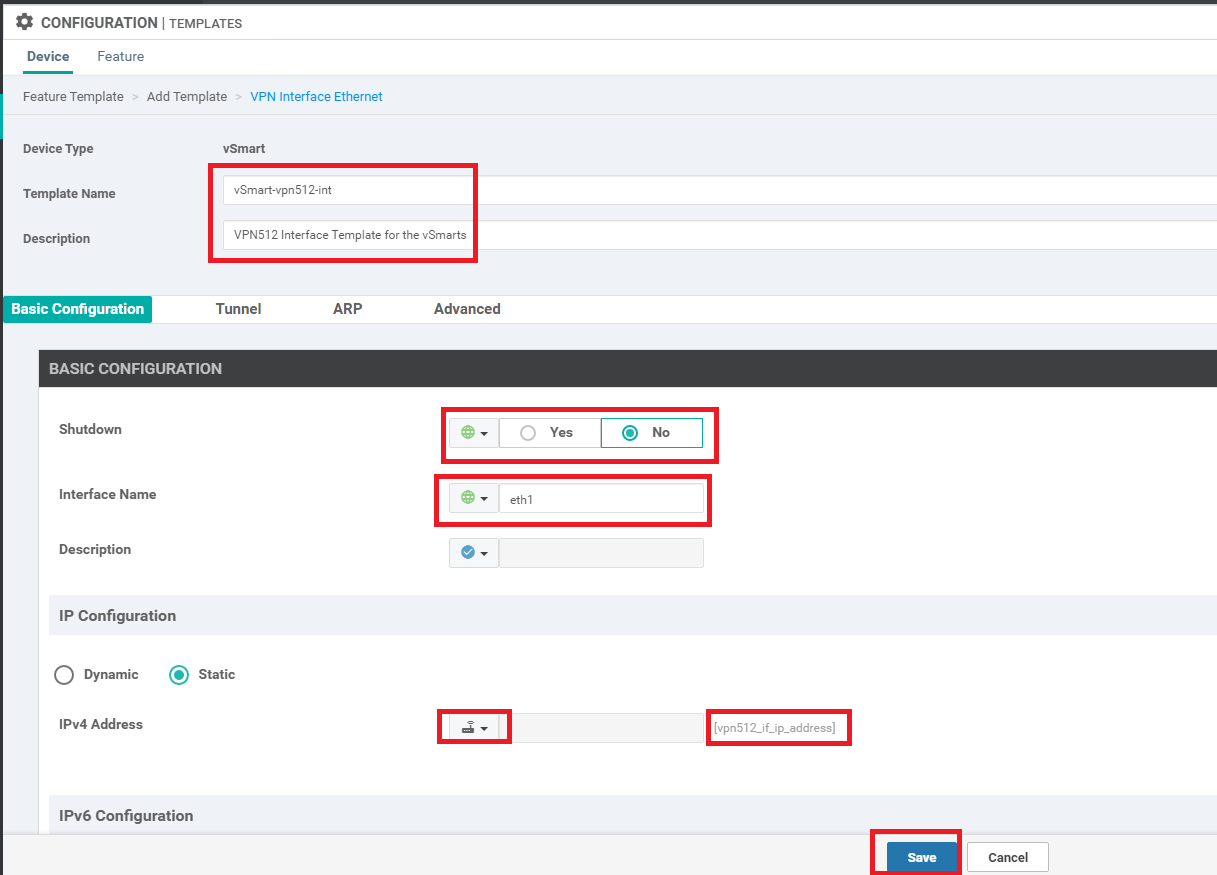
-
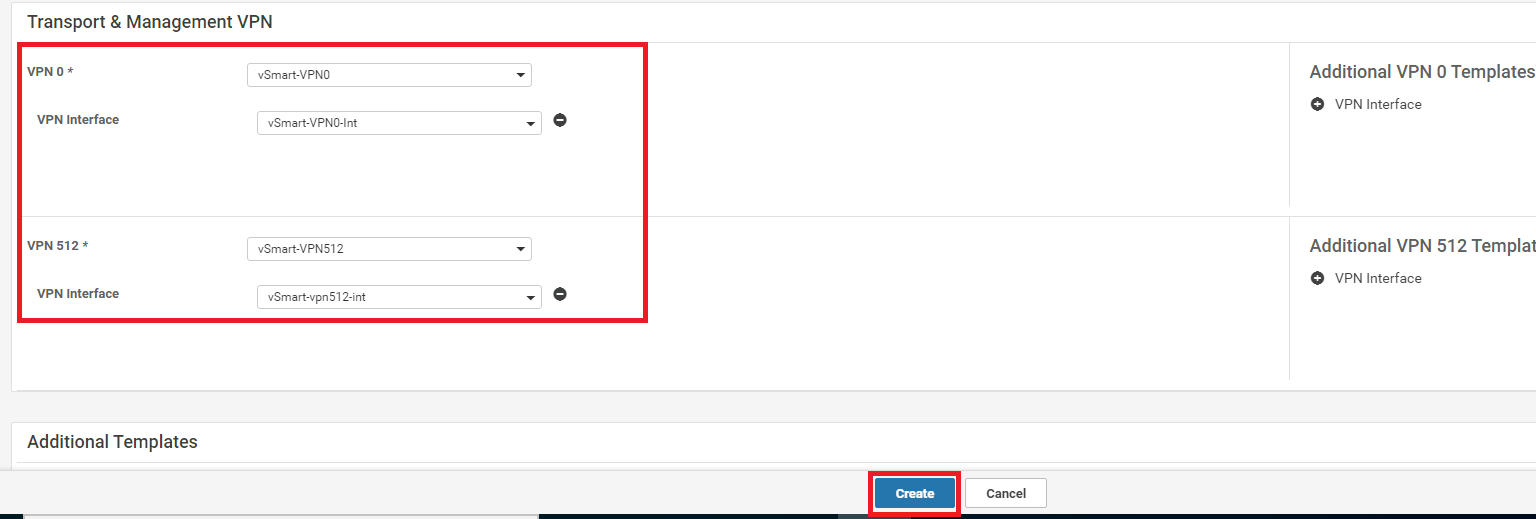
Make sure the Transport and Management VPN section is populated as shown below and click on Create.
We have completed the Device Template (and consequently the Feature Template) configuration for our vSmarts.
-
-
-
-
- Attaching vSmarts to the Device Template and Verification
Attaching vSmarts to the Device Template and Verification
Our Device Template for the vSmarts are set up and we now need to attach them to the Template.
-
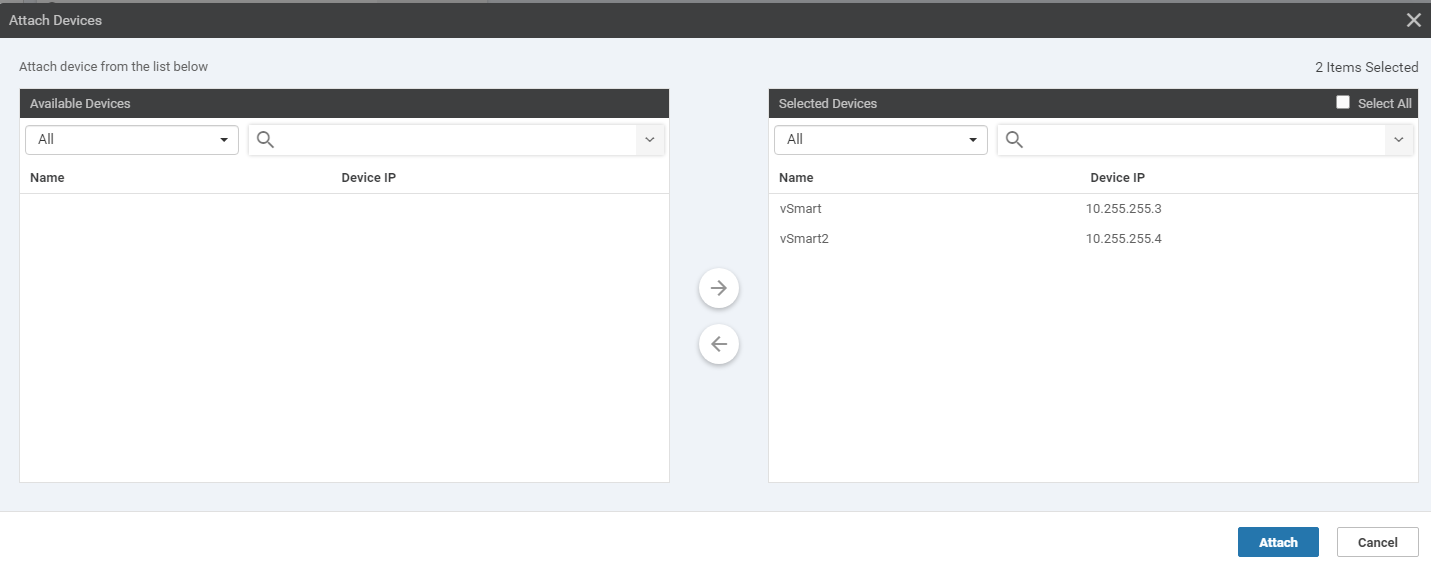
Click on Configuration => Templates (if not already there) and click the three dots next to the vSmart-dev-temp we just created. Click on Attach Devices

-
Choose both the vSmarts and click on Attach
-
You can populate the details in the Device Template window itself since there isn’t much. If you’re more comfortable with the Edit Device Template option, use that to enter the values and click on Next. Details to be entered are shown in the images below


-
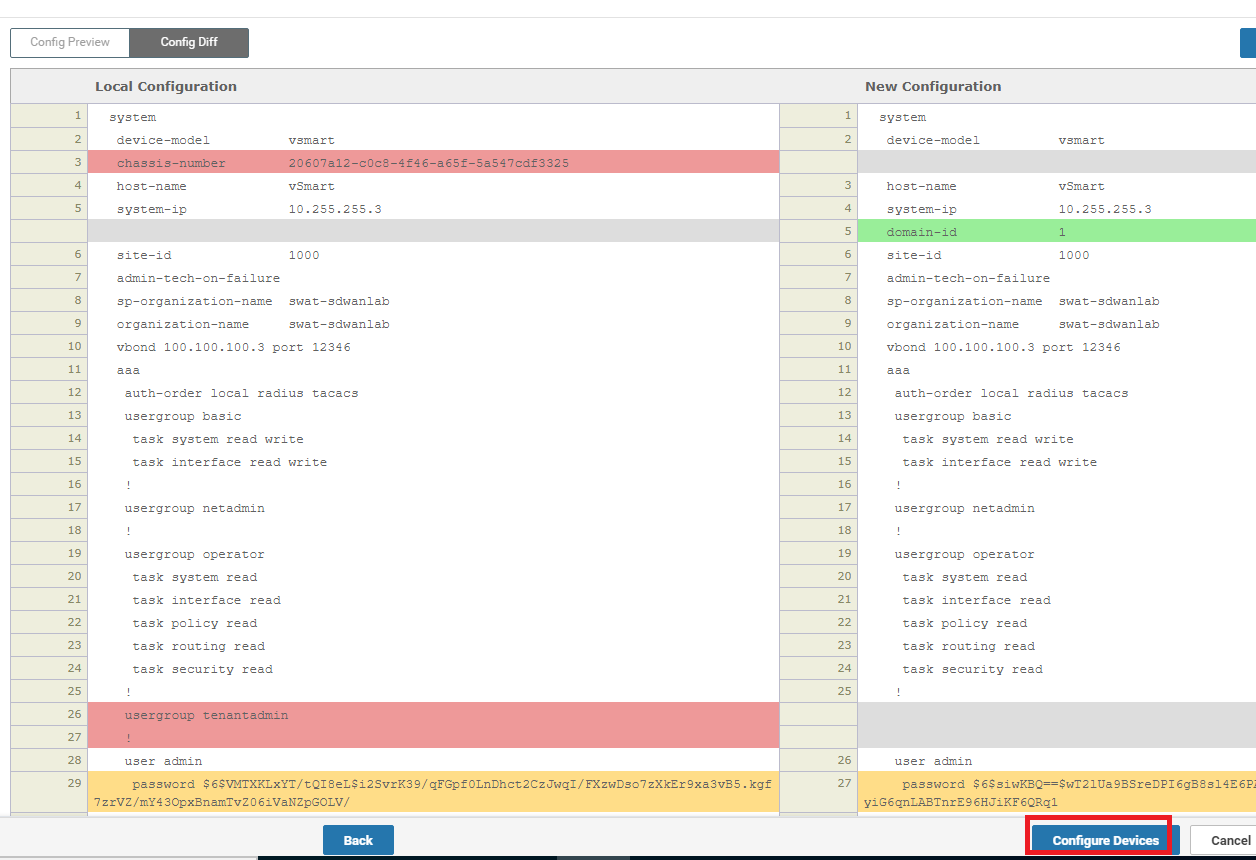
Click on the Device List on the left-hand side and click on Config Diff. Choose Side By Side Diff to review the configuration difference

-
Once done reviewing the configuration difference, click on Configure Devices
-
Confirm the configuration change by clicking on the check box and then clicking OK

-
Wait for the vSmarts to be configured successfully

-
Navigate to Configuration => Devices and go to the Controllers tab. You should see the vSmarts in vManage mode

This completes our activity of attaching Device Templates to the vSmarts.
clear control connections. After a few seconds, all control connections (i.e. 10 of them) should be up.