- Overview
- Pre-work and Testing
- Initial Configuration
- Configuring NTP and DNS
- Setting up vManage as the CA
- Enabling AMP and Testing
- Configuring the Decryption Policy
- Activity Verification
Overview
Starting with IOS-XE 17.2.1r, the cEdges can function as transparent TLS/SSL Proxy devices. Encrypted traffic can be decrypted by the cEdge which is then analyzed by the Unified Threat Defense (UTD) engine to identify risks hidden in encrypted traffic. Some of the benefits of a TLS Proxy are:
-
Transparent inspection of encrypted traffic for threats
-
Threat and Malware protection for TLS traffic
-
Security Policy enforcement on decrypted traffic
TLS proxy devices act as a man-in-the-middle (MitM) to decrypt encrypted TLS traffic traveling across the WAN, and send it to UTD for inspection. TLS Proxy thus allows devices to identify risks that are hidden by end-to-end encryption over TLS channels. The data is re-encrypted post inspection before being sent to its final destination.
-
- Pre-work and Testing
- Initial Configuration
- Configuring NTP and DNS
- Setting up vManage as the CA
- Enabling AMP and Testing
- Configuring the Decryption Policy
- Activity Verification
Pre-Work and Testing
We will first perform some initial testing without AMP and TLS/SSL Proxy functionality enabled.
-
Log in to vCenter (10.2.1.50/ui if connected to the GHI DC and 10.1.1.50/ui if connected to the SJC DC) via the saved bookmark using the username/password for your POD. Locate the sdwan-sjc/ghi-site40pc2win-podX VM and click on it. Click on the console icon to open a console session to the PC (choose Web Console if prompted)
Username Password sdwanpodX
where X is your POD number
e.g. sdwanpod5C1sco12345 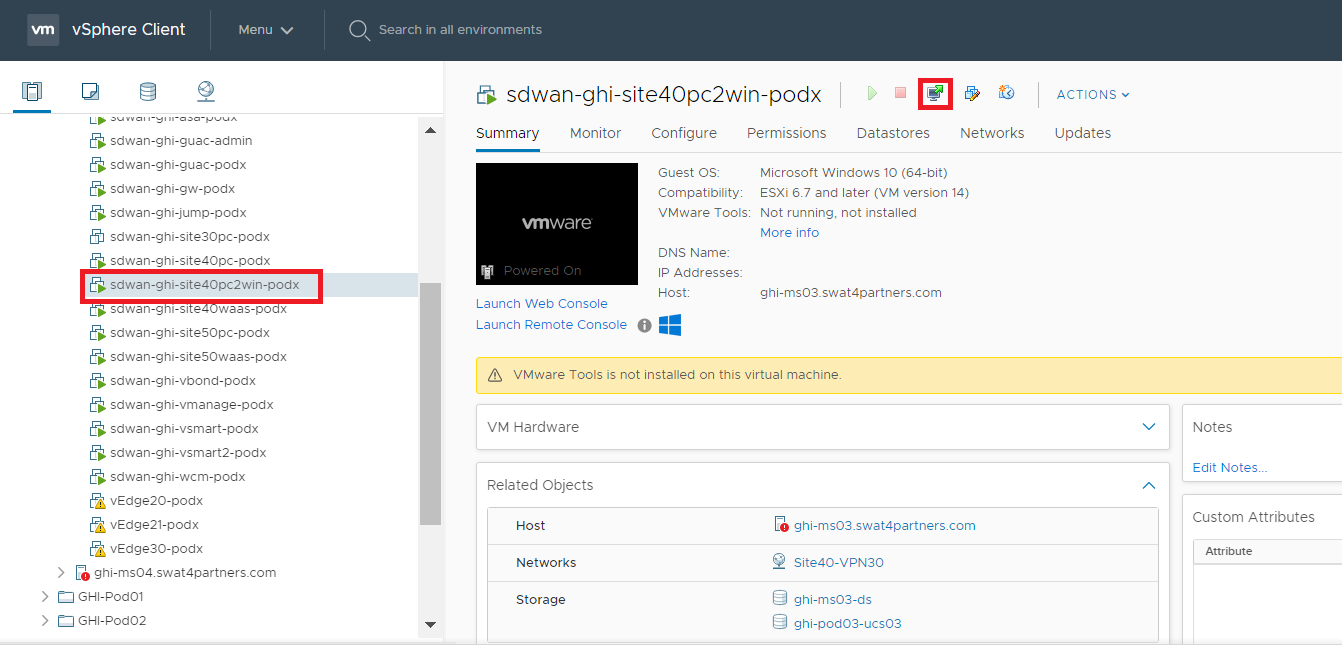
-
Log in to the Windows PC at Site 40 and click on Start. Search for Windows Security and click on the Windows Security icon
Username Password admin C1sco12345 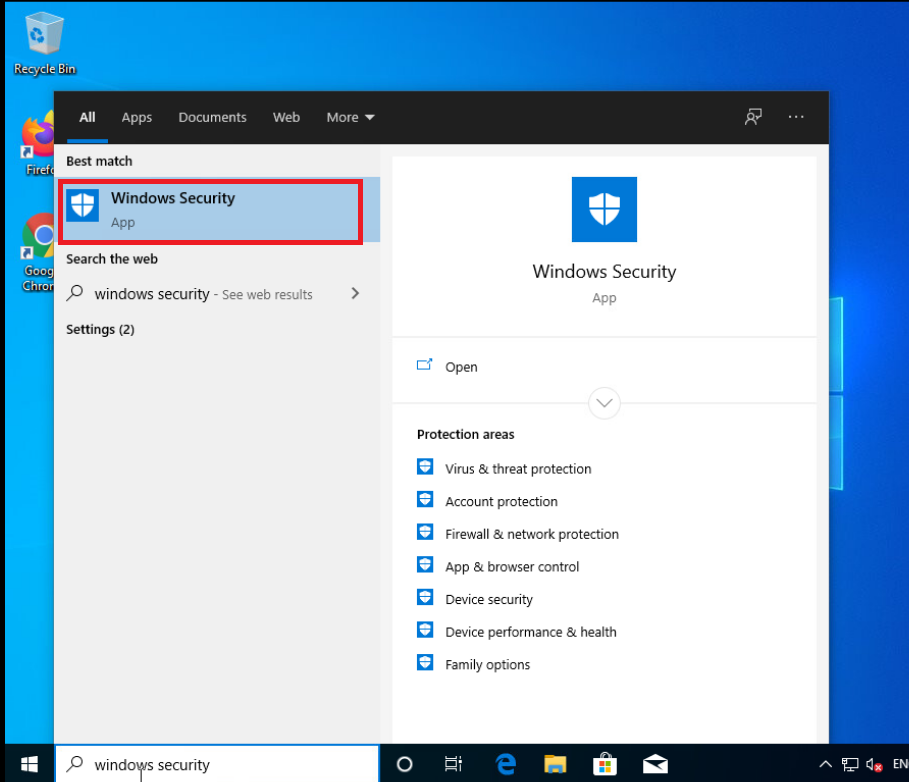
-
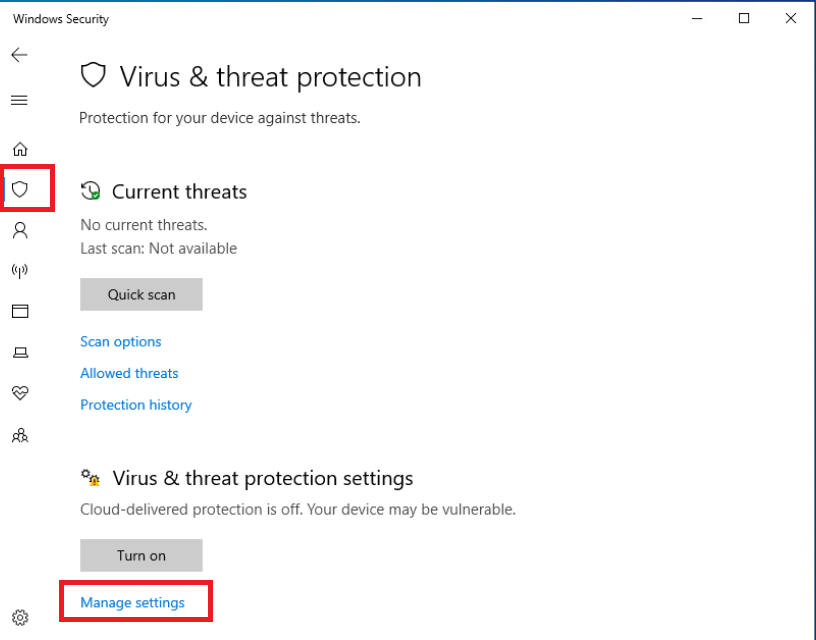
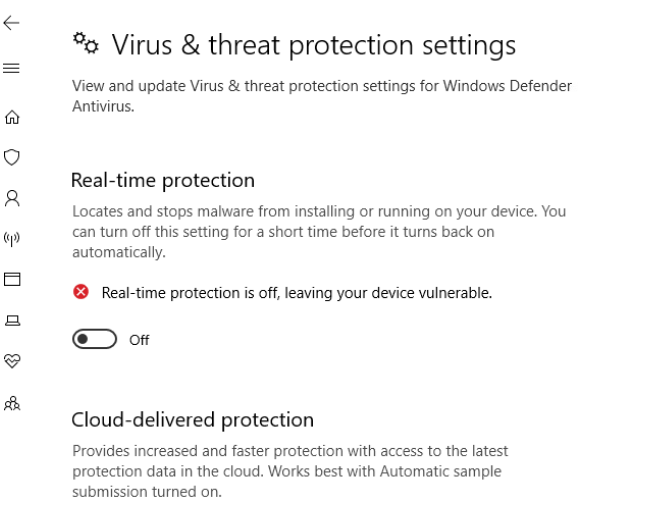
Click on the Virus and Threat Protection icon on the left hand side and then on Manage Settings
-
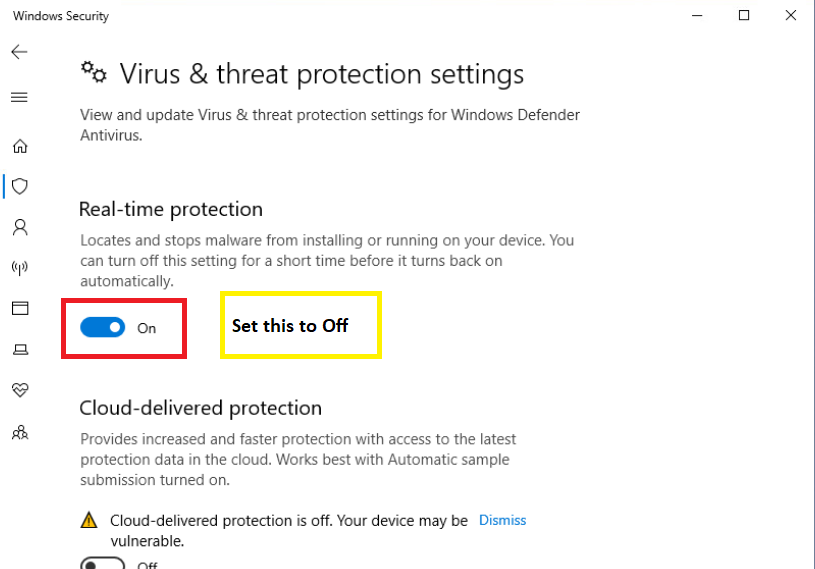
Set the Real-Time Protection slider to the Off position. If this PC is rebooted, the slider will need to be set to Off again
-
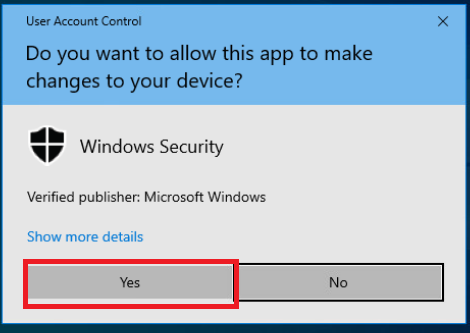
Click on Yes to allow the changes. Real-time protection should now be off
-
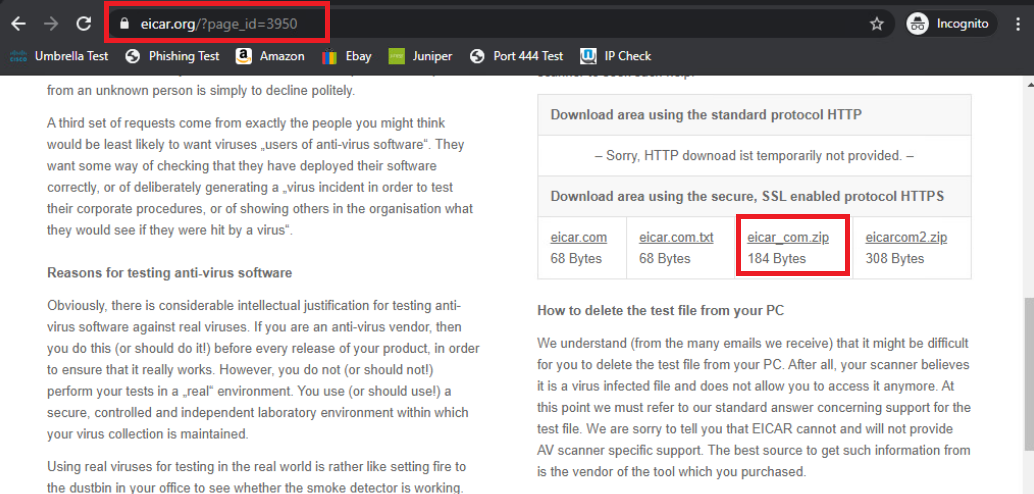
Open Google Chrome and navigate to eicar.org/?page_id=3950 or use the Malware Test bookmark. Scroll down and click on the eicar_com.zip HTTPS download link. This will initiate a download of a sample malware file
-
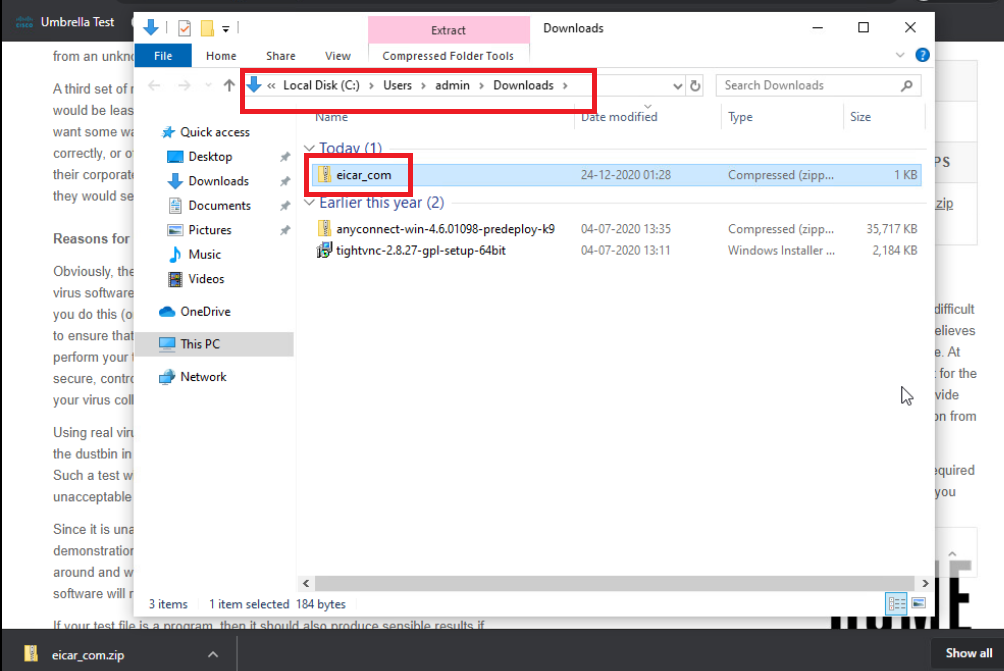
The download will go through and we should see the eicar_com.zip sample malware file in the Downloads folder. Delete the file (press Shift + Delete after clicking on the file to permanently delete it) since we will be performing this test multiple times
We thus saw that a known malware file was downloaded via HTTPS since:
-
There is no malware protection mechanism in place
-
The traffic is encrypted
-
-
- Initial Configuration
- Configuring NTP and DNS
- Setting up vManage as the CA
- Enabling AMP and Testing
- Configuring the Decryption Policy
- Activity Verification
Initial Configuration
SSL/TLS Proxy configuration requires a few pre-requisites to be in place. These are:
-
TLS Proxy devices and the clients should have their times in sync
-
A device will need to be set up as a CA. There are a few options: Enterprise CA, Enterprise CA with SCEP enabled, vManage as CA and vManage as an Intermediate CA
-
Traffic flows must be symmetric and pinned to a particular link, if there are multiple links
We will be setting up the vManage as the CA, along with configuring NTP and DNS for our network.
Configuring NTP and DNS
-
Log in to the CLI of vManage via the saved session in Putty (or SSH to 192.168.0.6) using the username and password given below. Enter the commands enumerated here to update the DNS and NTP servers
Username Password admin admin 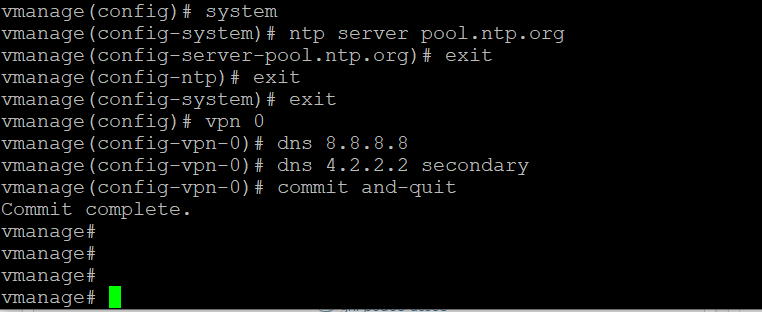
config t system ntp server pool.ntp.org exit exit exit vpn 0 dns 8.8.8.8 dns 4.2.2.2 secondary commit and-quit -
Run
show ntp assocafter a few seconds to verify that the vManage is now sync’d to pool.ntp.org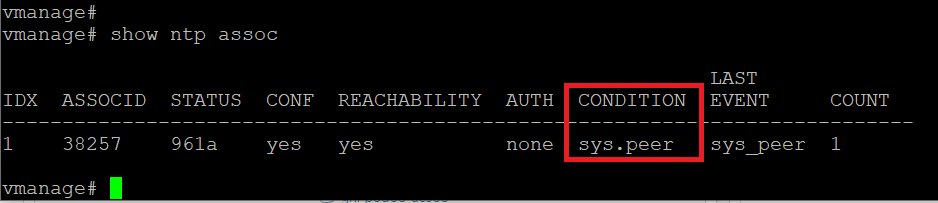
-
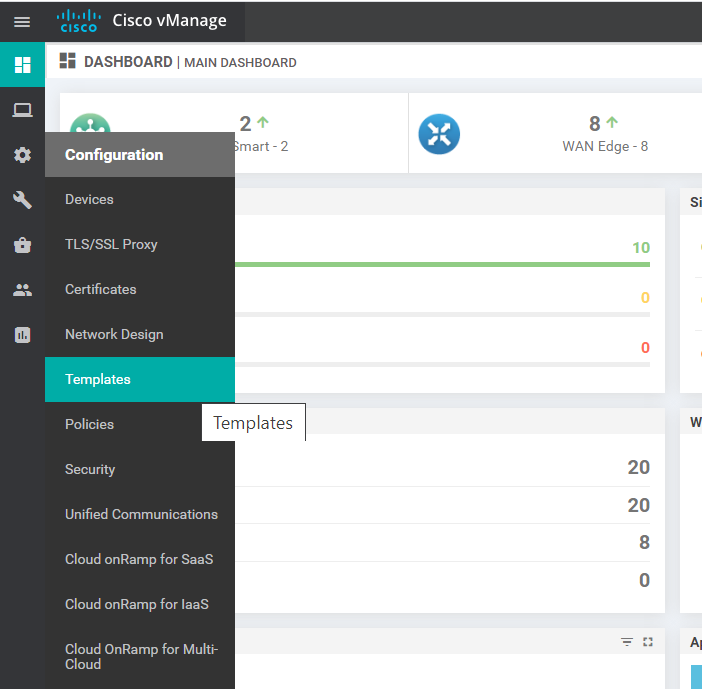
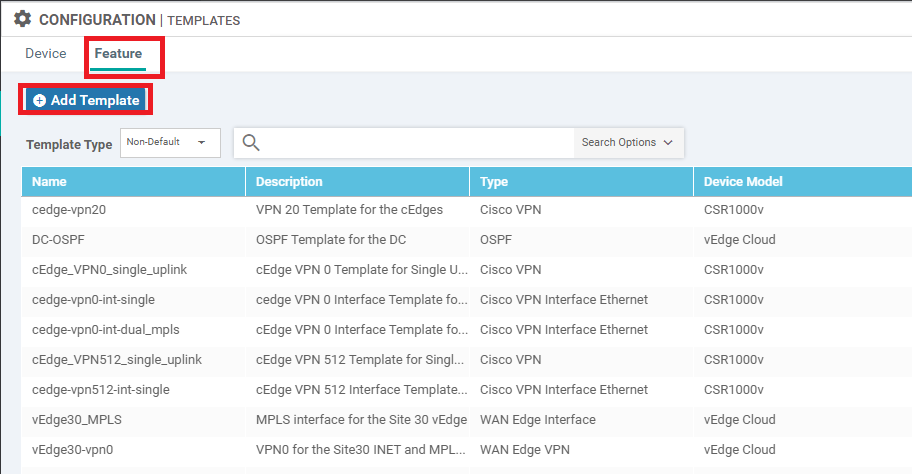
Log in to the vManage GUI by using the bookmark in Chrome (or by going to 192.168.0.6 via a browser). Navigate to Configuration => Templates and head over to the Feature tab. Click on Add Template
-
Search for csr and select the CSR1000v device. Click on Cisco NTP to create an NTP Feature Template for the cEdges
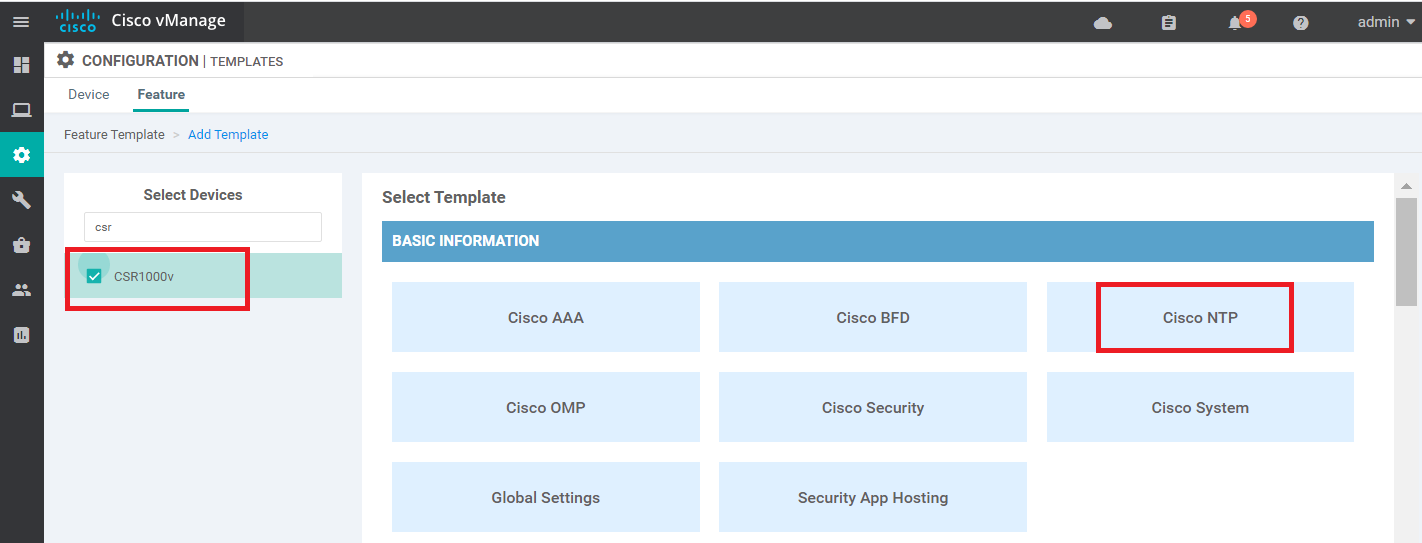
-
Populate the name and description per the table given below and click on New Server. Enter the details as per the table, screenshot given for reference. Click on Add once all the server details have been populated and then click on Save to save the template
Section Field Global or Device Specific (drop down) Value Template Name cedge40-ntp Description NTP Template for cEdge40 Server Hostname/IP Address Global pool.ntp.org Server Source Interface Global GigabitEthernet2 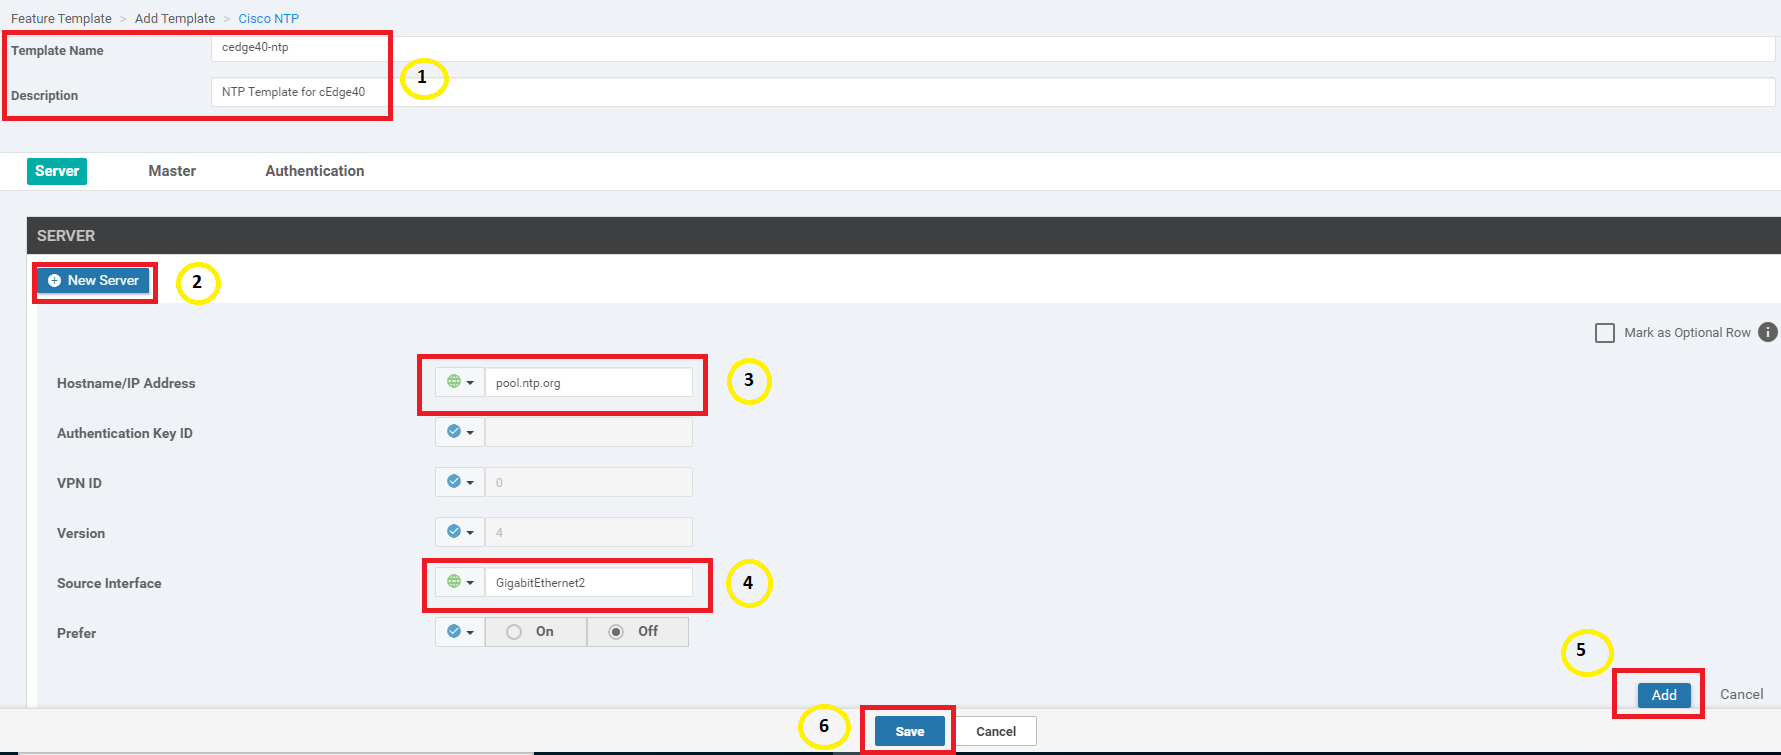
-
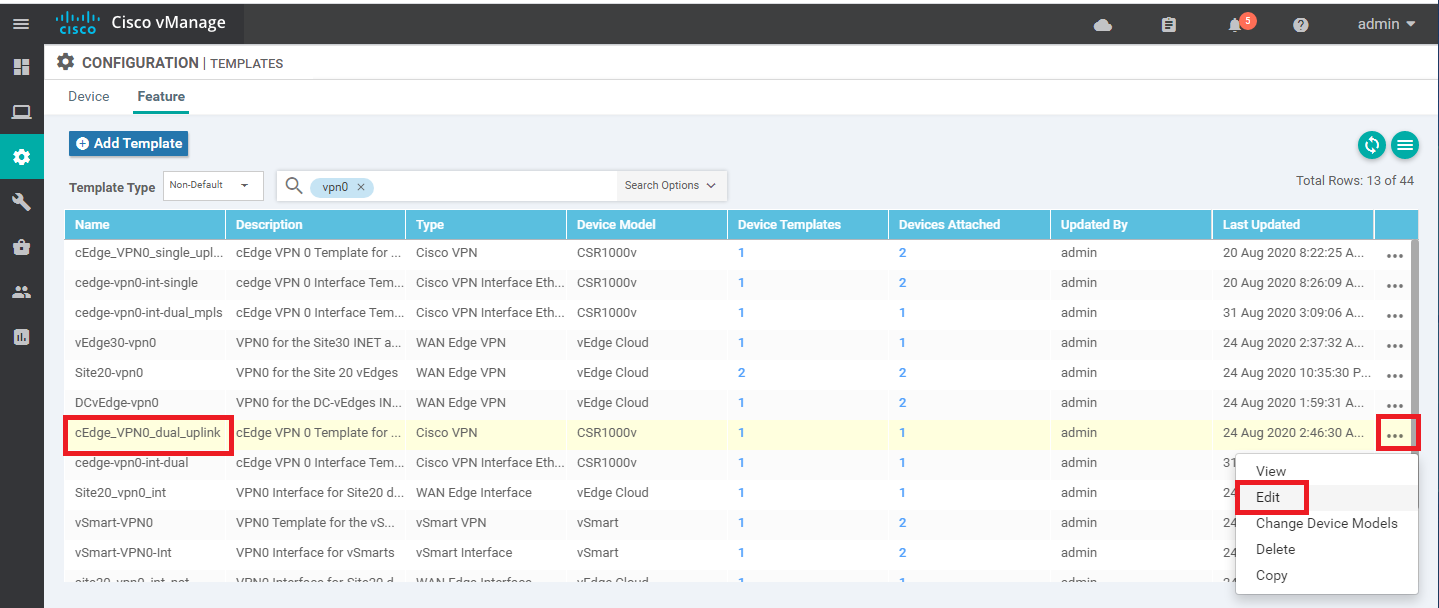
At the Feature Templates tab, locate the cEdge_VPN0_dual_uplink template and click on the three dots next to it. Choose to Edit the template
-
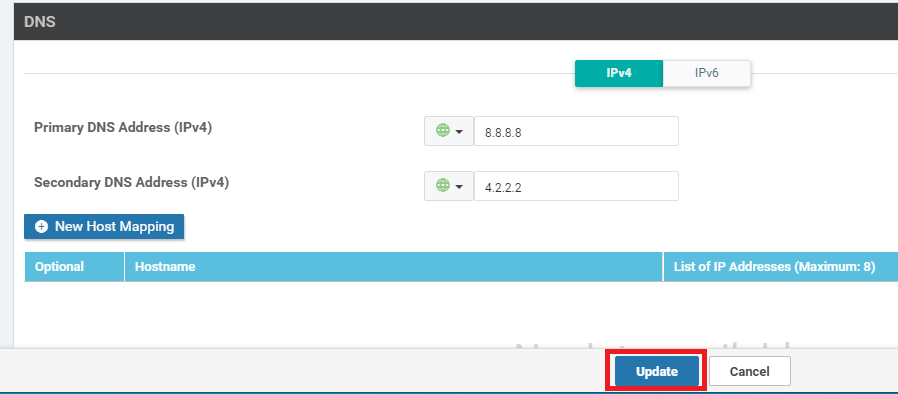
Populate the Primary DNS Address and Secondary DNS Address as 8.8.8.8 and 4.2.2.2 respectively. Click on Update
-
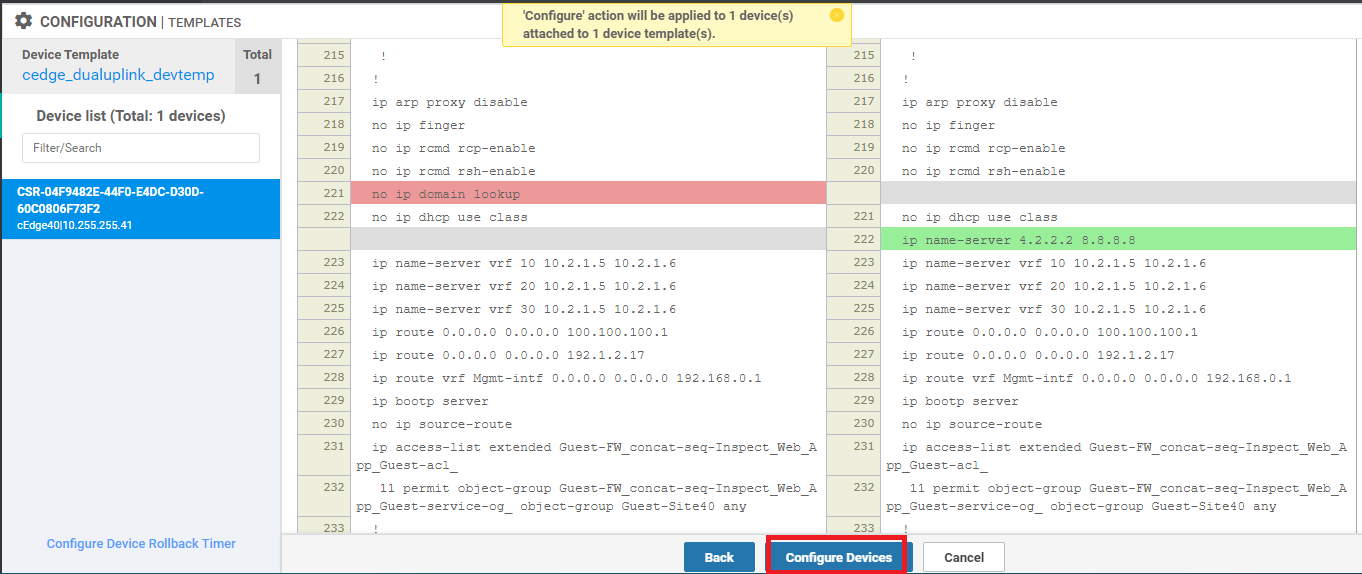
Click on Next and Configure Devices. You can choose to view the side by side configuration if needed
-
Go to Configuration => Templates and locate the cedge_dualuplink_devtemp Device Template. Click on the three dots next to it and choose to Edit the template
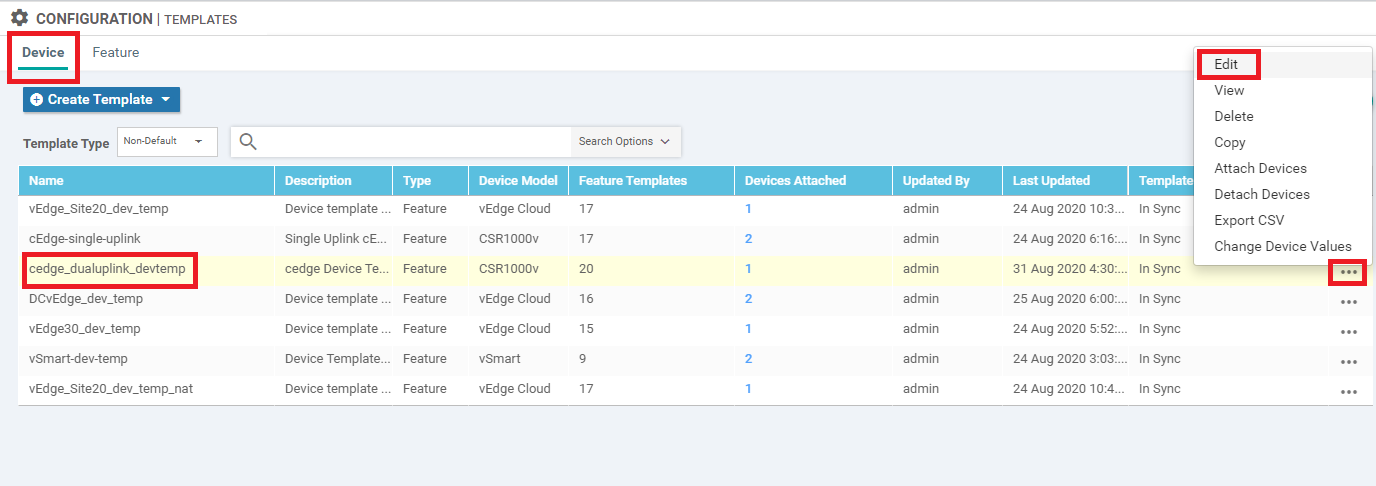
-
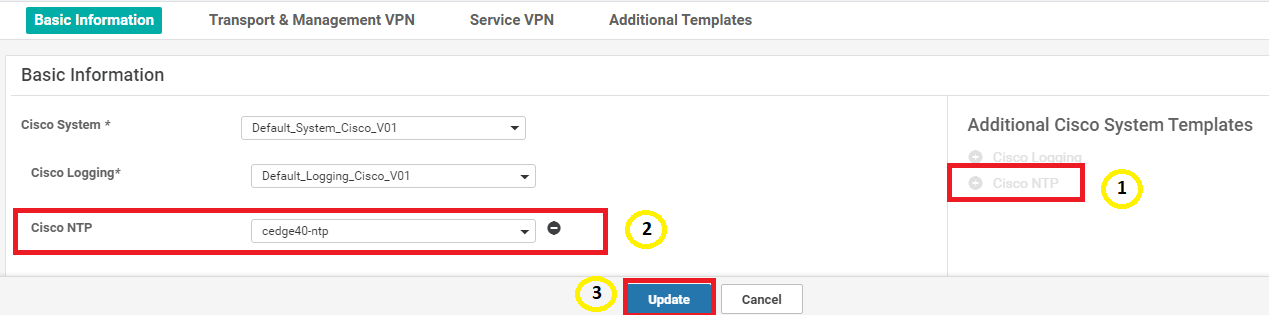
Click on Cisco NTP to add an NTP Feature Template and populate the cedge40-ntp template we created. Click on Update
-
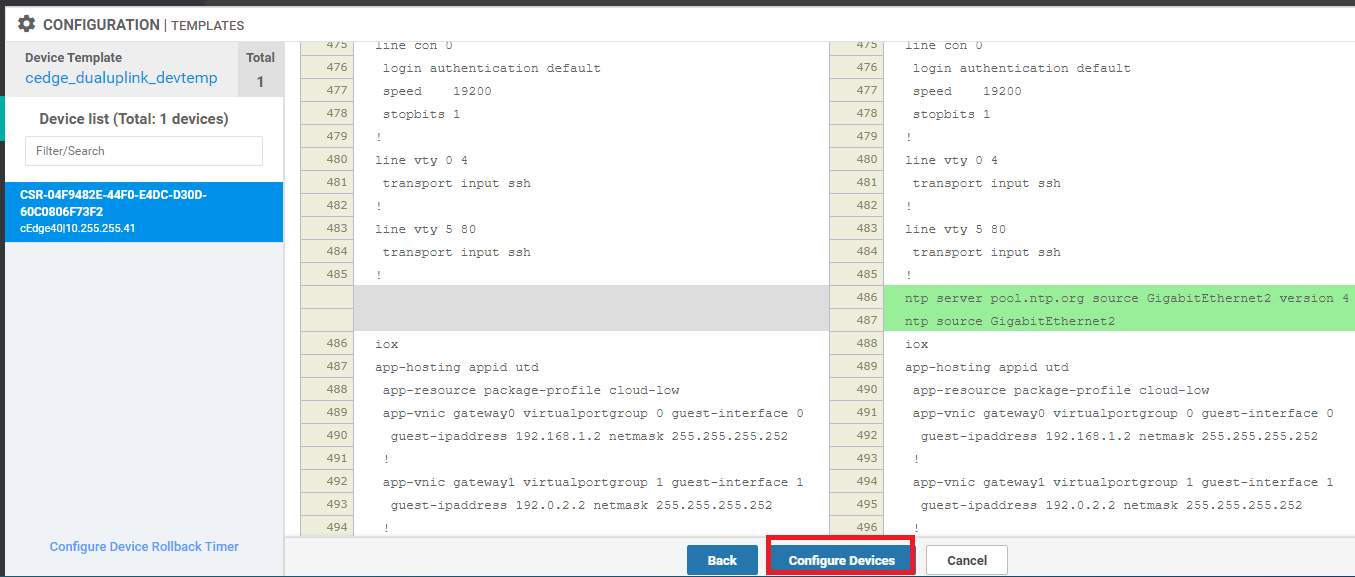
Click on Next and Configure Devices
-
Once the configuration is pushed successfully, log in via Putty to cEdge40 using the saved session (or SSH to 192.168.0.40) and issue a
show ntp assocto verify DNS resolution of the NTP server and a state of sys.peer
This completes the DNS and NTP configuration required for TLS/SSL Proxy setup.
-
-
- Initial Configuration
-
- Setting up vManage as the CA
- Enabling AMP and Testing
- Configuring the Decryption Policy
- Activity Verification
Setting up vManage as the CA
We will now set up vManage as the CA and install the certificate on our client PC at Site 40.
-
Log in to vCenter (10.2.1.50/ui if connected to the GHI DC and 10.1.1.50/ui if connected to the SJC DC) via the saved bookmark using the username/password for your POD. Locate the sdwan-sjc/ghi-site40pc2win-podX VM and click on it. Click on the console icon to open a console session to the PC (choose Web Console if prompted)
Username Password sdwanpodX
where X is your POD number
e.g. sdwanpod5C1sco12345 -
Log in to the Windows PC at Site 40 and open Google Chrome. Navigate to 100.100.100.2 and log in to vManage, after accepting any certificate errors
Site 40 PC2 credentials:
Username Password admin C1sco12345 vManage credentials:
Username Password admin admin 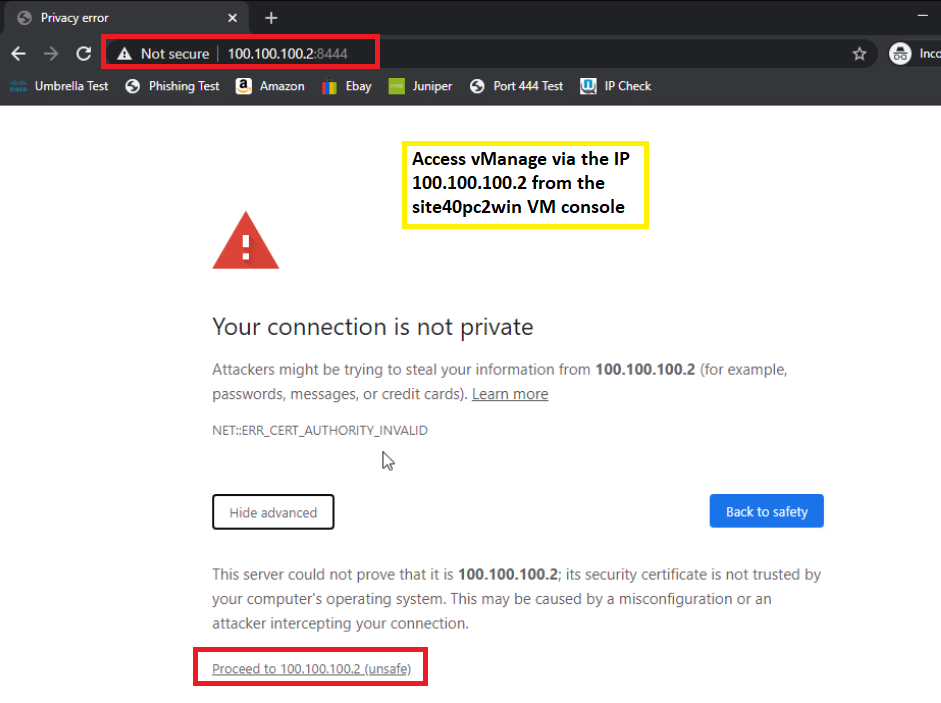
-
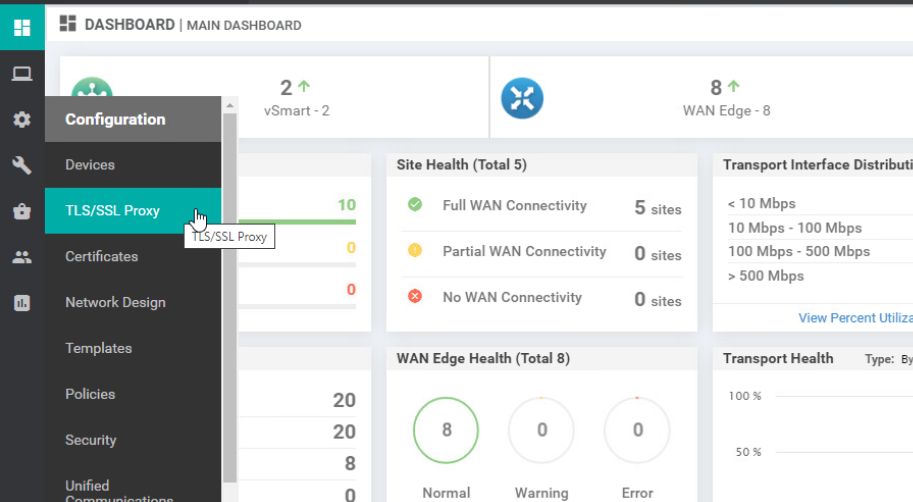
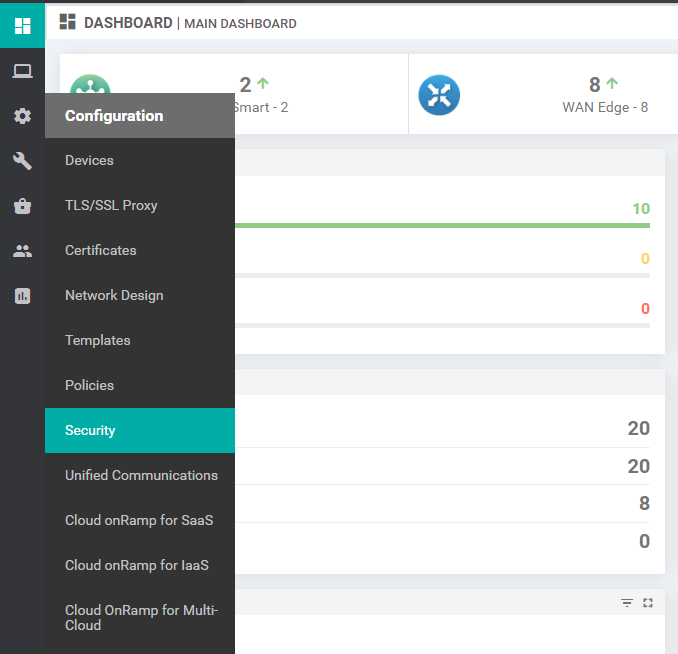
Go to Configuration => TLS/SSL Proxy
-
Select vManage as CA and enter the details as per the following table. Click on Save Certificate Authority
Field Value Common Name tlsproxy Organization swat-sdwanlab Organizational Unit Cisco Locality SJ State/Province CA Country Code US Email abc@cisco.com Validity Period 10 years 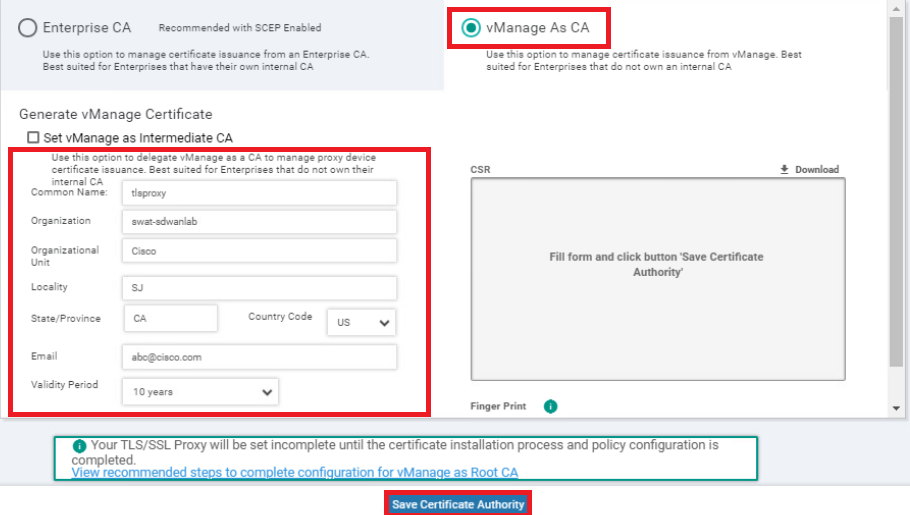
-
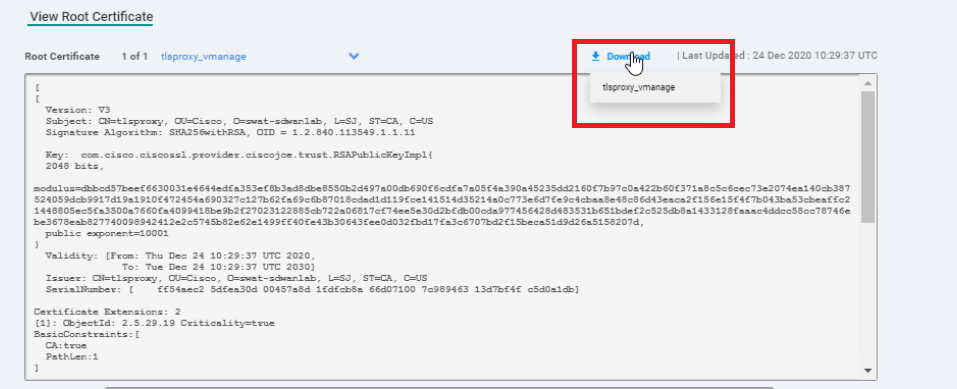
Click on Download and download the root certificate, which we will be installing on the Site 40 PC2 itself
-
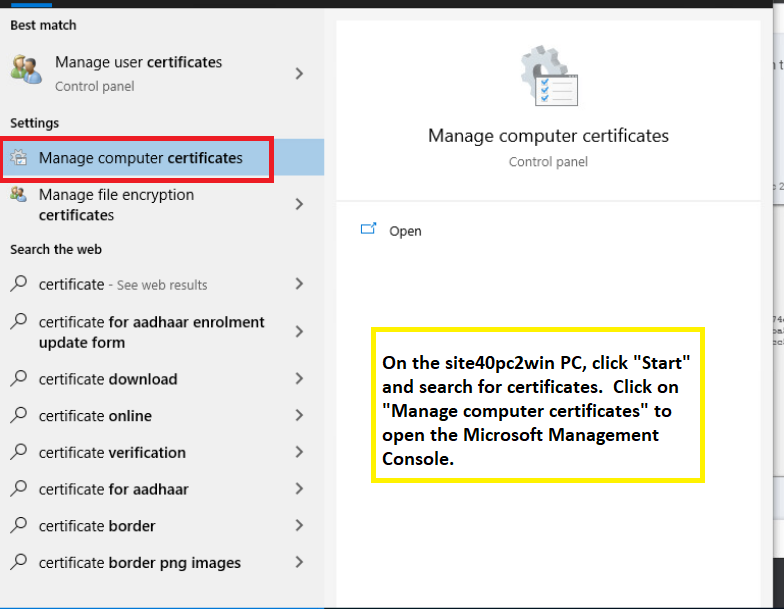
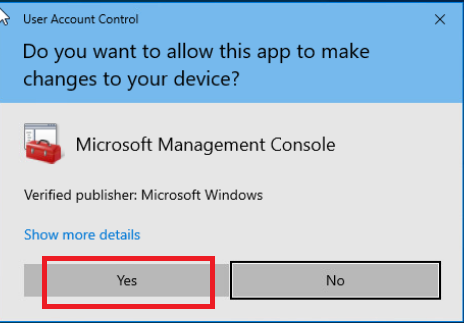
Click on Start on the Site 40 PC2 and search for certificates. Click on Manage computer certificates, which should open the Microsoft Management Console. Click on Yes to allow MMC to make changes
-
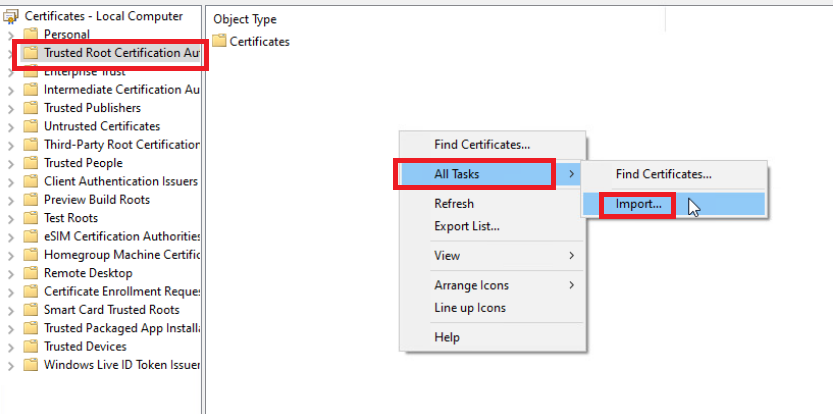
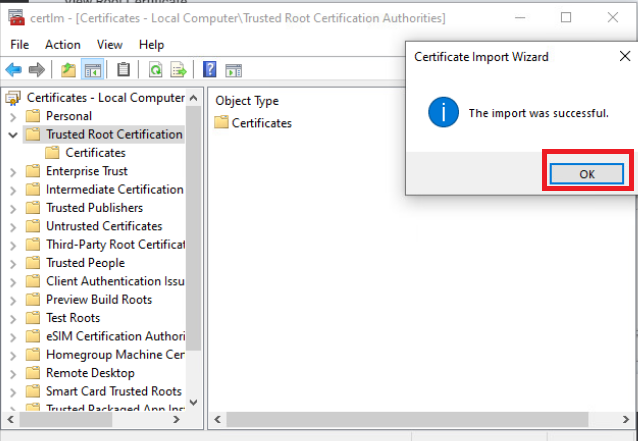
Click on Trusted Root Certification Authorities and then right click in the blank white space on the right hand window pane. Choose All Tasks => Import
-
Click Next in the Certificate Import Wizard

-
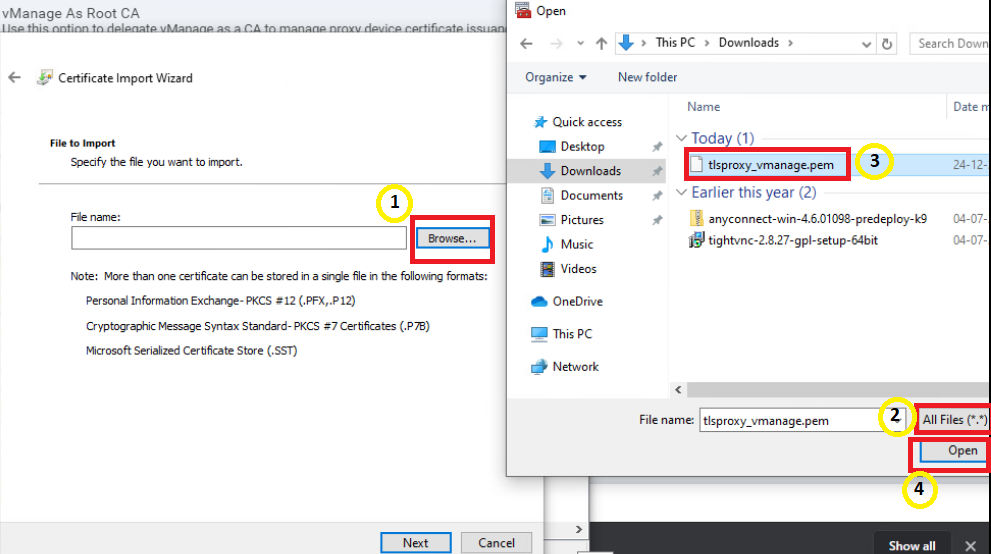
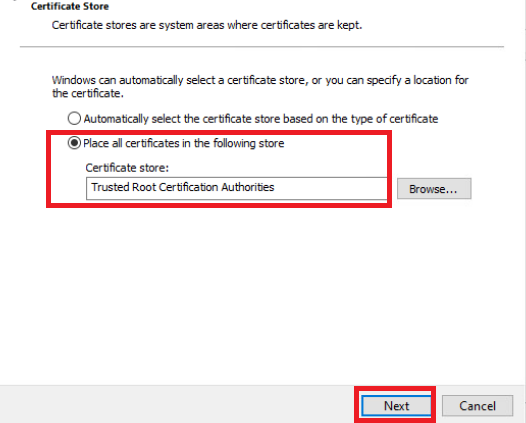
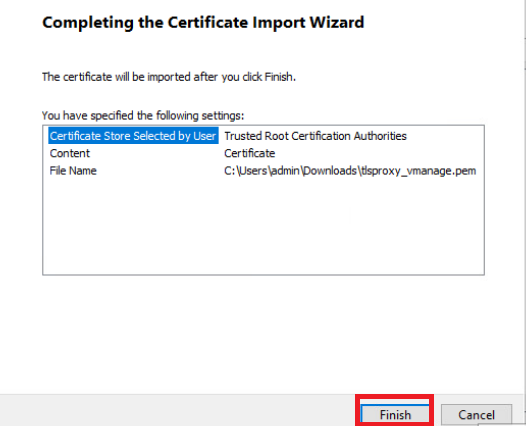
Click on Browse and set the File Type to All Files. Select Downloads and click on the tlsproxy_vmanage.pem file we downloaded and click on Open
-
Click on Next and ensure that the certificate store is set to Trusted Root Certification Authorities. Click on Next

-
Click on Finish and then OK once the import is successful
We have successfully set up the initial configuration for TLS/SSL Proxy in a Cisco SD-WAN environment.
-
-
-
-
-
- Enabling AMP and Testing
- Configuring the Decryption Policy
- Activity Verification
Enabling AMP and Testing
Advanced Malware Protection will be enabled in this section and we will try to download a sample malware file via HTTPS. Since the TLS/SSL Proxy isn’t configured yet, we expect the file to be downloaded despite AMP being enabled. This is due to the fact that traffic is encrypted and AMP cannot analyse encrypted communication.
-
Navigate to Configuration => Security on the vManage GUI and locate the Guest-FW-IPS-DIA policy. Click on the three dots next to it and choose to Edit

-
Click on the Advanced Malware Protection tab and then on Add Advanced Malware Protection Policy. Choose Create New
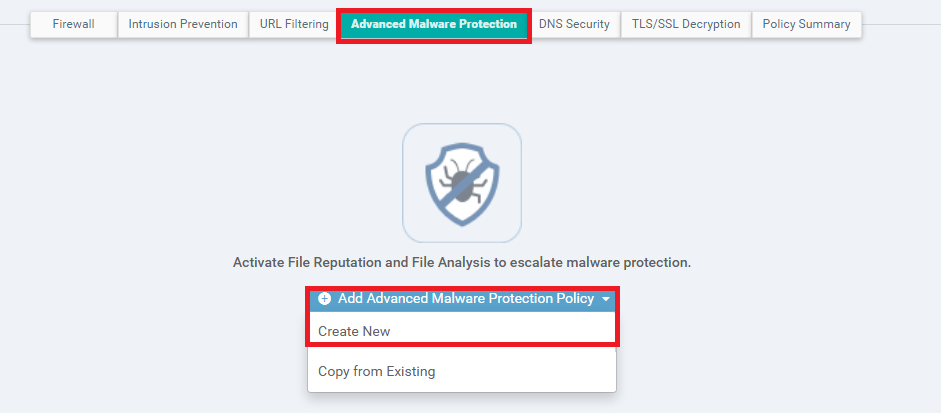
-
Enter the details enumerated in the table below and click on Save Advanced Malware Protection Policy. When the Custom VPN Configuration radio button is selected, you will get a help walkthrough which will instruct you how to specify custom VPNs. Click on Got It and then click on Target VPNs. Enter 30 as the Target VPN
Field Value Policy Name amp-policy VPN Custom VPN Configuration Target VPN 30 AMP Cloud Region NAM Alerts Log Level Info File Analysis Disabled 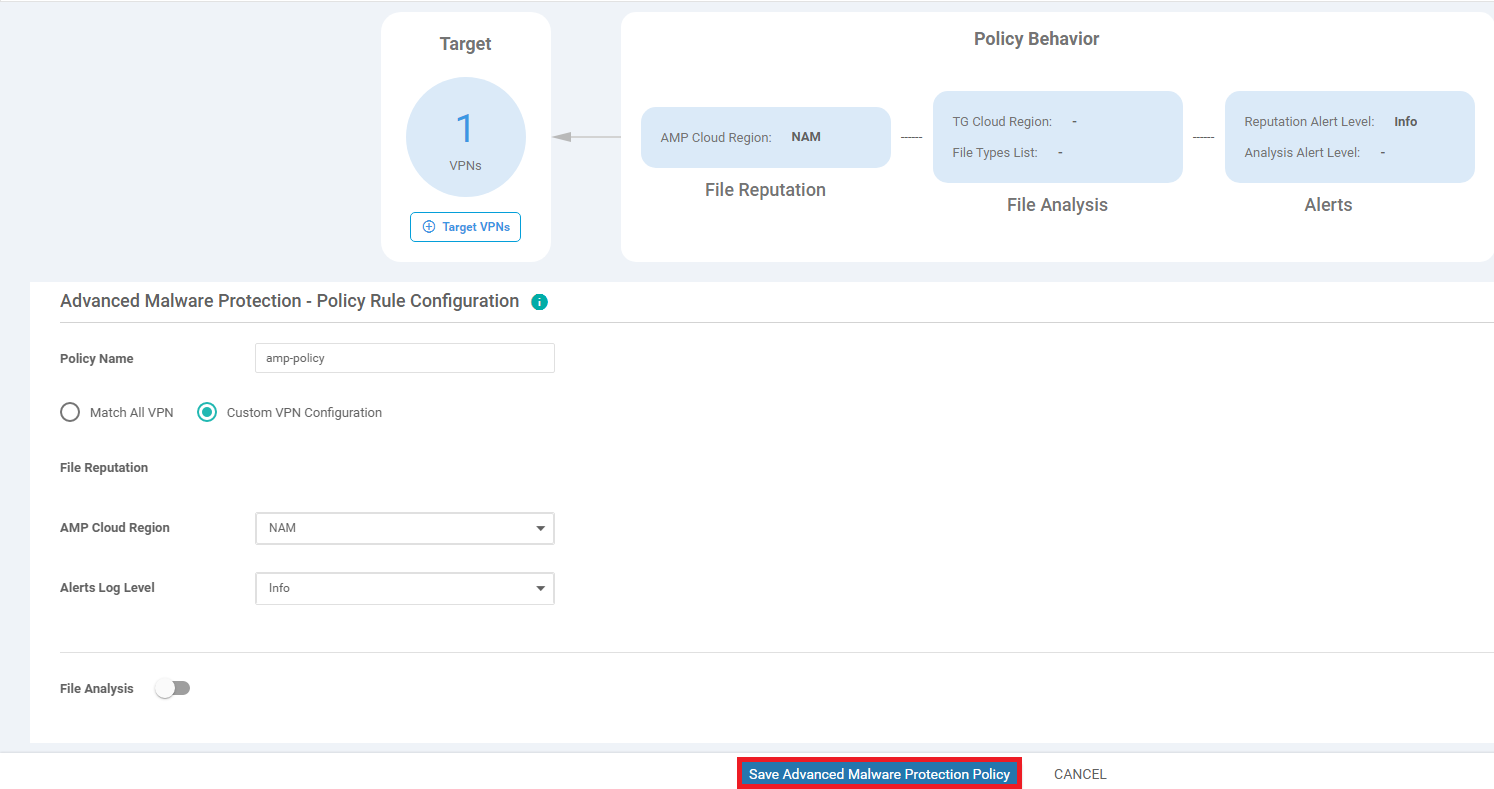
-
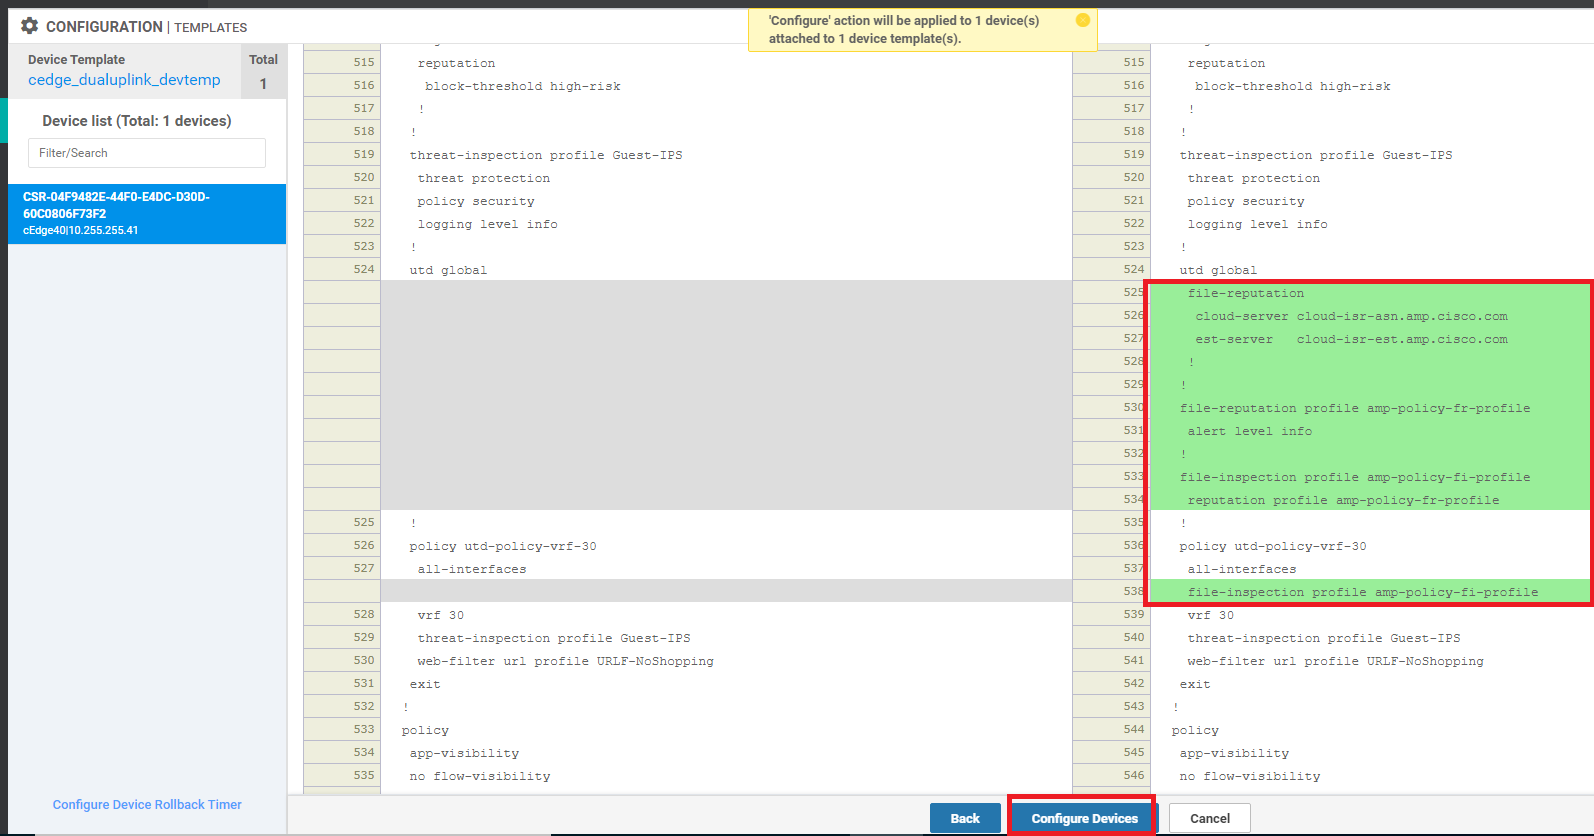
Click on Next and then Configure Devices. You can choose to view the side by side configuration, if required
-
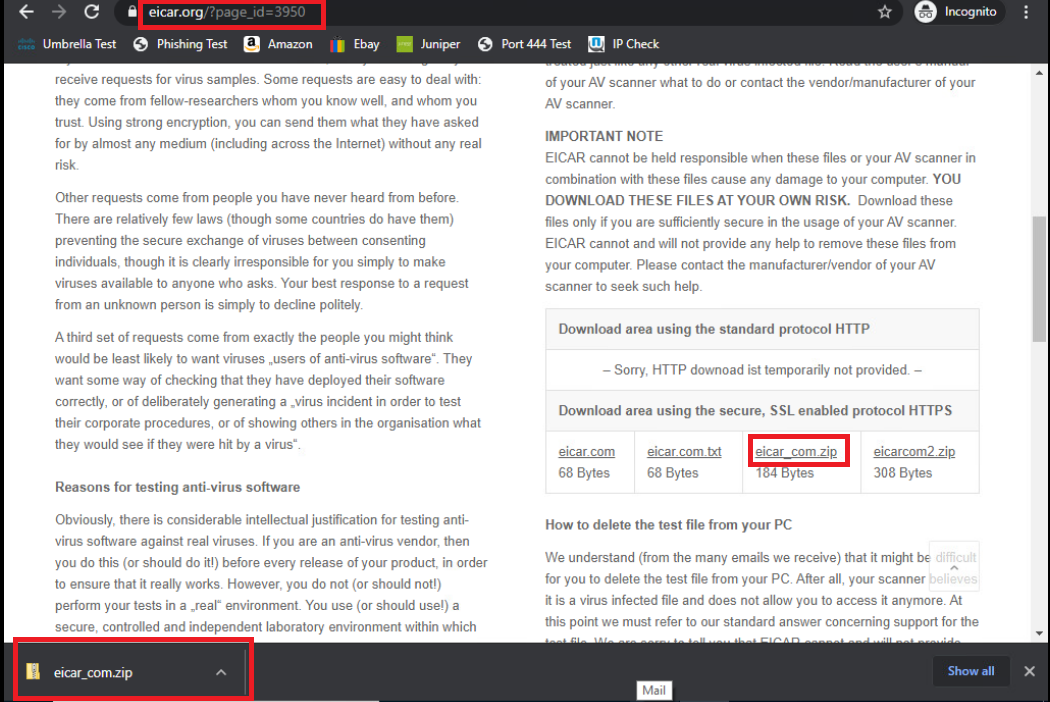
Go back to the Site40PC2 (Windows) via the console session in vCenter. Click here and go through Step 1 to access the PC. Open Google Chrome and use the Malware Test bookmark or navigate to eicar.org/?page_id=3950. Download the eicar_com.zip sample malware file and you will notice that the file gets downloaded successfully
We have enabled AMP in our SD-WAN environment and tested that HTTPS communication isn’t analysed/blocked by AMP due to its encrypted nature, despite downloading a known malware file.
-
-
-
-
-
-
- Configuring the Decryption Policy
- Activity Verification
Configuring the Decryption Policy
We will now configure cEdge40 as the TLS/SSL Proxy device.
-
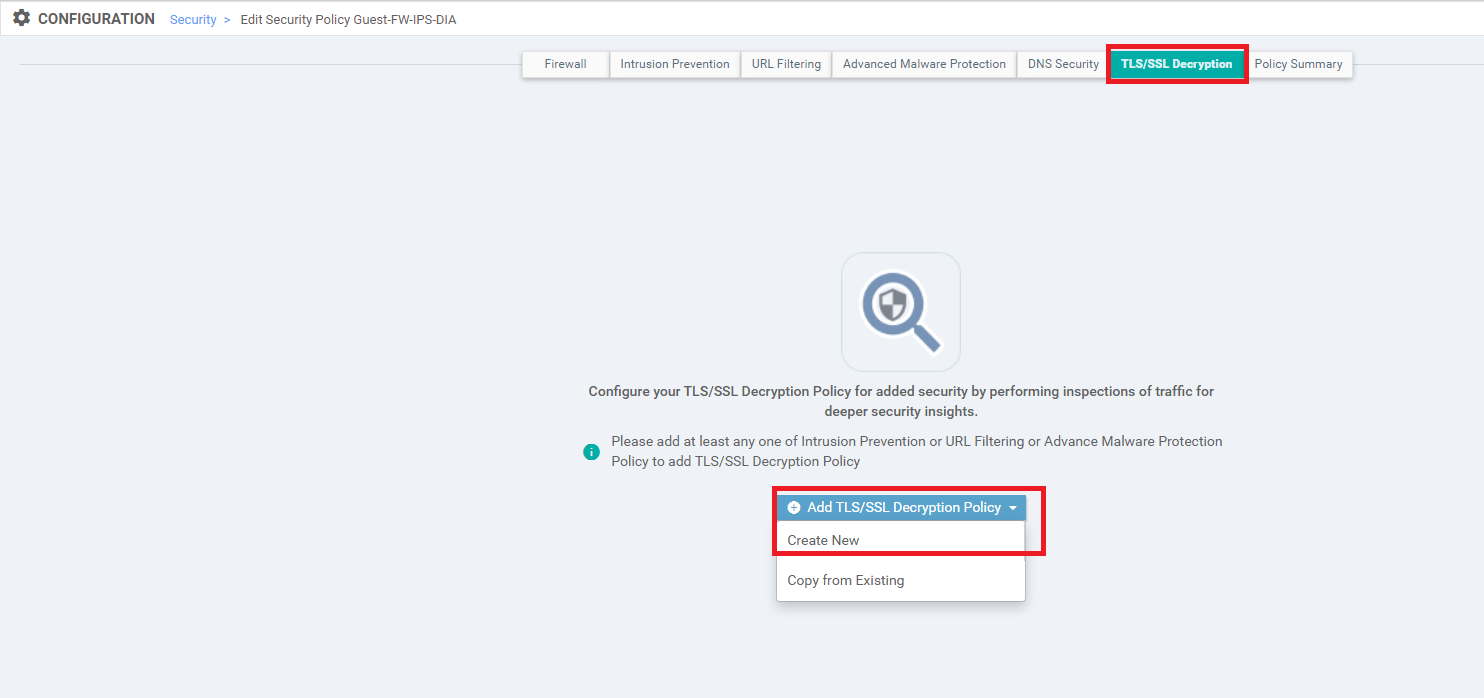
Navigate to Configuration => Security and locate the Guest-FW-IPS-DIA policy. Click on the three dots next to it and choose to Edit the policy. Click on the TLS/SSL Decryption tab and click on Add TLS/SSL Decryption Policy
-
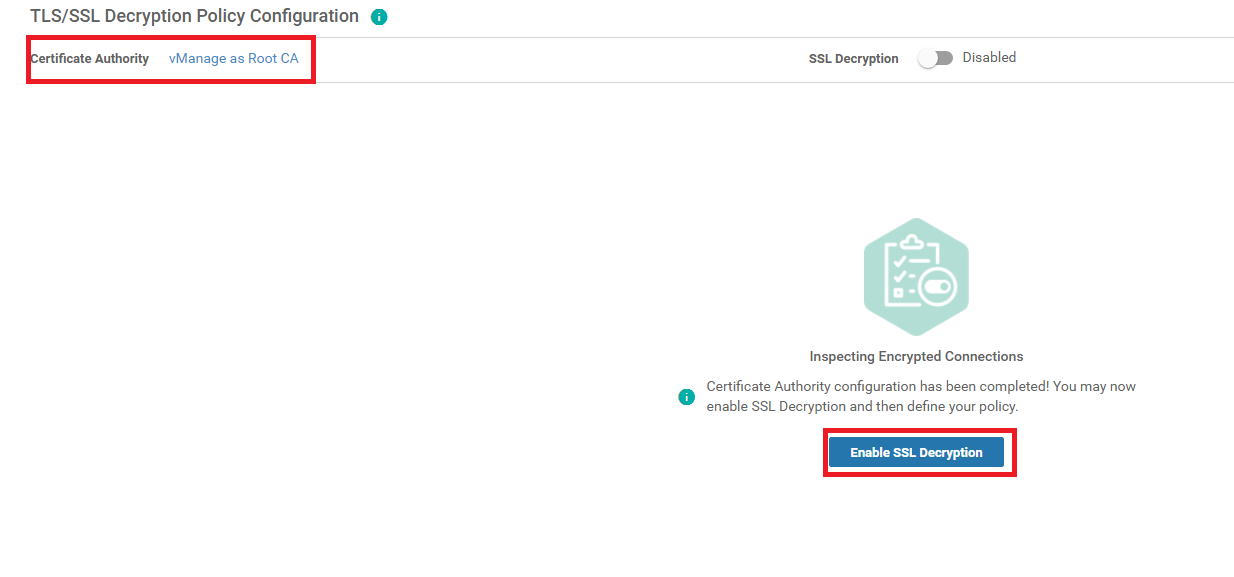
Make sure that the vManage shows up as the CA and click on Enable SSL Decryption
-
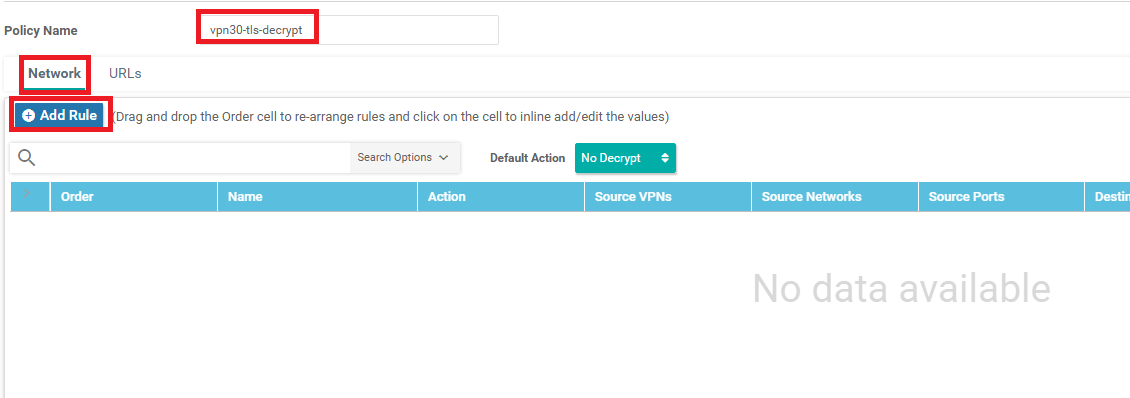
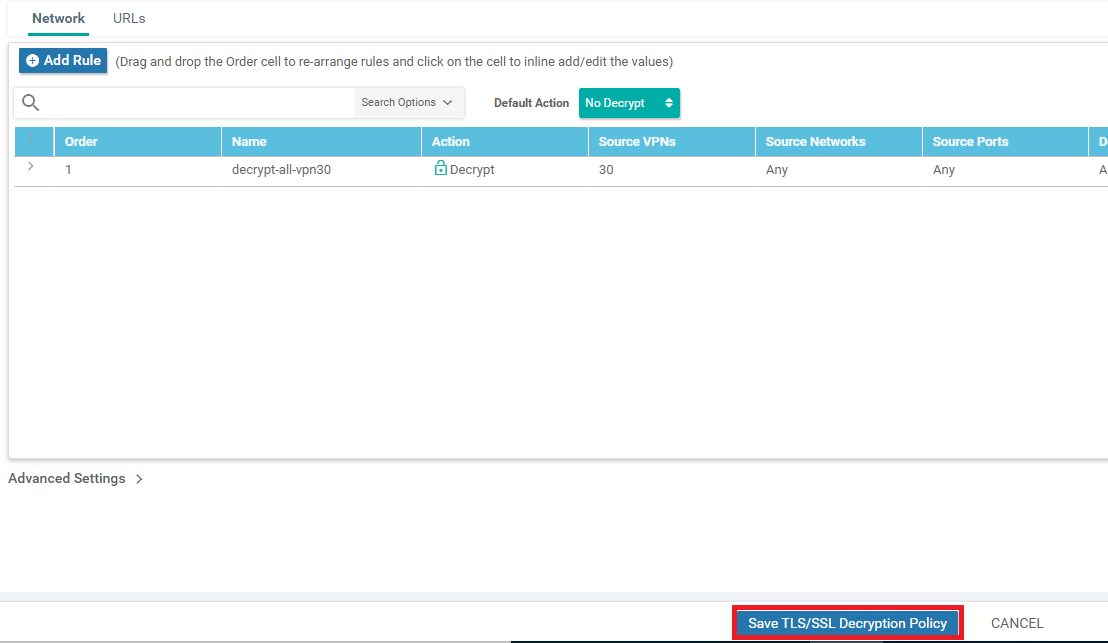
Give the policy a name of vpn30-tls-decrypt and create a Network Rule by clicking on Add Rule
-
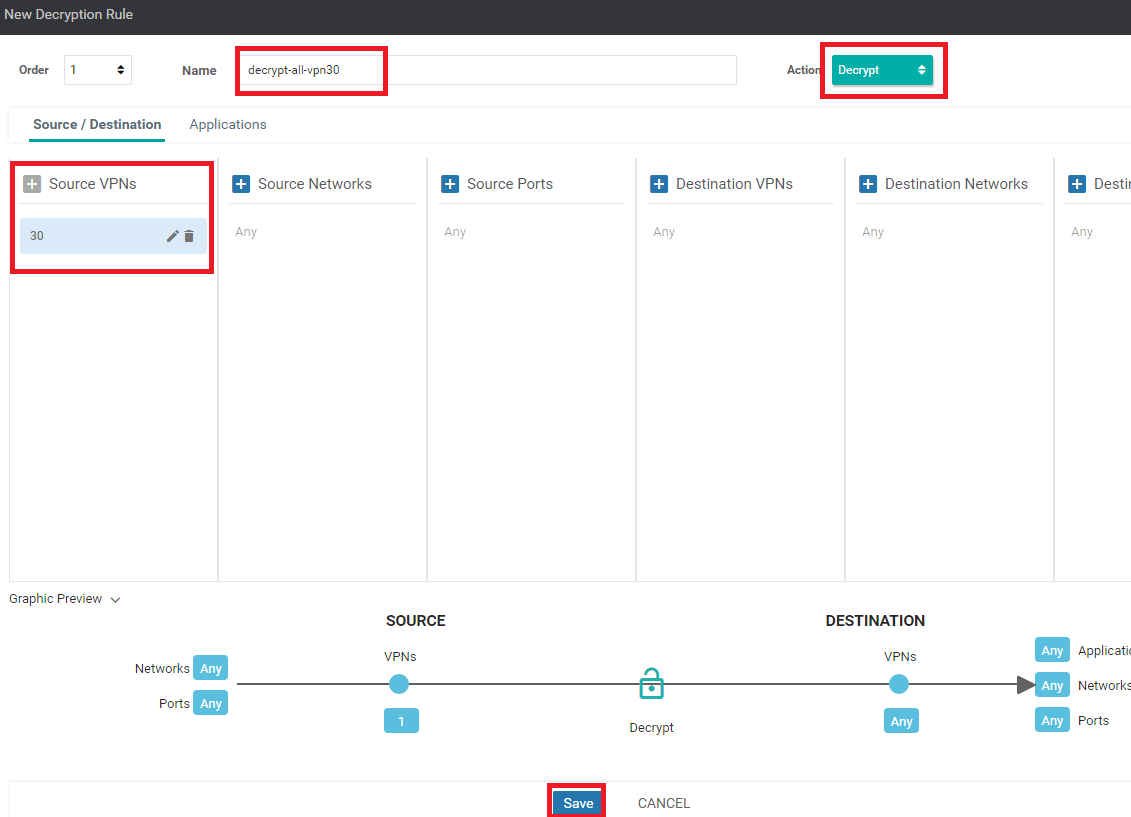
Set the name of the rule to decrypt-all-vpn30 and choose Decrypt for the Action. Click on Source VPN and set the Source VPN to 30. Click on Save and then Save again in order to save this rule
-
Make sure that the policy has a Decrypt rule added and click on Save TLS/SSL Decryption Policy
-
At the main policy page, click on Save Policy Changes and then choose Next and Configure Devices. You can view the side by side configuration if needed

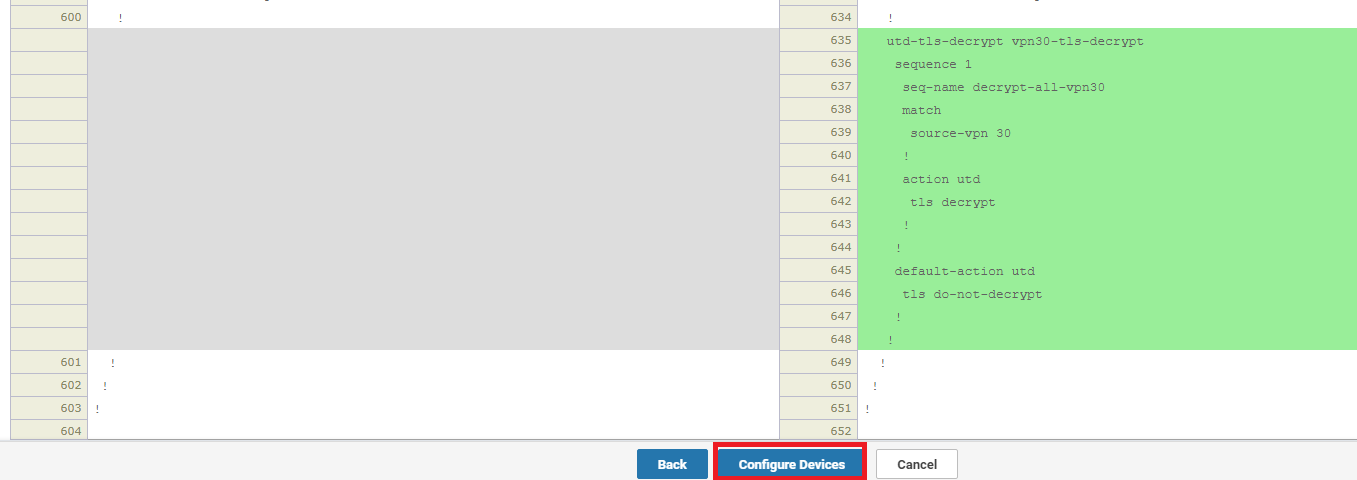
We have configured a decryption policy for cEdge40.
-
-
-
-
-
-
-
- Activity Verification
Activity Verification
-
Once the changes have been pushed successfully, log in to the CLI of cEdge40 via Putty using the saved session (or SSH to 192.168.0.40). Issue
clear utd engine standard logging eventsand thenshow sslproxy status. The SSL and TCP Proxy Operational State should be RUNNING and Clear Mode should be set to FalseUsername Password admin admin 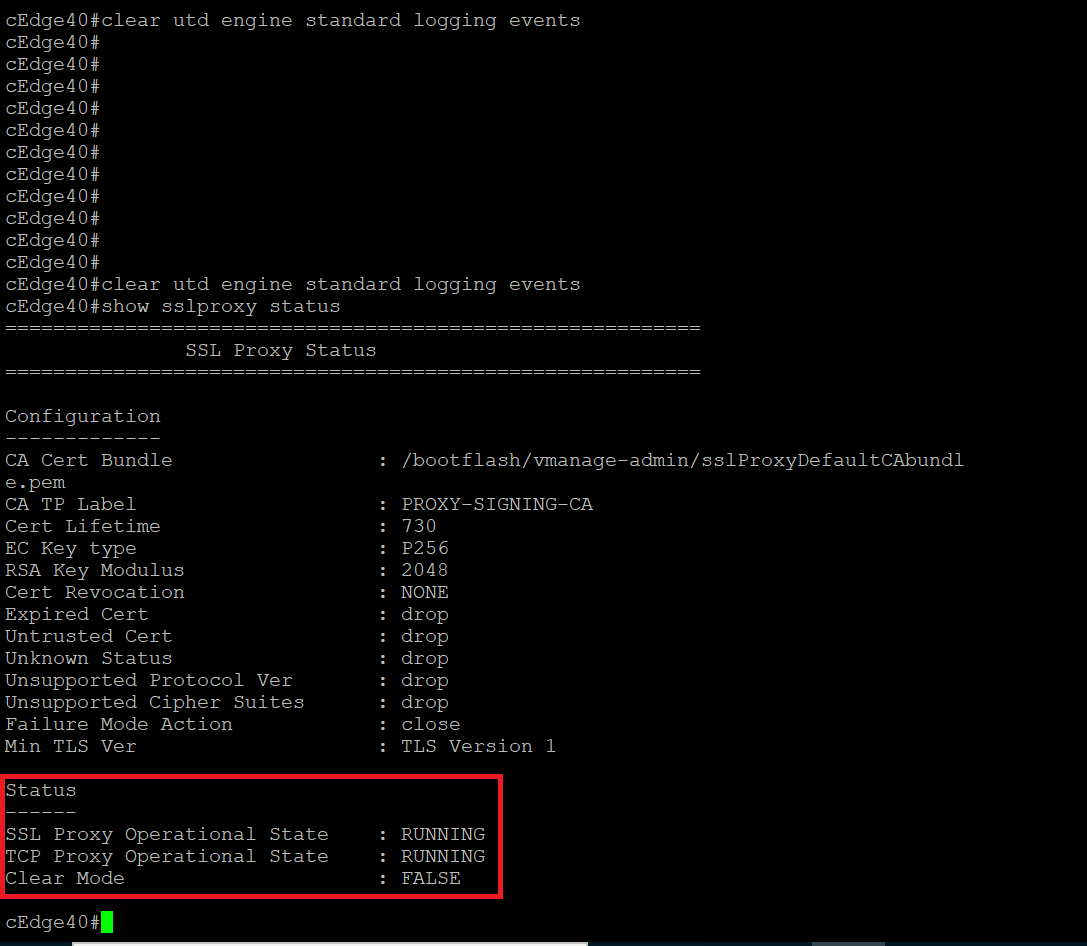
clear utd engine standard logging events show sslproxy status -
There should be some traffic being generated from Site40. Issue
show sslproxy statisticsand make note of some connections being proxied. Runshow utd engine standard logging events- there might be some events logged, depending on what’s open on the Site 40 clients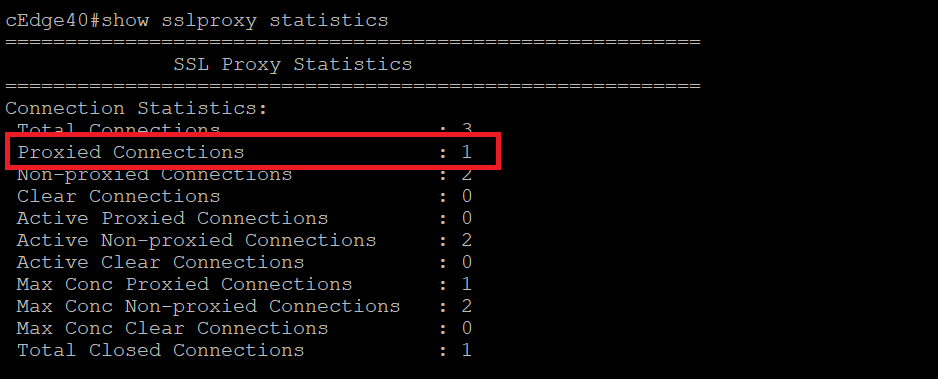


show sslproxy statistics show utd engine standard logging events -
Run
clear utd engine standard logging eventsand thenshow utd engine standard logging events. We shouldn’t see too much activity here, but some events will be logged automatically over time (like the dns.google events seen before)
-
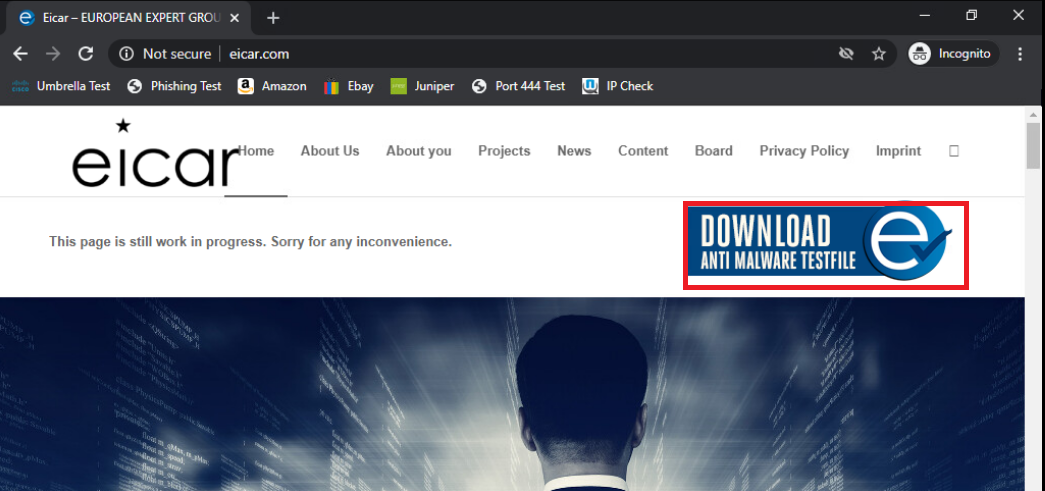
Open Google Chrome on the Site40PC2Win VM (or navigate to eicar.com in a browser)
-
Wait for a few seconds (might need to refresh for the site to load) and issue
show utd engine standard logging eventsin the cEdge40 CLI. You should see some traffic now being analysed by AMP, being flagged with Unknown Disposition. This traffic will be allowed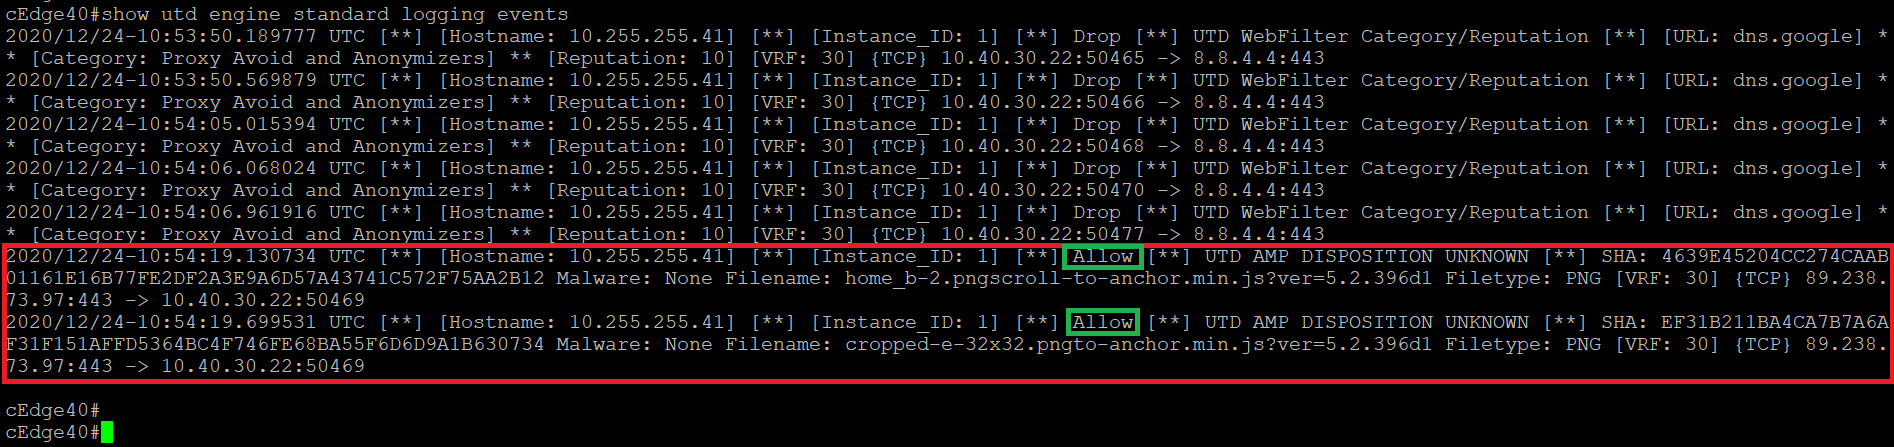
-
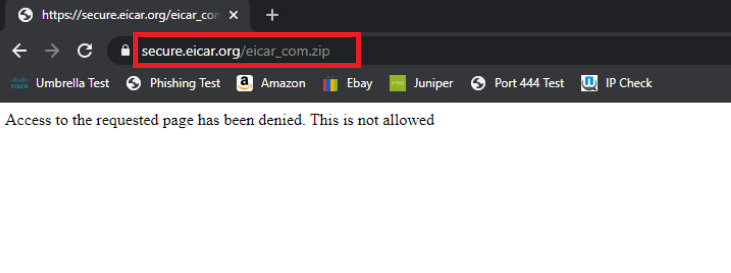
On Chrome at the Site40PC2Win, click on the Malware Test bookmark or navigate to eicar.org/?page_id=3950 and click on the eicar_com.zip hyperlink to download the file
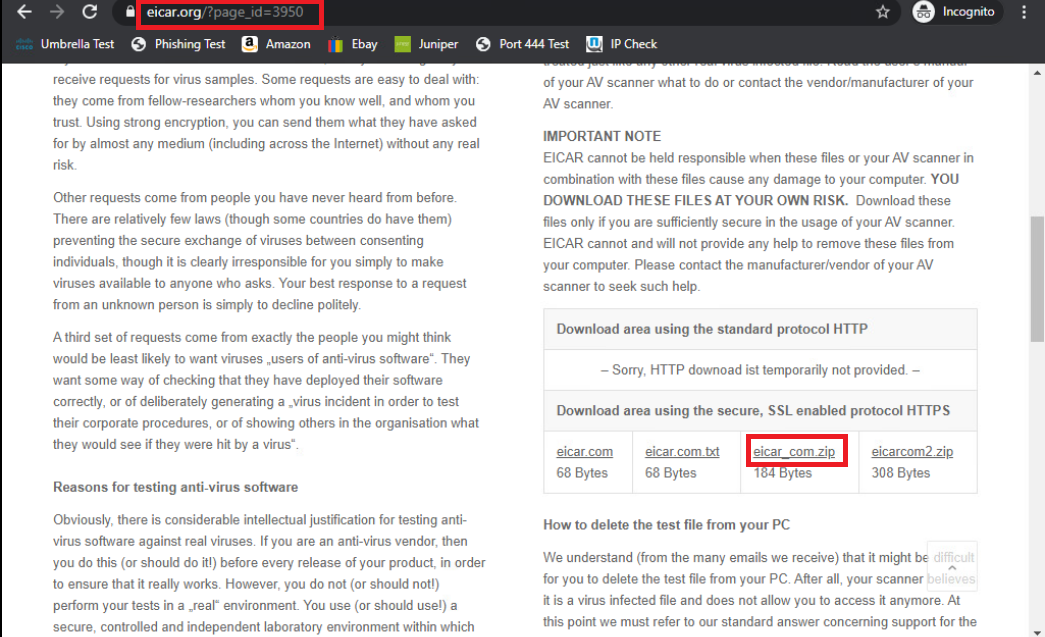
-
You will notice that the file download is now blocked
-
From the CLI of cEdge40, issue
show utd engine standard logging eventsand we will see the file download being blocked
We have thus configured cEdge40 as a TLS/SSL Proxy device that is decrypting encrypted traffic, acting as a man-in-the-middle.